Which means I don't really have any way to keep jewelry. It wasn't an issue for many years, because I just didn't have much of it. Over the years, however, I've slowly accumulated more, and instead of being nicely put together in a jewelry box, which just ends up a jumbled mess, they're getting scattered between the bedroom and various bathrooms on different floors.
Not good.
I want to be able to have my jewelry together in one place and organized. I don't want a jewelry box. I want to be able to just see at a glance what I've got and access it.
Pinterest to the rescue!
I saw a number of jewelry frames that keep various types of jewelry organized and hung on a wall.
I like that idea.
I'll just have to make sure the cats can't get at the dangling necklaces. LOL
What I have started today may be somewhat small for my needs, but if it works out, I will expand on the idea to better suit what I want displayed.
To start, here are the materials for this project.

2 unfinished wood craft frames - these comes with pegs, which will not be needed for this project.
1/2 inch cup hooks - This is the smallest size of these hooks. I wasn't sure how many I would use, so I bought two 6 packs. Extra can always be used in future projects!
Wood Glue - There are a lot of different types of adhesives available now. I considered a multi-surface glue, but in the end, decided to go with a basic wood glue.
Mesh - I checked out quite a few different types of screening and meshes. In the end, I chose an aluminum window screen, which is a finer mesh than I originally envisioned. Fiberglass was also an option for this type of screen, but it didn't appeal to me as much. For this, choose a mesh that suits your needs. You could even thread crochet a mesh, if you wanted to.
Other tools you'll need are pliers, scissors and clamps - I used large binder clips - and possibly a ruler and pencil.
You will also need whatever you want for your choice of decorating the frame. As long as there is room to screw in the cup hooks, you can decorate with whatever materials you want. In my case, I plan to simply spray paint the whole thing in gold (my daughter happens to already have gold spray paint), because the hooks are gold, and keep it simple. Woodburning or using wood paint markers were also ideas I'd considered. The possibilities are wide ranging.

The first order of business was to remove the clips from the backs of the frames, that are there to hold any photographs or art that would normally be framed. They pull out quite easily, with a bit of side-to-side wiggling.

Next, decide which of the frames will be your front. Of the frames I have, one had these rougher edges. The layers of wood were also not all the same, so one corner had this odd little stepped bit. Theoretically, I could have sanded the rough bits out, but since the other one didn't have anything like this, the one you see in the photo got relegated to the back.

The frames are also not going to be identical in size and shape. As you can see here, the lengths are slightly off. I want to be aware of this to compensate for it when I glue the two frames together.

While lining them up, check out the inner frames, too. Because the back of one will be glued to the front of the other, there will be this "ledge" all around the inside.
If I wanted to, I could have instead chosen to glue the backs together. This would eliminate the "ledge" between the layers and the inner frame would be sort of boxed in. I chose not to do it that way for two reasons. One, that bit of "ledge" will provide a touch of extra support for the mess and two, I won't have to add any sort of hanger to the back, as it already has holes drilled for the pegs. I can use those to hang, if I want.

Now it's time to get the mesh ready.
The mesh comes in long rolls, and I'd already cut a section before taking the photos, being sure to cut much larger than the opening inside the frame. In this photo, you can see the selvage edge of the mesh

We still want the mesh to be a fair bit bigger than the frame opening. Use it as a guide, and fold under the cut edges of the mesh. If using aluminum mesh like what I've got here, please be careful not to stick yourself. Also, when cutting, watch out for little bits of aluminum traveling about and throw them away immediately. These are NOT something you want to find by accident while working on your next project!
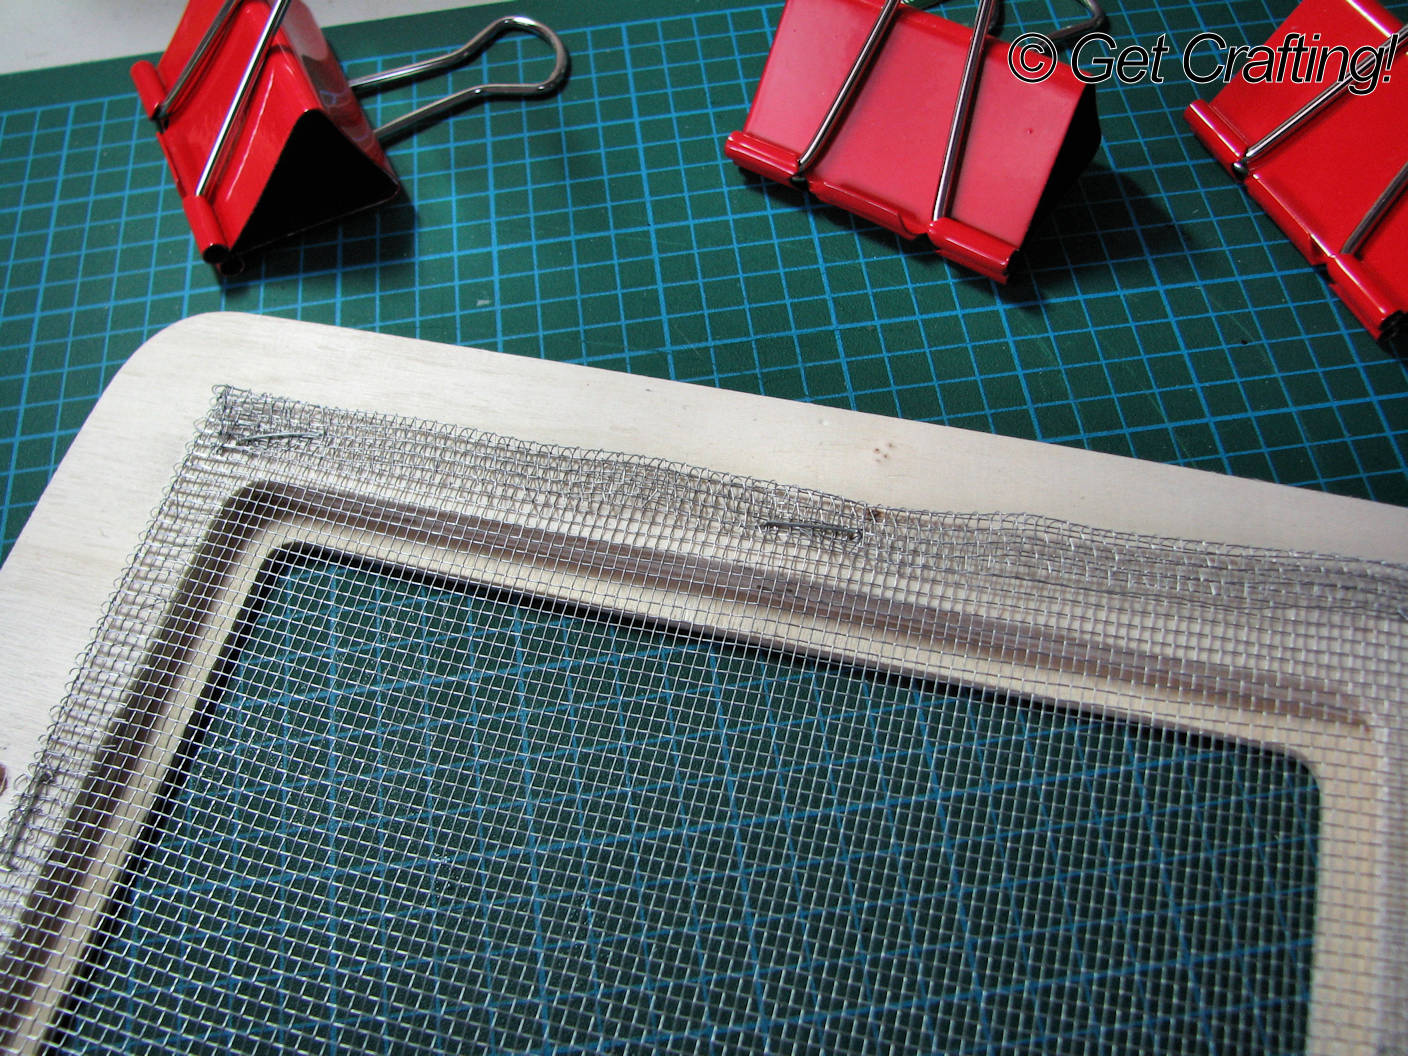
Now we are working on the back side of the frame that will be the FRONT of your jewelry hanger. Carefully lay out the mesh as smoothly as possible, then use a stapler to tack it down. This wood is soft enough that an ordinary office stapler will do the job.
This is where the mesh will be gently pulled taut, but care must also be taken not to distort the mesh by pulling too hard. It doesn't need to be too tight. It just needs to be tight enough to be smooth.
This is also the point where you can cut off excess mesh that is too thick at the folds, such as in the corners. Press the staples as flush with the wood as you can as well (I just used my pliers to do that, but if you have a small crafter's hammer, that would work, too.

Gluing time!
Apply glue according to the instructions, over both the open wood and the mesh portions. You won't need to spread the glue about. The pressure of clamping it will force the glue into the mesh, as well as spreading it at least somewhat. We don't need it to be covered right from edge to edge. It's more important to get that mesh secured.


Next, press the second frame onto the glued back of the first frame, adjusting it to compensate for any differences in size and shape, as determined earlier. Once you are sure of the positioning, clamp the frames together.
This photo shows the front of the jewelry frame.
And here's a view of the back.
The instructions on my glue said to leave it clamped for 10 minutes.
I've just left it while doing this post, so now I'm going to go and remove the clamps.
Stay tuned for part 2!
No comments:
Post a Comment