Pages

Sunday, October 30, 2011

Temari - starting an 8 point star pattern

Hey, I'll bet you thought we were all done with measuring and pins, right?

Not quite.

To recap: we've wrapped a core, measured and pinned it, then placed the guide lines.

In this next series of photos, we will start working on an 8 point star (kiku) pattern from two centres - the North and South poles.  For this you'll need to choose at least 2 colours (I'm using three) of thread, plus a contrasting metallic thread.

For the coloured thread, cotton perle is recommended, but you can also use ordinary embroidery floss.  For the metallic thread, I chose to stick with the same colour as the guide lines, but it can be any other colour you choose.

You will also need your sharp, large eyed needle, more pins, and I'd recommend keeping those pliers and thimble handy, too.

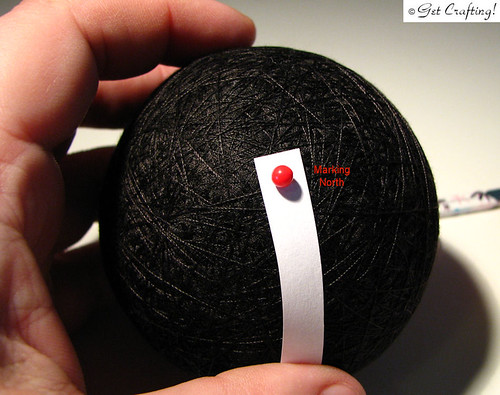
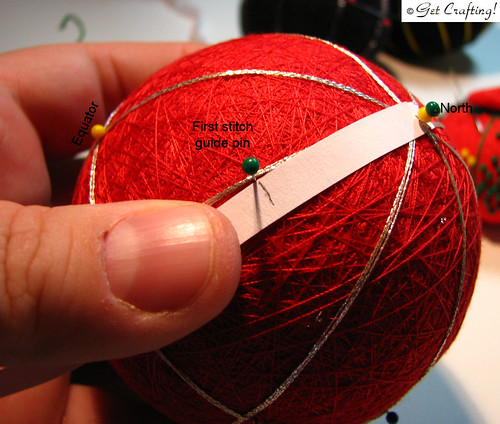
Oh, and another strip of paper to measure with.  Snip a bit at one end so that you can slip it onto the North pin, as you did to the strip for measuring out the guide line pins earlier.  For the pattern I'm doing hear, pencil in a mark 1 3/4 inches from the pin.
Temari - starting an 8 point star pattern

Place a guide pin at the mark at each guide line.  After you've marked the Northern hemisphere, move the paper to the South pin and repeat the process.
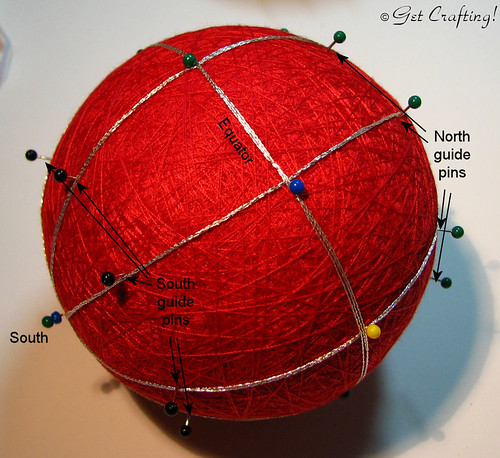
Temari - starting an 8 point star pattern

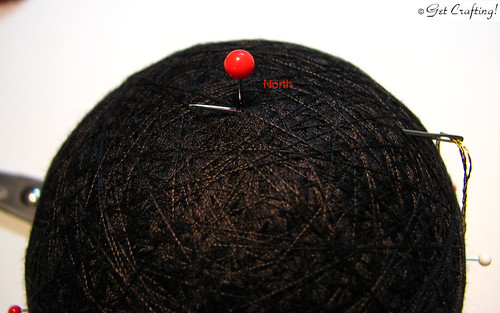
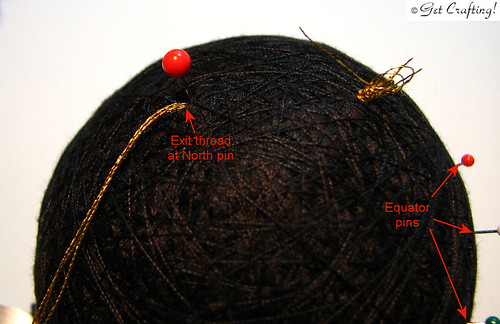
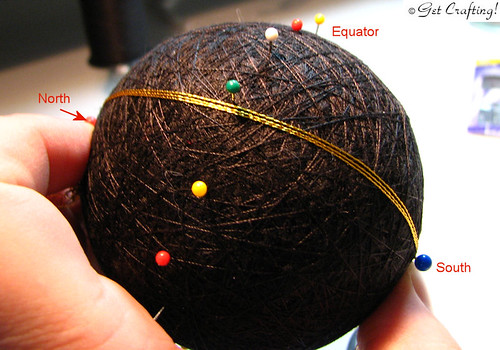
When you're done, you're going to have this hedgehog looking thing.  There will be a North pin, a ring of 8 pins 1 3/4 inches from there, 8 pins marking the equator, another ring of 8 pins 1 3/4 inches from the South pin, and finally the South pin itself.

Now, finally, you can start stitching!

If you're not much of an embroiderer, no worries.  Stitching the design involves tacking the design around a guide line, catching a few strands of sewing thread in the process.  This is why wrapping that sewing thread randomly was so important.  If the threads run in the same direction, your stitches would just slide out of place.

To begin!

For this part, I used the full 6 strands on the floss, so there was no need to split it like we did for the guide lines.  Cut a length you're comfortable working with, thread your needle and tie a knot at one end.

To make an 8 point star, you will actually be stitching two overlapping 4 point stars.
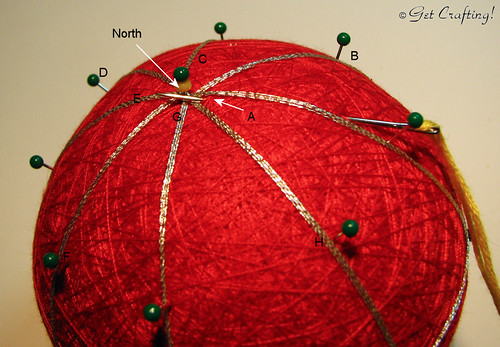
Temari - starting an 8 point star pattern

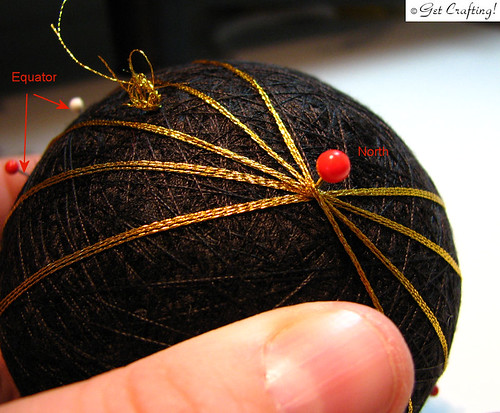
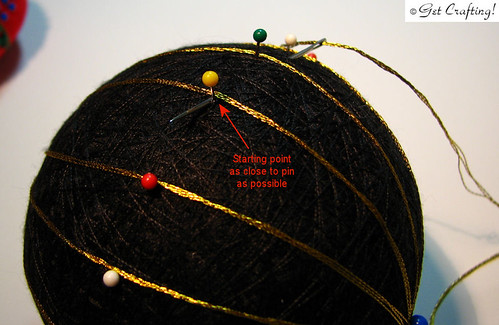
Insert your needle near one of the guide lines, so that the ends will be hidden after the knot is cut away, and bring it up on the left of a guide line as close to the North pin as you can get it.  I have that point marked A in the diagram above.  As with the guide lines, you may need to give it a few tries before you get it where it needs to be.  Thumb digging may be required.  Pliers may also be needed to pull the needle through.
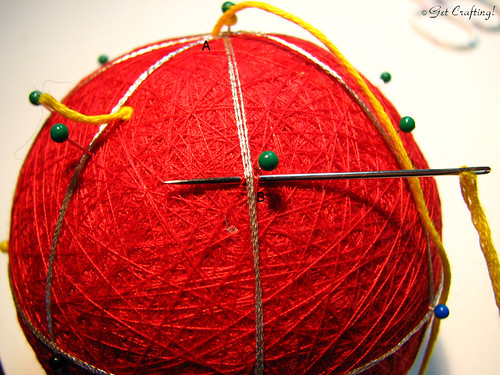
Temari - starting an 8 point star pattern

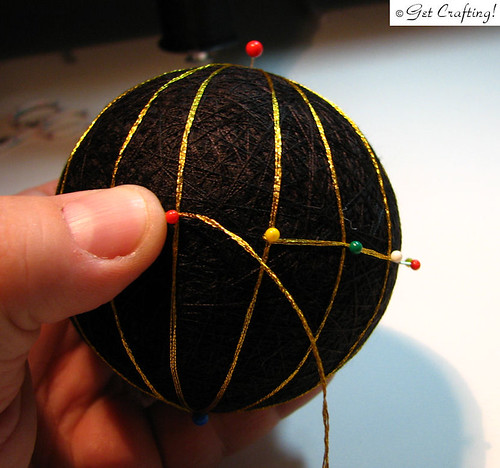
Rotating the ball slightly clockwise, bring your needle down to the guide pin on the first guide line on the right, which I have marked as B.  Insert the needle on the right of the guide line, just below the pin, and exit on the left, catching a few strands of the sewing thread in the process.  Pull the thread through and rotate slightly clockwise again.
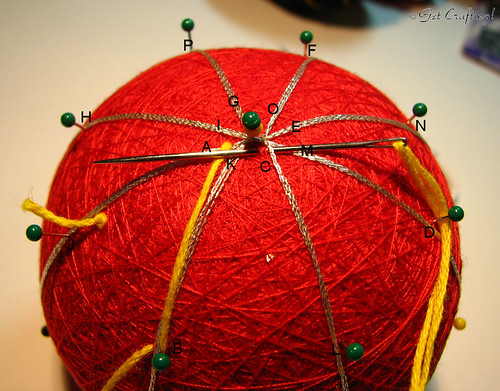
Temari - starting an 8 point star pattern

Bring your needle back up to the North pin, now working around the next guide line to the right, which I've marked C.  Again working as close to the North pin as possible, make a stitch from right to left around the guide line.

Continue around the ball in this manner until you've made 4 points on your star, with the last point at the pin labeled H.
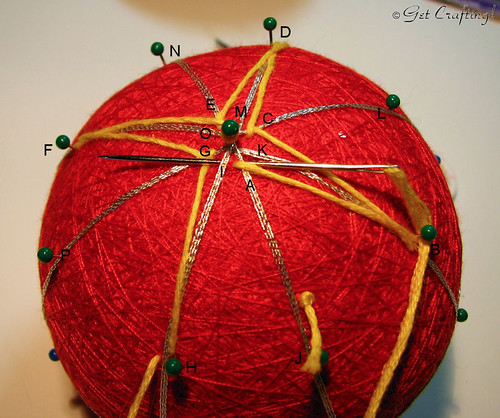

Temari - starting an 8 point star pattern

From point H, bring your needle back to point A.  Insert the needle to the right of the guide line at point A, then exit to the left of the guide line at point I.  Note that point I is on the same guide line as point H.

You are now beginning your second 4 point star.
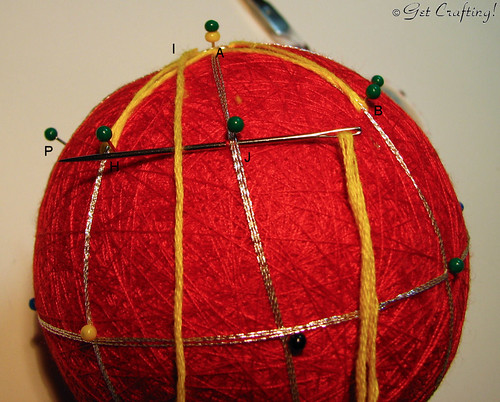
Temari - starting an 8 point star pattern

From point I, rotate slightly clockwise and make a stitch at point J.  Note that J is on the same guide line as point A.
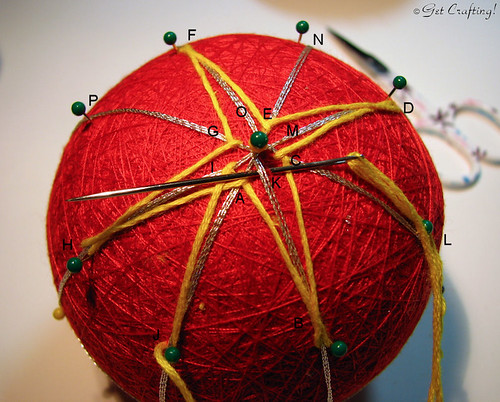
Temari - starting an 8 point star pattern

Bring the strand up and to the right, working the next stitch at the North pin at point K.  In this photo, you can see where I cut the beginning knot away.  The bit of thread still visible will be hidden by the strands of thread.

Continue working around in this pattern to form another 4 points.
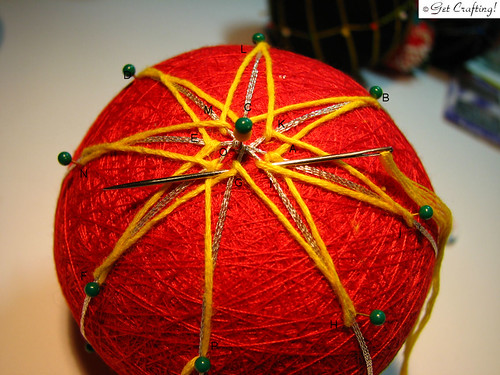
Temari - starting an 8 point star pattern

When you reach the end, insert the needle to the right of the guide line at point I.  If you look closely at the photo (you can click on the image to go to my flickr page, where you'll have access to a slightly larger version), you can see I've exited the needle at point G, to the left of the guide line and slightly below the previous stitch. This is another time when manhandling things with your thumb helps to get the needle out in the correct location.

At this stage, you can remove the guide pins at the points.
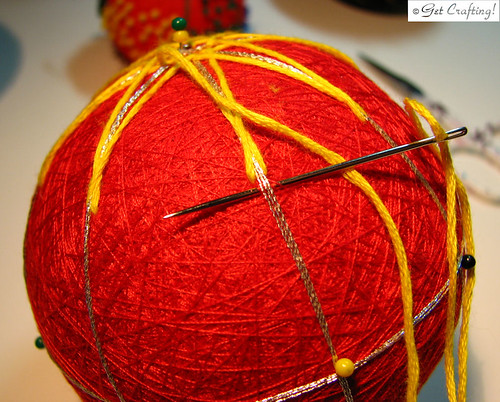
Temari - starting an 8 point star pattern

Bring the strand down to the next point on the right, making your stitch slightly below the previous stitch.
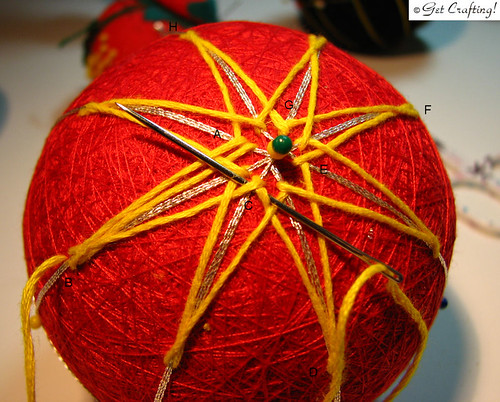
Temari - starting an 8 point star pattern

I like to refer to the first stitch in every round at point A.  Since we have shifted over by one strand in the second round, what was point G before is now point A.   After making your stitch at point B, bring your needle back up to the pin, labelled point C.  Always working your needle from right to left, notice that the needle now runs under both strands of the previous stitch, as well as under the guide line.
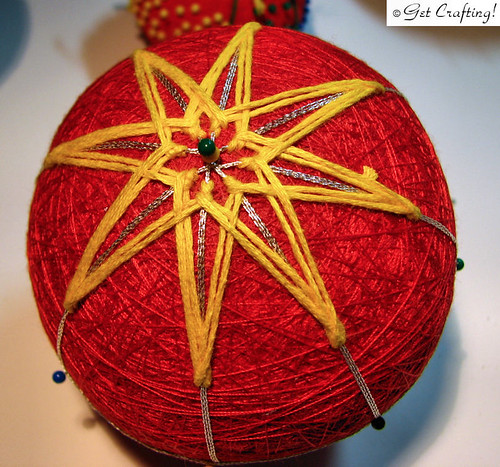
Temari - starting an 8 point star pattern

Continue working around for both overlapping stars.  Finish off the thread by running it back and forth into the padding a time or two to anchor it.

Repeat all these steps around the South pin.

After this, it's time to switch colours.  It's also time to let my husband have a turn at the computer, so it will wait until later!


Temari - placing the guide lines

All right now!  We've prepared our core.  We've measured out and placed pins for our guidelines.  Now it's time to place the guide lines. 

For this part you will need a contrasting thread and your sharp, large eyed needle.  For the thread, I usually use a metallic thread, which is available in a really nice variety of colours.  I chose gold for my black mari, silver for the red. 

Also handy; a pair of needle nose pliers (I was able to use the handles of one of my embroidery scissors instead, but pliers are really, really handy to have). Oh, and you might want a thimble, too.  You can do without it, but I'd recommend using one.

 Temari - placing the guide lines

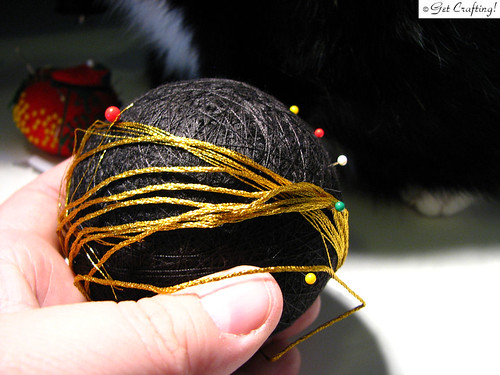
The length you'll need depends on how many divisions you have.  For this mari, with 16 divisions, I will need it long enough to wrap around the circumference 8 times, plus once more to mark the obi  at the equator, plus a bit extra for room to maneuver.  Metallic strands tends to break and twist very easily, though, so you may want to use shorter lengths and restart a new length several times.  Personally, I find fighting with the strands less annoying that restarting new lengths, so I went with one long piece.  If you're not already used to working with metallic thread, go with several shorter lengths.

In this photo, I've wrapped the thread around 9 times, plus a few inches extra.  It ended up being long enough to mark the longitudinal guidelines, but not the obi at the equator, which meant restarting a new length to do the obi.

Like regular cotton embroidery floss, the metallic floss comes in 6 strands twisted together to make the thread. This is too bulky for the purpose.  Instead, I worked with 3 strands on the needle, carefully separating the length I measured in half.  Take your time doing this, as the strands can get easily tangled and knotted.  The easiest method is to grab one strand and slowly pull it out, then repeating until all the strands are separated.  You can then group as many strands together as you want to work with.

After threading 3 strands onto the needle, tie a knot at one end.

Temari - placing the guide lines

Starting at the North pin, insert your needle some distance away from the pin, through the padding of the mari, and bring the point up at the North pin.  This will probably take several attempts to get it to emerge in the right place.  I find digging my thumb down into the padding near the pin helps.

Yes, you'll be doing that a lot.  For all their delicate appearance, you'll likely be rough handling your mari quite a bit!  It's okay.  They can take it.


Temari - placing the guide lines

Once you've got the needle exiting where you want it, pull the thread all the way through until the knot is flush with the surface.  Go ahead and use your pliers to pull the needle through.  Don't yank it tight, at this point, though.  You'll be doing that later, when you trim the knot away.

Temari - placing the guide lines

At this point, you're going to ignore your needle for a while.  Wrap your thread around the ball, placing it snug against an equator pin, the South pin, and the opposite equator pin as to go around.  Keep the thread nice and snug against the surface.

Temari - placing the guide lines

When you reach the North pin again, rotate slightly clockwise and wrap again, this time running against the next equator pins.

Temari - placing the guide lines

Continue wrapping in this manner, with one guideline for each pin on the equator.

Temari - placing the guide lines

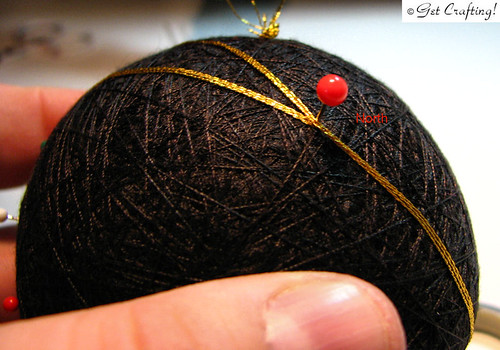
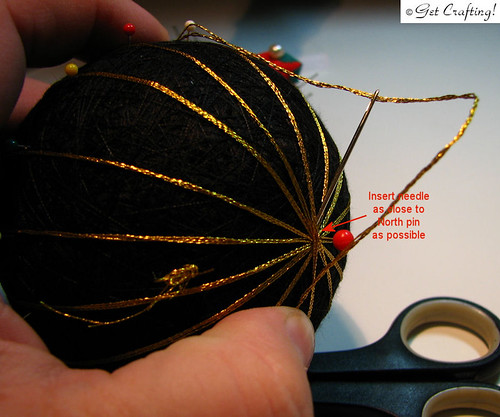
This next part is a big awkward.  While maintaining tension to keep the guide lines snug against the surface, take your needle up again and insert it at the North pin, as close to the pin as you can get, making sure that your strand goes over the guide lines to lock them in place.  Draw the needle through a short distance from the pin and pull it tight.

Temari - placing the guide lines

To anchor the end, draw the needle back through the padding again, inserting the needle in the same spot you exited from so that there is no visible stitch.  I exited under one of the guide lines so that any bit that's still showing after the end is trimmed will be hidden by stitching later on.   This method of working the tail end back and forth through the padding to anchor it is how all the ends get finished.

Temari - placing the guide lines

To work the guild line for the equator, thread another strand.   Choose any equator pin for your starting point and insert the needle a short distance away, bring it up at your chosen pin.  Note that the needle emerges on one side of the guide line.  Pull through until the ends of the strands are close (using your pliers to get the needle through, if necessary).  Trim away excess so that the end is completely hidden in the padding of the mari.

Temari - placing the guide lines

Wrap the thread around the equator of the mari in the opposite direction your needle came out from, so that there's less chance of accidentally yanking the whole thing out.  I like to weave back and forth around the pins so that there's no chance of the equator strand slipping out of place as I work.  Keeping the tension snug against the surface while you work, finish the thread by inserting the needle at the starting pin, this time on the opposite side of the guide line, working into the beginning of your strand, and reversing the direction of your thread.  Bring the needle up a short distance away and close to the strand and trim away excess thread.  Trim away your starting knot as well.

Temari - placing the guide lines

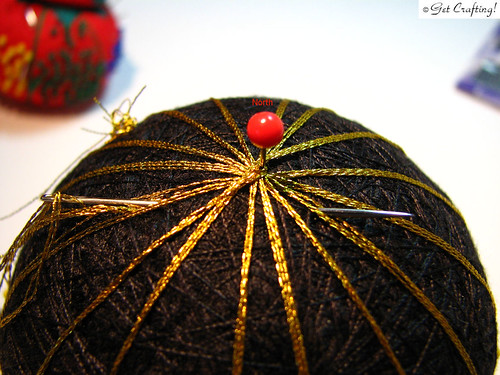
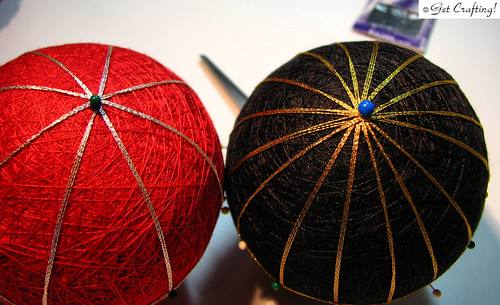
Here are the South pins of the prepared mari in 8 and 16 divisions.

Time to work on the designs!


Temari - measuring for guide pins

One of the things about temari is that, even though you might start with the same size foam core ball, by the time it's all wrapped, no two will be exactly the same size.  The other thing about temari is that the patterns require rather precise measurements.

So how do we manage this?

With a simple strip of paper and coloured pins.

Temari - measuring for guide pins

For this part of making temari, you will need a narrow strip of paper long enough to go around your mari, plus about an inch.  You will also need pins in several colours.  While it doesn't matter as much with a 3 inch core, I recommend getting the shorter pins.  When I first made these using 2 inch cores, I only had the longer pins.  When pushing them into the core, they actually started to hit each other and cause problems!

The main points on your mari will be the north and south poles, and the equator.

Note that for these temari, I am making a polystar pattern from two centres.  One will be an 8 pointed star and the other will be a 16 pointed star.


Temari - measuring for guide pins

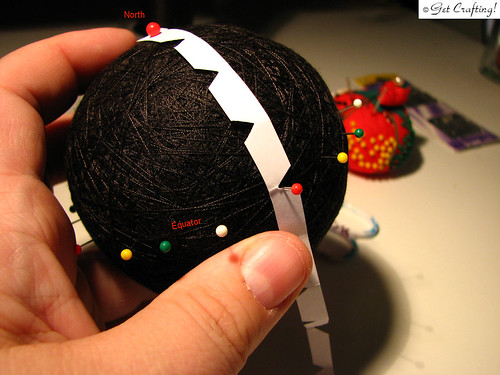
Take a pin and your strip of paper and place them anywhere on your mari.  This will be your North pole.

Temari - measuring for guide pins

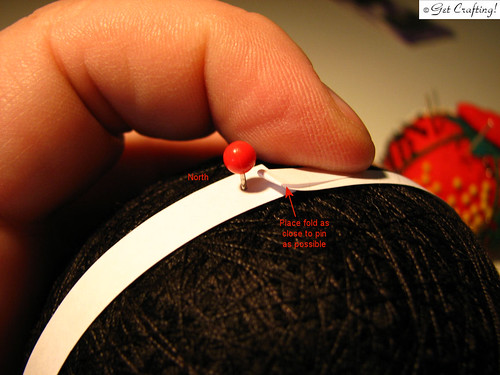
Gently and smoothly wrap the strip of paper around the ball until you're back at the North pole.  Carefully fold back the end of the paper so that the fold is snug against the North pin.  From the pin to the fold is the circumference of your mari.

Temari - measuring for guide pins

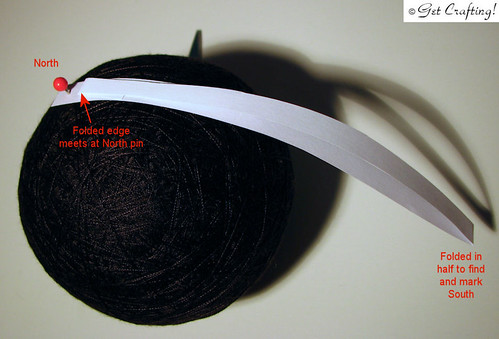
Carefully fold the paper strip back on itself, so that the folded edge meets the pin again.  Find and crease the strip at the centre.  This will be used to mark the South pole of your mari.  Snip a small V off at the fold, so that the point of the V is in the middle of the fold.

Temari - measuring for guide pins

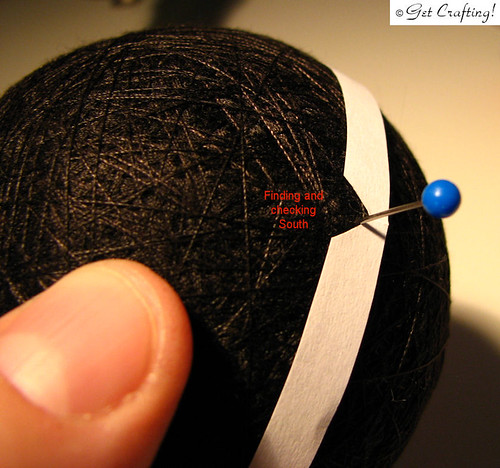
Gently open the strip and wrap it around the ball again, so that the folded end is again touching the North pin.  Place another pin in the notch you cut out to mark the South pole.

Rotate the strip of paper around the North pin several times to measure out the South pole.  You will likely have to adjust the location of the South pin a few times before you'll be able to match the pin with the V notch from any direction you take the strip from the North pin.

Once the South pin is in place, carefully fold the strip back on itself at the notch, so that the fold at the end is again at the North pin.  Carefully fold the strip in half again, so that the centre with its V notch is also snug against the North pin.  Crease the new fold.  This crease marks the centre point between your North and South pins, and will be used to mark the equator of your mari.

Temari - measuring for guide pins

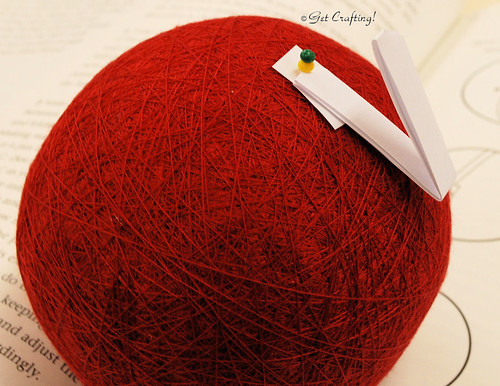
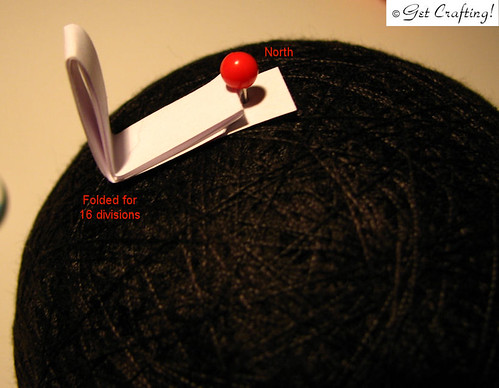
For an 8 pointed star, fold the strip one more time, which will look like this.

Temari - measuring for guide pins

For a 16 pointed star, add one more fold.

Temari - measuring for guide pins

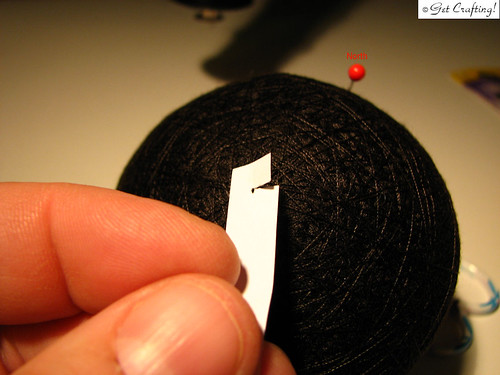
Gently undo the folds and remove the strip of paper from the North pin by cutting the paper so it can be slid off without removing the pin.

Temari - measuring for guide pins

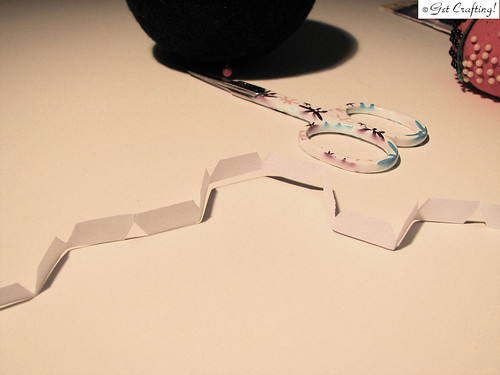
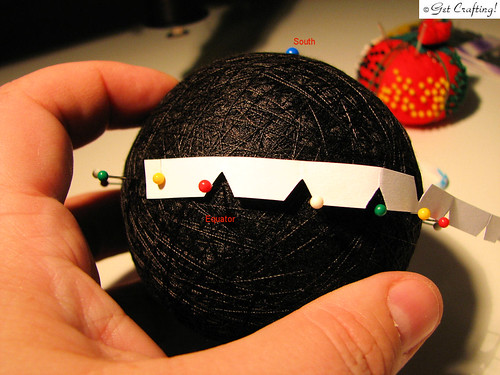
Carefully re-crease the folds to make them sharper, cutting out V notches at each fold.  The point of the notches should be at the centre of your strip of paper (or as close as you can get it).  To help me keep track of things, I cut the notches for the equator fold on the same side of the strip as the South fold, while the other folds were notched on the other side.

Temari - measuring for guide pins

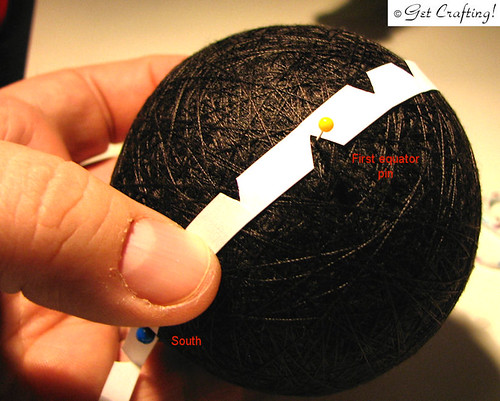
Replace the strip of paper at the North pin and gently wrap the strip around to the South pin so that the paper is smooth against the ball.  Place a pin in the notch in between the two to mark the equator.

Temari - measuring for guide pins

Carefully rotate the paper around the North pin, placing more pins around the equator.  For this mari, I placed 16 pins, while for the red mari I placed 8 pins.  At this point, don't worry too much about how evenly spaced they are.

For this part, I like to use different colours in sequence to help keep track of my guidelines later.  For this mari with 16 divisions, I used 4 different colours, while the one with 8 divisions only needed 2 different colours.

Now it's time to adjust the equator pins to make them evenly spaced.

Temari - measuring for guide pins

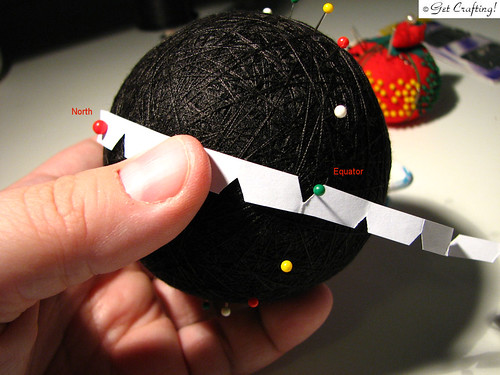
Remove the strip from the North pin and attach it to any pin in the equator.  Slowly wrap the strip around the equator, adjusting pins so that they are in the notches as you go along.

Temari - measuring for guide pins

After the equator pins have been adjusted, return the strip to the North pole and check each pin again, adjusting as necessary to ensure they are still the right distance from the North pin.

Feel free to check and recheck the pins, adjusting as necessary, as many times as you need to.  The equator pins should line up the same, whether you measure from the North or South pins, and you should be able to place the strip on any pin in the equator and wrap it around with all the pins lining up with the notches.  Take the extra time to line them up to prevent problems later.

Temari - measuring for guide pins

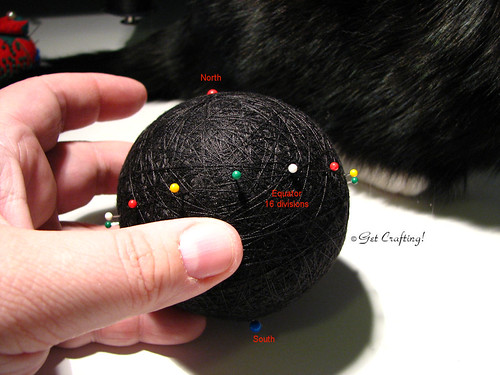
After everything is measure off, this is how your mari (with 16 divisions) should look.

Cat is optional.

After this, the guidelines will be added.


Temari - preparing the core

Hello, all!

Finally, I've got some photos processed for a temari step-by-step.  I still have a batch of photos to finish up, but I can at least get you started. :-)

First, a bit of background.

Temari is the name for Japanese embroidered thread balls (not to be mistaken with tamari, which you eat).  The word literally means hand (te) ball (mari), and have been made and given as gifts for a thousand years!

Needless to say, the materials used to make modern temari have changed a bit, though they certainly can still be made in the traditional manner. 

I am by no means an expert in making temari, but you don't have to be.  Even a simple temari is a thing of beauty.

The temari I am making in these photos are meant to be hung on a Christmas tree, so there will be the extra step of adding hangers onto them at the end.

So let's get started!

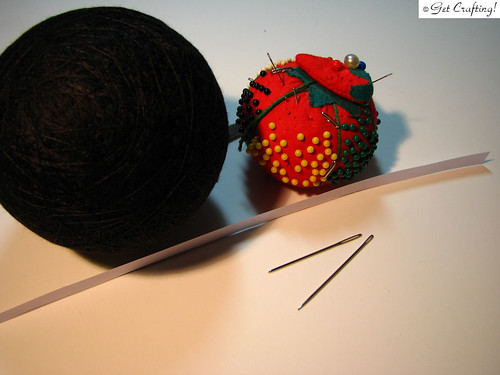
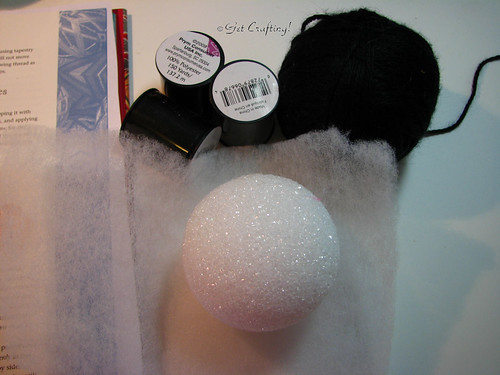
The first step is preparing the core.  Here's what you'll need.

Temari - preparing the core.

Foam ball: recommended size, 3 inches.  You can go with smaller (my first ones were only 2 inches), but this size is a lot easier to hang on to and work with.

Quilt batting: This can be optional, but it does add padding, which makes stitching easier, and makes them easier to wrap.  Making them easier to wrap is a good thing.  You won't need much.  For a 3 inch ball, a piece about 6 x 9 inches should be enough.

Yarn and sewing thread in matching colours: again, the yarn can be optional.  The first temari I made did not have any.  It does make covering the core faster and adds padding that makes stitching easier.  You won't need a lot of yarn - 1 skein will be enough to cover several balls - but you will need a lot of sewing thread.  Recommend three spools of sewing thread.  For the yarn, choose something that is fairly soft and pliable, but not too bulky.  I'm using Bernat Satin for this one.  I used a Red Heart Super Saver for another, which I found left things a bit bumpy after being wrapped in sewing thread.

Also needed; a blunt, large eyed needle, a sharp, large eyed needle and scissors.

Temari - preparing the core.

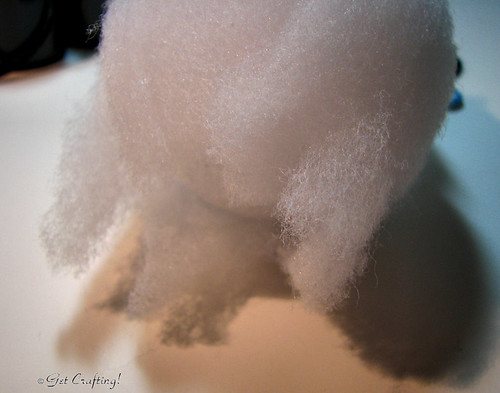
Begin by wrapping the foam core ball with the quilt batting.  First wrap around and trim off any excess length.  Trim off any excess from the ends, snipping out little V's in the process, so that the ends can be covered without excess bulk or lumps and bumps.

Temari - preparing the core.

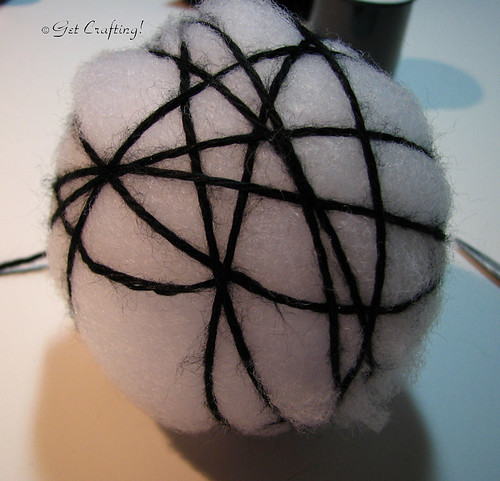
Begin covering the batting covered core with the yarn.  It's important to wrap as randomly as possible.  Avoid having strands close together that are running in the same direction.  Wrap the yarn quite snug, but not tightly.  That will come later.  Keep wrapping until the core is completely covered.  You should have a good, thick layer of yarn at this point.  Snip the yarn with about a foot or two for a tail.


Temari - preparing the core.


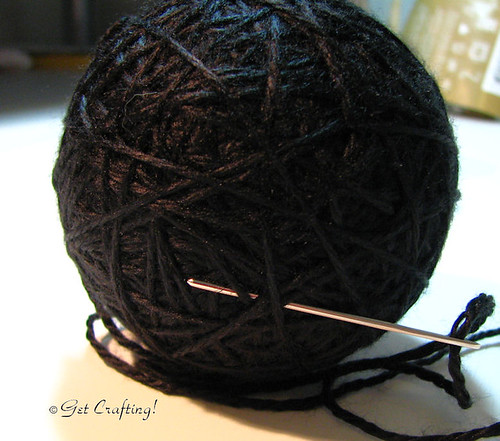
Thread the end onto a blunt needle.  Finish the end by catching the tail end around a few strands of yarn in random directions.  Use this as an opportunity to anchor any strands that look like they might slight out of place.  When near the end of the tail, draw your needle deeper into the layers of yarn and batting to anchor it and bury the end inside.  Snip off any tail remaining.

Temari - preparing the core.

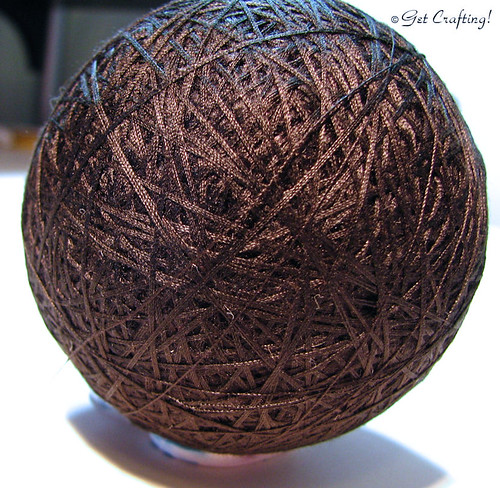
Begin covering the yarn with sewing thread.  If you've bought your thread in a large cone, you'll be working with just one strand, but if you picked up a bunch of spools, start by working with 3 strands together.  It'll cover quite a bit faster this way.

Just to let you know, this is the part that seems to always take me the longest.  The ball also has a tendancy to slip out of the hands and go bouncing and rolling across the room.  Very frustrating! *L*

Temari - preparing the core.

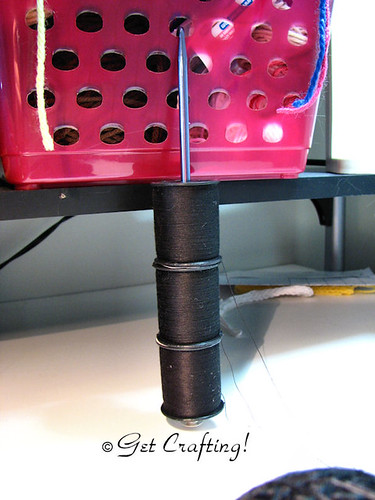
To make it easier to wrap the ball with sewing thread, I set this up so that the three spools could unwind smoothly.  I've got them threaded onto an afghan hook, which I hung from my odds and ends basket.  It didn't quite reach my work surface below, so it did swing a bit while I was wrapping, but this worked MUCH better than having them bouncing around on the desk.

Again, wrap snugly, but you don't have to go very tight yet.

Temari - preparing the core.

Once the yarn is completely covered with thread, cut two of the threads and continue wrapping with just a single thread.  Again, it's very important to wrap as randomly as you can.  With the single thread, start wrapping tightly.  Just watch not to wrap so tight the thread breaks.  That's a pain in the butt.  Just keep on wrapping until you can no longer see the three threads together, and the entire ball is smoothly covered.

When covered, cut your thread with a 1-2 foot tail.

Temari - preparing the core.

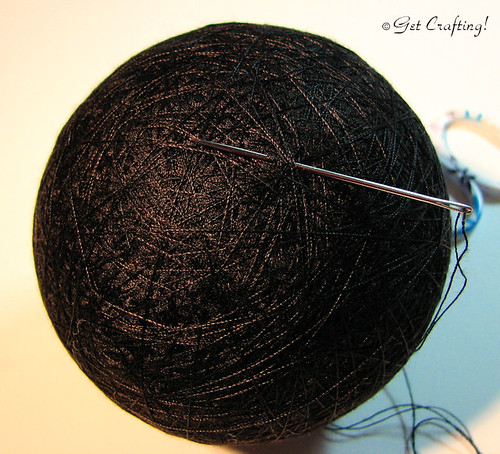
This time, thread your sharp needle onto your thread, then sew the tail through a few strands at a time, back and forth all over the ball, so tack down any strands that might slip around while working, and to anchor the tail of your thread.  Once again, finish by burying the end inside the padded layer of the ball.

There you go!  You now have the core of your temari ready for the next step.


Friday, October 28, 2011

Class news

First up, for the local folks interested in learning crochet, here is my current schedule of classes for November, at the Clareview Michaels.  These dates are all on Fridays.

November 5     Discover Single Crochet     5:30-8pm
     This class is perfect for beginners who have never picked up a hook before, or who haven't crocheted in a long time and would like to start over.

November 11     Discover Tall Stitches     5:30-8pm
     Another beginner class, this is good for people who already have some knowledge of the basics and want to add some height to their stitch repertoire.

November 18     Discover Textured Stitches     3-5:30pm
     A more intermediate class, if you've already got the basics down and want to start adding interest to your projects, this is the class for you.

November 25     Discover Granny Squares     3-5:30pm
     The eternal granny square!  Good for beginners who know how to do the basic stitches.

Demo Event:  Warm Up America & Blankets for Canada
     I still need to confirm this date and time with the Michaels I work at, but this is an event that takes place at ALL Michaels locations.

November 6     1-3pm
     Join me for a couple of hours working up simple swatches in knit or crochet that will later be joined to make blankets and donated to charity.  Donation bins will also be set up for people to drop of finished squares as they are able.  More details will be added as I learn them.

I also have the classes listed above booked through February.  Here is the December schedule, also all on Fridays.

December 2     Discover Single Crochet     3-5:30pm
December 9     Discover Tall Stitches         3-5:30pm
December 16   Discover Textured Stitches 5:30-8pm
December 23   Discover Granny Squares   5:30-8pm

NEW!

I just found out about these today, but there are 4 new classes available!  I still need to talk to my manager about arranging these, but these are what they will be.

Discover Baby
     Techniques to make two new projects, a Hooded Textured Baby Blanket and Daisy Ring Rattle Toy, will be covered in this class.

Discover Wraps and Throws
     The techniques here will give you the skills needed to make the patterns, Discover Lace Crochet Openwork Wrap and the One Piece Granny Throw.

Discover Gifts
     The project for this class is a handy tote bag.

Discover Time for Crochet
     This is an open ended class!  Anyone who is having troubles with techniques from previous classes or wants any sort of assistance, this is the class for you. 

I can't wait to get together with my manager and start up these classes! 


Monday, October 17, 2011

Have crafts, will chat (updated)

Yesterday evening a bunch of us got together for a Craft n Cat at my place.  Sorta.  We live in a co-op, which gives me access to a multi-purpose room I can book at any time.  Lots of space, tables, chairs and even a fridge, microwave and kitchen sink.  Very handy.

The only down side?  Horrible lighting for pictures.

While there I worked on my first temari Christmas decoration.  I'm not at all happy with the photos, so I'll try again when I ready a new base for stitching.

I was able to salvage some other photos, though.  We took part in a coaster swap that I wrote about earlier.  Of course we all brought projects along to work on while we had our tea and munchies. :-D


 Here's one project in process.  The pattern is from Baby Styles by Beehive (Book No. 117) from late 1970s or early 1980s.  It's going to make a wonderful gift!


The last time I saw this cowl, it was just a narrow band of stitching!  It's made with a mohair blend sock yarn, if I remember correctly.  Long enough to wrap twice around the neck, light and warm!

update from the lovely maker of this cowl: "I just kind of improv'd. Cast on 300 sts, beaded the first two purled rows at every 5 sts (i think), and I did a second beaded, purled row on one edge beading every 5...carried on and on every 14th row slipped a bead on every 16th st. Finished with purled edge, beading every 5 sts. That's about it."


This set of coasters for the swap were made from a pattern found online somewhere, using Handicrafter Cotton.


These were my gift!  Aren't they awesome?  Instead of coasters, she made cabled cup warmers.  Love the knitted cables.

update:  "I got the mug cozies from a pattern on Ravelry.com, fell in love with the cabling."


This fascinating quilted coaster was finished during the Craft n Chat. I love the origami look.


I just had to get a shot of these socks in progress.  Each sock has 440 beads that need to be strung before the sock is started.  The maker of these is a knitting goddess who makes the most amazing socks and miniature clothing. 


The spiral piece you see under the socks became this after being sewn into shape.  Then, because we had a sink handy, it became ...


... this.  This is after being felted by hand in the sink.  I believe more felting is planned for it.

From the talented lady who made these:

"I found the idea for the quilted origami in a book titled, Fantastic Fabric Folding by Rebecca Wat (I hope that link works).  Now that I've got the hang of it, I think I'll make a pillow or wall hanging. The felted knitted coaster is from a pattern I found on Ravelry: Felted Coaster."

Felting.  That's something I still need to try.  Both this kind and needle felting. 

Add that to the list! :-D