Pages

Friday, April 29, 2011

Making a centre pull yarn ball - crochet hook method

Using a crochet hook as a nostepinne is very similar to using the pencils.  Start with the largest crochet hook you've got available.

Centre pull yarn ball - crochet hook method

For me, that's a 9.00mm hook.  Larger would be better.

First, make a slip knot at the hook, as if you were about to do some crochet.  Snug the slip knot tight at the throat of the hook, so it won't slide up as you work.

Centre pull yarn ball - crochet hook method

Pull the yarn up to the other end and start wrapping back towards the middle, just as was done for the pencil method.

Centre pull yarn ball - crochet hook method

The ball of yarn I'm using here is a fair bit bigger, so I made the core a bit longer than for the previous balls.  Again, wrap back and forth for a few layers, then continue the same as with the pencils.

Centre pull yarn ball - crochet hook method

As I wrapped, I made the height of the ball greater than the core by changing the angle of my wrap, allowing the yarn to go over the top and bottom every now and then.  In this photo, only about half of the ball has been wrapped.   Then I gave it to my younger daughter to finish so I could upload the photos and start these posts.

She loves making these!

There you have it.  Three methods of making a centre pull ball of yarn.

Have fun!

Making a centre pull yarn ball - Two Pencils method

For this next method of making a centre pull yarn ball, a pair of pencils are used as a nostepinne.

Centre pull yarn ball - two pencil method

Start with two pencils of equal length.  Preferably new and unchewed.

Yes, my dearest daughter, I'm looking at you.  Glaringly.

Snark.

Anchor the yarn with a figure 8 around and between both pencils, near one end.

Centre pull yarn ball - two pencil method

Pull the pencils snug together as you bring the yarn up towards the opposite ends, then start wrapping the yarn back towards the middle.  At this point, place the wraps close together.

Centre pull yarn ball - two pencil method

After a couple of inches, wrap the yarn back up again.  Keep wrapping back and forth until it's about 3-4 layers thick, or more if you're using a thin yarn.  With each layer, the wraps will be fewer and farther apart.

Centre pull yarn ball - two pencil method

Once I'm happy with the thickness, I like to do a few wraps from top to bottom.  This prevents the loops of yarn from coming loose and tangling later.

Centre pull yarn ball - two pencil method

After that, just keep on wrapping!

Centre pull yarn ball - two pencil method

When you get to the end, lock the yarn in place the same was as described previously.  Unwind the figure 8 you made at the start, if necessary, then remove the pencils one at a time (if you yank on both at once, you might inadvertently pull out the first wraps you made and create your very own yarn barf!).

Centre pull yarn balls

Here's a comparison of the two methods.  With the fingers and figure 8 method, the centre is completely filled, which is why it's so important for the yarn to be in a figure 8 and straight.  If you just wrap the start around your fingers, without the figure 8, the loops catch on each other when the end is pulled and you can get a yarn barf.  Using the pencils (and it's the same for the next method I will show), the open space in the centre prevents any of that.

Two down, one more to go. ;-)

Making a centre pull yarn ball - Fingers and figure 8's

For the first method of making a centre pull yarn ball I'll show you, you don't need anything but the yarn and your own fingers.  This makes it the most convenient of methods.  Here's how you start.

Centre pull yarn ball - finger method

First, wind the yarn around several fingers, with the end at the bottom (in this image, you can see the end just under my pinkie).  You can do this method either around your first two fingers or around thumb and first finger, whichever you prefer.

Centre pull yarn ball - finger method

Next, start wrapping the yarn around two fingers (or finger and thumb) in a figure 8 pattern.

Centre pull yarn ball - finger method

Keep winding in a figure 8 pattern until you get it good and wide.  If you're using a thinner yarn, shoot for 20 or more wraps.

Centre pull yarn ball - finger method

The next part is a bit tricky.  Carefully remove the loops from  your fingers, wrapping the yarn around the middle a few times in the middle to anchor the loops.

Centre pull yarn ball - finger method

Keep wrapping around the core back and forth until it's fairly well covered.  You want to keep those loops from tangling around each other.

Centre pull yarn ball - finger method

Once the core is well covered, keep on going.  I like to wrap all in one direction, but as long as the tail end is free, you can change directions and make a round ball, if you like. 

Centre pull yarn ball - finger method

As the ball gets bigger, you can change the angle of the wraps slightly as needed so they don't slip out of position and come undone while you work.

Centre pull yarn ball - locking the wrap


When you get near the end of your yarn, do a few last wraps around the middle to hold it all in place.

Centre pull yarn ball - locking the wrap

Then lock the end by tucking the it under in a loop.

That's it!

Making a centre pull yarn ball: why do it?

I've taken a series of step-by-step photos to demonstrate how to make a centre pull yarn ball.  The first thing to answer, though, is why one would want to do it in the first place?

If you're using a twisted hank of yarn, the answer is pretty obvious.  When buying a typical skein of yarn, though, they can be centre pull, too.   Like this.

Centre pull yarn balls

Isn't that pretty?  I took out this ball, and there was the end, just waiting to be grabbed.  This is what we're supposed to get.

Unfortunately, this is what we usually get.

Yarn Barf

Meet the yarn barf. 

This is actually a very small one and easy to untangle.  I've had some that just refused to give up the end of the yarn, and instead gave up almost their entire innards.  That's not too bad if you've got a nice smooth, bulky yarn like this.  With a finer weight or a textured yarn, it can be ridiculously difficult to untangle the mess.

A well made centre pull ball of yarn not only keeps things neat, but allows for smooth flow while you work.  Much more pleasant!

If you have one, you can use a nostepinne to wind your yarn.  You can also buy a winder

If you have neither I will show three different ways to make a centre pull yarn ball.  The difference is in how the core is started.  After that, they're pretty much all the same.

First up, the finger winding method.  No tools needed at all!

Saturday, April 23, 2011

Our assembled Easter basket

We made a few changes in this year's basket.  It's a lot heavier than usual this year, too! *L*   Fitting it all in is always a challenge.

Our Easter basket

In our basket, we have:

Bread (recipe here) - "symbolic of Jesus, the Bread of Life."
eggs; kraszanki (onion skin dyed eggs) and peeled eggs (first soft boiled, their shells cracked, then boiled in a tea and chai spice mix for about an hour or more) - "indicate new life and Christ's Resurrection from the Tomb."
butter (mixed with garlic, parsley and paprika) - "reminding us of the goodness of Christ that we should have toward all things."
salt - "So necessary an element in our physical life, that Jesus used its symbolism: "You are the salt of the earth." "
chrzan; grated dried horseradish root (I've also used prepared horseradish paste or a chunk of fresh root) - "Symbolic of the Passion of Christ..."
sausage (garlic) - "indicative of God's favour and generosity."
ham (a Polish ham we found at the Italian Centre grocery store) - "Symbolic of great joy and abundance."
cheese (we chose friulano, this year) - "symbol of the moderation Christians should have."
prosciutto rosettes (new this year, in place of the more traditional bacon, which we've never included before ourselves) - "A symbol of the over abundance of God's mercy and generosity."
olives (garlic stuff and almond stuffed - new this year) and
olive oil (new this year) - The olive tree symbolises wisdom, peace, hope, light, fertility, health, wealth and balance.
candy coated chocolate eggs - my one concession commercialism. ;-)


This will be part of our brunch tomorrow, and some of the ingredients will be used to marinade the lamb I'll be doing this year for dinner.

Friday, April 22, 2011

Our Easter preparations

Today we're getting stuff ready for our traditional Easter basket.

Making kraszanki

Half of the eggs we'll be doing this year were cooked with onion skins.  This evening, we'll be doing tea dyed eggs that will be shelled for the basket.

The bread is always the centerpiece of our basket.

Our Easter bread

Here is our basic bread recipe, with the variations I did below.

For 2 loaves.

1-2 Tbsp yeast (preferably the old style active dry yeast, not the quick rise stuff)
1-4 Tbsp sweetener
1/4 cup butter or oil (optional)
2 1/4 - 2 3/4 cups warm liquid
2 tsp salt
6-8 cups (whole wheat or blend)

Dissolve yeast in warm liquid (water, milk, broth, potato water, or the liquid from making yogurt cheese) with 1 tsp sweetener (honey, sugar or molasses)
After 5-10 minutes, add remaining sweetener, salt, butter and 3 cups flour.
Beat at medium speed with mixer for 2 minutes, or 200 strokes with a wooden spoon
Add 1 more cup flour and beat briefly.
Add remaining flour until a soft dough results.
Turn dough onto lightly floured surface and knead until elastic and smooth.
Please dough in oiled bowl.  Turn to oil all sides, cover lightly and place in a warm spot to rise until doubled.
Punch down dough and knead briefly.  Shape into loaves and place into oiled loaf pans.  Cover lightly and allow to rise until the dough reached the top of the loaf pans.
Back in oven preheated to 350F (325F if using glass pans), in centre rack, for about 35 minutes.
Cool on racks.

Our variation:

For sweetener, we used plain granulated sugar.  For the liquid, we used 1 cup warm water to proof the yeast in the bowl of our mixer (I have a KitchenAide with a dough hook).  In a tiny bowl, I used 1 Tbsp of warm water to soak the saffron threads.  While those were doing their thing, I scalded 1 cup of milk and melted 1/4 cup butter into it.  Two eggs were also added (the equivalent of about 1/2 cup liquid).

For more photos of our Easter preparations, check out my flickr account.

Easter craft, 2011 - crochet eggs

My original thought for an Easter craft was the paint wooden eggs.  When I couldn't find a local source for any, I turned back to my hooks.

I ended up doing a variation of the Lion Brand egg cozie pattern (available for free, sign in required).  They have a number of variations that all use the same body shape.  In my variation, instead of stopping at round 15, I stuffed the egg at that point, then worked a couple more decrease rounds before using the finished end of the yarn to close up the opening.  Here's how they turned out.

Crochet Easter Eggs

I started off with the two pastel eggs at the top - one in pink and green, the other blue and white.  These were done using a 3.75mm hook and the same variegated handicrafters cotton.  The two on the bottom in the same yarn were done using a 4.25mm hook, with spiked sc thrown in for texture.

The read and purple ones were both done in tapestry crochet.  The purple is Paton's Brilliant and the red is Bernat Shimmer, and I used a 3.75mm hook.  The pink egg with teal stripes was also done using a 3.75mm hook.  The teal yarn is actually a very fuzzy yarn with textured bits in other colours, but all the fuzz and texture ended up on the inside.

The large one in the middle is also done in a 4.25mm hook, using a textured yarn we found in a bin at the Reuse Centre, so I have no idea what it is.  This egg was actually flipped inside out before stuffing, and the final reducing rounds were worked from the inside.  The front of the stitches were almost completely smooth.  I could have brushed it to get the fuzziness, but the colourful textured bits would still have been stuck on the other side.  The back looked a lot more interesting than the front.

These work up very quickly.  A plain egg with no colour changes or textured stitches, can be done in about half an hour.  I've got an unfinished one with cables waiting to be stuffed right now, and will probably do a couple more tonight, before I stop making them.  That will be it for any crafting I do for the next few days, I think.

Meanwhile, we've got bread dough rising and will be colouring eggs for our Easter basket today.  I'll also prep the little containers of butter and salt, and anything else that can be done ahead of time.  Preparing our Easter basket is our girls' favourite tradition - and mine, as well! :-)

Wednesday, April 20, 2011

Experiment - nudibranch hat

Many years ago, while living in another province, my husband and I came upon some selling brightly coloured hat somewhat like the jester hat.  They had 6 points on them, with bells on the ends.  My husband loved his, but it didn't survive our kids. ;-)

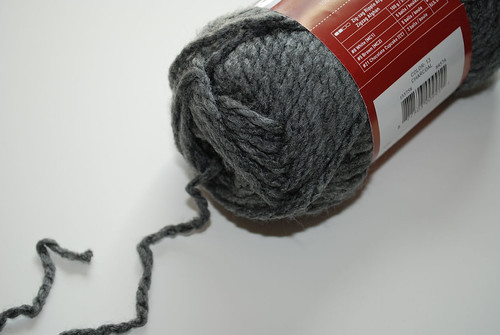
I was thinking about that hat and how I might do a crochet version.  Once I turned various techniques around in my head, I dug through my stash for a yarn I could experiment with.  I discovered an untouched ball of the same yarn I used for the pixie hat.  Dang it.  If I'd remembered the second ball, I wouldn't have mixed yarns and colours with my pixie experiment.  Ah, well.  That's the fun of experimenting.  :-D

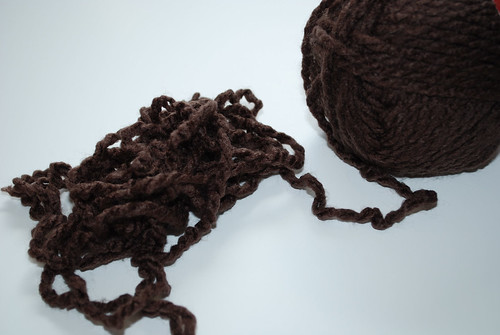
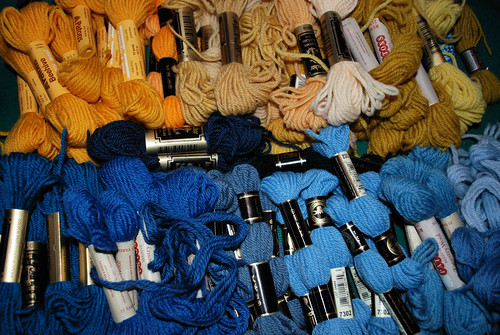
I also found a light weight yarn that had some fuzz to it.  The colours didn't match at all, but being an experiment to figure out construction, I decided to use it as well as some sort of contrasting texture. 

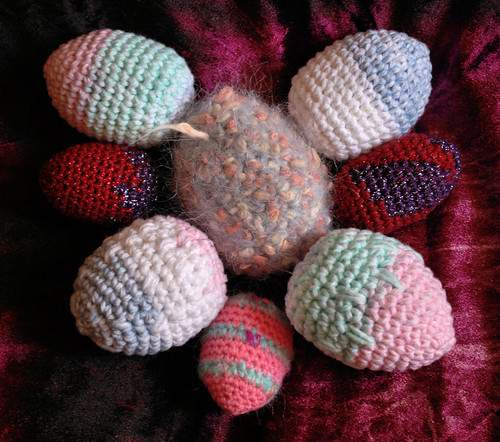
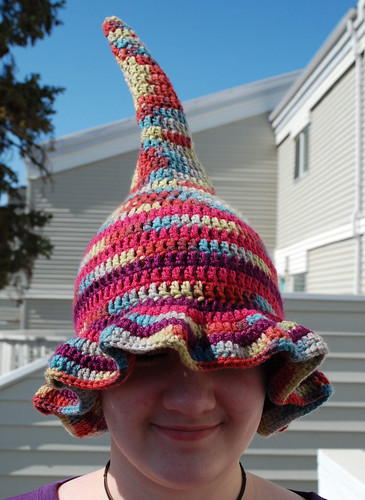
What I came up with was a hat made in two parts.  The top began as a flat disc until I reached the width where I would normally stop increasing at and start building up the sides.  Then, instead of making straight sides for the body of the hat, I made points.  The second part was the brim and body of the hat worked bottom up, then I made matching points.  The two were then stitched together with sc, and finally I used the light weight yarn to do a contrasting edge.  The ruffled texture reminded me of some types of nudibranch.  I didn't have enough of the light weight yarn to finish what I had started, but it did give me ideas for any future versions I will be making.

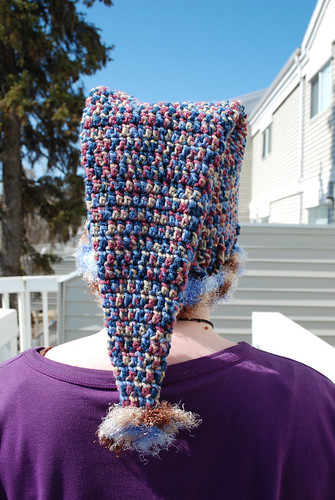
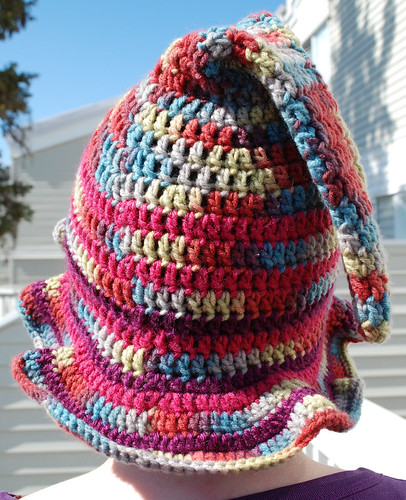
Here is the end result.  First, from the back with a view of the top section.

Experiment - nudibranch hat

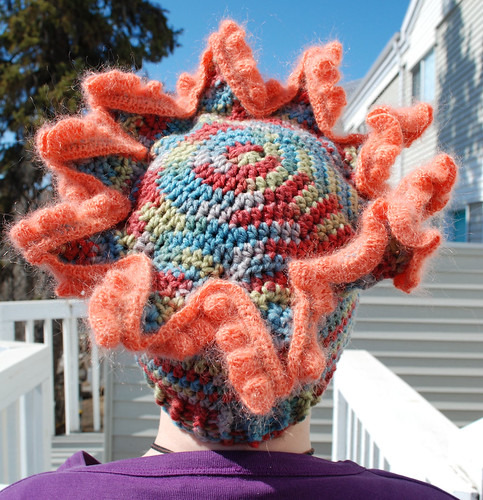
The variegated yarn is a worsted weight, and I used a 6.50mm hook.  I started with a magic ring of 7 dc, then increased evenly until I got it to 70 dc.

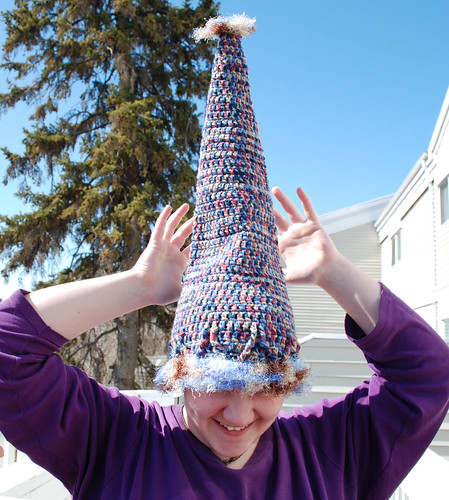
There are 10 points on this version.  After the final round of 70 dc, I made a turning chain, then did 7 dc (I did not count the turning chains as stitches).  I turned again and did 6 dc in the next row, working the decrease in the middle.  I continued that pattern, decreasing by 1 stitch every row, until I was down to 1 dc plus the turning chain.  Then I slip stitched down the side to the top of the first 7 dc row.  At that point, I worked another 7 dc into the next 7 stitches of the crown of the hat and worked the next point.  This was continued until I finished all 10 points.

With an odd number of stitches, it worked out that the slip stitch down the side always put me on the correct side to do the next point.  When I did my next version of this, I made points that were 10 dc wide at the base, and for that I had to turn the piece before slip stitching down the side.  I will have a separate post for that version.

Experiment - nudibranch hat

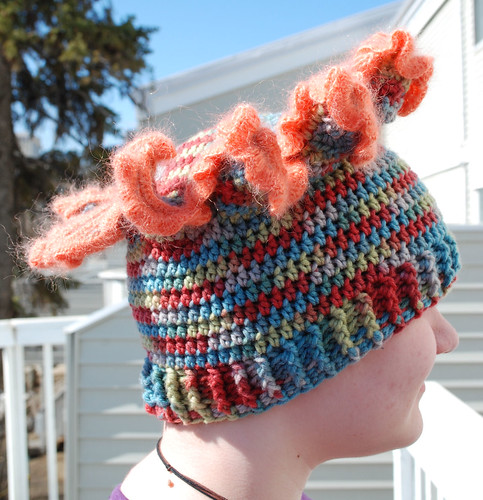
Once the crown was done, it was time to do the body.  I started from the brim, with a 70 ch foundation ring, then alternating front and back post stitches to make the ribbed brim.  After 3 rows with front and back post dc stitches, I switched to just dc and worked the rounds until it was the depth I wanted.  I then added point to the body using the same method as for the crown.  After the points were done, I went back to finish the edge of the brim by adding a single round of alternating front and back post sc stitches.  That tidied up the edge quite nicely.

Experiment - nudibranch hat

Then it was time to put the two together.  After lining up the point, I joined them using sc, which you can sort of see on one of the points in the above picture.

In joining the two pieces, something interesting happened.  Because the side of the points with the slip stitch ends up slightly tighter than the other side, and the way the top and bottom points lined up, the points developed a natural twist to them.  I found this effect rather nice!

I could have stopped at that point, but wasn't happy with how the edges looked.  Especially on the underside (I worked the sc from the top).  That's where the light weight yarn came in.

Switching to a much smaller hook (a 3.25mm, I think) I worked the contrasting yarn in two rounds.  From the top, I worked two sc stitches of the contrasting yarn into the front loop only of the joining sc stitches.  Then I turned it and worked two sc stitches into the remaining back loop (which was now the front loop, since I turned it and was working in the other direction) of the joining sc stitches.

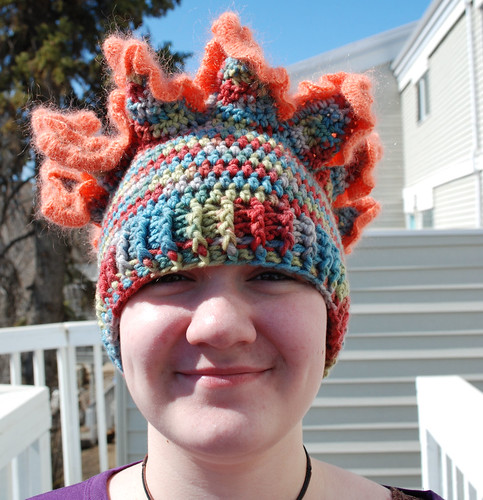
Then came the nudibranch ruffle.  Working from the underside of the hat, I alternated between doing 3 dc and 2 dc into each sc in the underside round, except when it came to the space in between the point.  There I reduced the number of stitches per sc and also brought it down to hdc and sc.  At the very center of the join between two points, I did 2 sctogether.  Then, working back up the side of the next point I worked up to hdc back to dc stitches and continued the ruffle.  I found no need to change the ruffle pattern at the tips of the points.

Experiment - nudibranch hat


Returning to the back view of the hat, you can see the inside round of sc stitches in the contrasting yarn.  It had been my intention to do a second round of ruffled stitches into that round as well, but I didn't have enough yarn.  That will have to wait for a future version.

Some final thoughts.  From a construction point of view, I'm very happy with how the concept turn out.  There are a few things that I decided needed to change (aside from the colours. *L*).  I had worked the decreases in the points in the middle of each row, rather than the start or the end, because I thought it would make a difference in attaching the two pieces together.  I didn't like how it ended up looking, though, so for my next one, I did the decrease as the start of each row.  More on that when I post about that version.

With the contrasting edge, I definitely want to do another version with ruffles, but I'm not sure I'd go with two rounds of it, as I'd planned to here.  I think it would depend on what contrasting yarn I ended up going with.  I definitely want to go with the nudibranch look, though, and am thinking of ways to make the hat look even more like a nudibranch! 

As with the previous hats, this was an experiment that was never really meant to be worn.  The family was very enthusiastic about the results, though, and have already asked for other versions.  My kids have even worn this in public! *L*  It's quite comfortable to wear.

Thursday, April 14, 2011

Customer order with a difference

One of my neighbours has asked me to do a custom order hat with scarf flaps for her.   Because of her rather unique needs, I've asked her permission to blog about it, which she has graciously granted.  I will be blogging the process in a series of posts as I try to figure out a design that will work for her.

There are a couple of ways I've made hats with scarf flaps; vertically in rows, with the scarf portion worked up at the same time as the body, or horizontally in rounds with the scarf portion added either horizontally or vertically.  Working the scarf portion vertically allows me to easily add keyhole slits to close up the scarf without having to tie it.

My neighbour (I'll call her G) wants a keyhole scarf.  Here are a few of the things I need to work around.

First off, she has an unusually shaped head. Or, as she puts it, a big head. *L*  So the circumference will need to be somewhat larger.  However, having spent the first 6 months of her life lying on her back, the back of her head it also flat.  Her proportions are quite different, and her neck is mostly hidden. I had some concerns about her oxygen tubes, but it doesn't look like they will be an issue at all.

G's other challenge is that she cannot reach up to put a hat on her head.  With the scarf she uses now, she has to hold the ends and sort of toss the loop over the head.  This is the same motion she'll have to use to put on the hat she's asked me to make.  This means the hat has to have at least some stiffness to it to stay open and not flop closed while she tried to toss it onto the top of her head, then use the scarf flaps to put it into position.  She then wants to be able to close up the scarf with the keyhole and tuck the ends into her jacket.  With her arm mobility, the keyhole can only be on one side.

Today I was finally able to head over and get some measurements to work with.  I've got the circumference of her head, the distance from her temple to the top of her head, her temple to where the top of the keyhole will need to be, from temple to temple across her forehead, the distance from the nape of her neck to her eyebrows, and finally I figured out the maximum width the scarf flaps can be, and the minimum length for her to be able to tuck it into her jacket.

The yarn for her hat will be a double thickness of Paton's Silk Bamboo in Sea, a colour that matches her winter coats quite well.  I think, however, I will use some Bernat Satin to work up swatches and test out different ideas.  I had been thinking of working the hat vertically, but now that I've got her measurements and taken a good look at the shape of her head, I don't think that will work as well.  Ooh... unless...   I could work it vertically without short rows for shaping and leave the top with a drawstring closure.  This way, she can put her ponytail through the opening, if she wants.  Hmmm... there's a thought.  Oops, never mind.  She wouldn't be able to put her pony tail through herself, and the whole point is for her to have a hat that she doesn't need to have someone else put on for her. 

The closure for the scarf portion is another issue.  The scarf G showed me is a knit scarf that has a narrow, ribbed, portion near the ends, then it widens again before coming to an attractive, leaf-like point.  At the narrow, ribbed portion on one side, there's a second layer that's open, so she can tuck the other end through, and the two narrow portions overlap.  This lies somewhat flatter than a keyhole slit, but I think a keyhole might actually be easier for her to thread the scarf end though.


Whether I decide to work the hat vertically or horizontally, I will need to figure out stitch patterns that will combine stretch and flexibility to conform to her head shape, but will also have enough stiffness, at least along the edge, to stay open when she tosses the hat onto her head while holding the scarf flaps.  It also has to be somewhat dense to cut the wind and actually keep her warm.  The double thickness and silk blend will help with the warmth, but cutting the wind is always a challenge. A surface braid has the flexibility and stretch, but it doesn't cut the wind as much as I'd like.  Hook size and yarn thickness can help with that, though.

So, lots to think about and figure out. 

Time to break out my hooks!

Experimenting - peaked hat with novelty yarn embellishments.

After working up the pixie hat, there were a few things I wanted to try out.  Digging around my stash, I found a large skein of worsted weight yarn that would be more than enough for another hat.

This time, I went with a 5.50mm hook and worked in a spiral.  I still worked with a base 6, doing 2 sc, 2 hdc and 2 dc into the magic ring.  After that, I worked in dc stitches until near the end.

Like the pixie hat, I added 3 stitches to each increase round, but kept 2 rounds without any increases in between each increase round.  Using a stitch marker to keep track of the rounds was a necessity.  I also staggered where the increases were worked in the rounds.  The result was a very even, cone shaped peak.

Peak hat

In this back view, you can see where some of the increase rounds were done, as there is a bit of  a "step" visible.

Peak hat

The downside of working in only one stitch is that it gets very boring.  So when I got it to head width and started working only rows without increases, I started throwing in some cables by doing front post triple crochet for three rounds.

The next part is completely covered by the novelty yarn.  I wanted to make a different sort of brim.  After doing a round in just dc after the cables, I worked an increase round in sc, then a couple more rounds of sc without any increases.  For the last round, I flipped this "brim" up and worked the sc into the body of near the cable stitches.  This gave it a sort of roll for a brim.

I had intended to stop there, but it looked really unfinished.  I dug around my stash and found a novelty yarn with blues in it and decided to figure something out.  It's a very thin yarn, so I used a much smaller hook (a 3.50mm, I think) and did several rounds of sc around the posts of the stitches on the outside of the rolled brim until it was completely covered.  The "pom pom" at the tip is actually a bunch of chain loops in alternating sizes.

When my daughter first tried it on and did this...

Peak hat

... I had sudden images of the same hat made with bright red yarn for the body and white fun fur or eyelash yarn for the embellishment for a crocheted Santa hat!  A good thing to try with felting yarn, perhaps.

I think the colours on this one definitely challenged the pixie hat for the fugliest hat I've ever made.  LOL

As I was working the cone shaped peak, it occurred to me that, with some minor adjustments, it would make a great Thanksgiving cornucopia.  In basket weave stitch, of course.

After this hat, I got really silly.  More on that in my next post!

Wednesday, April 13, 2011

Experimenting - a pixie hat, first attempt

For the girls and I, one of our favorite routines is our trips to the library.  We try to go at least once a week, though we've been known to go considerably more often some weeks, not at all on others.  It's an enjoyable walk of a few blocks to the main branch.  Part of our routine includes seeing what's new in the small art gallery with its rotating display from local artists and craft guilds.  We usually finish up by visiting the Second Cup, just off the gallery.

This place is filled with some of the most interesting people, including the employees.  I often bring my project bag and do a bit of crochet while the girls and I have our drinks and chat.  I've even left the odd cup cozie behind for the staff.  One of our favorite staff members has a unique style all her own, with awesome dreadlocks and funky clothes.  I discovered she was interesting in learning how to crochet flowers, like what I made here.  So when I had the chance, I caught her before her shift and chatted with her about what she was looking to learn.  I couldn't help but notice the fascinating crocheted peak hat with floppy brim she was wearing at the time.

The hats I usually make are a basic form with variations.  Whether I work top-down or bottom-up, crown is usually flat or nearly flat, the sides are straight, and I would add either some sort of ribbing or a brim around the forehead.  Any manner of stitch variations can be used on the basic form to make it unique an interesting, but every now and then, I want to experiment with different shapes.

I wasn't quite going to try and recreate the peaked hat I was inspired by, but it did get me to thinking about the shape.  In visiting Ravelry and seeing some of the patterns there, I've recently seen quite a few new hats showing up, and that they were called pixie hats.

How appropriate.  It turns out the lovely young lady who's hat inspired me is named Pixie!

So here is my first experiment in a pixie hat.  While having a Star Trek marathon with my younger daughter, I dug out an incomplete skein of worsted weight yarn I had no plans for. I knew there wasn't enough yarn to finish what I had in mind, so I dug out a couple of small balls in pink and purple I had left over from who knows where.  This being a total experiment, with rather garish colours, I had no real thought of it actually being worn by anyone.  I finished this hat in a single evening - it took about 3 1/2 episodes of Star Trek.

Pixie hat

My daughter insisted I get a shot with the tail sticking up! 

Pixie hat

I worked the hat in rounds - the seam is just to the left of centre in this photo - and using a larger hook to start with.  A 6.50mm hook, if I remember correctly.  I started with a magic circle of 6 dc.  (All but the very last round are done in dc.)  I increased the next round by 3 stitches, then, then did 2 rounds without any increases.  I repeated that pattern of working one increase round (increasing by 3 stitches to the round) followed by two rounds without any increases for a while, then started doing the increases every second round until I got it to a length where I wanted to make the head portion.  There I evenly worked in more increases in each round until I eventually got it to 70 stitches.  As the variegated yarn was running low, I started adding in rounds in pink, then eventually added in rounds in purple as I worked the 70 stitch rounds for the head portion.

When I got the head portion deep enough, I switched to a smaller hook (a 5.00mm, if I believe - as you can tell, I wasn't too interested in recreating this exactly) for the brim portion.  I added enough increases evenly around the hat to create a bit of a ruffle and kept that up for a few more rounds.  The very last round was done in sc with no increases at all.

Pixie hat

Personally, I think it's the ugliest hat I've ever made! LOL  My daughter, however, loves it.  Yes, she wears this in public! LOL  The next day, she wore it when we took her guitar in to get the neck adjusted.  The guy who worked on it complimented her on the hat.  When she mentioned I'd made it while we watched a Star Trek marathon, he ended up telling us about the Toy and Comic Show that was happening the next day.  We even ended up exchanging names so we could add each other to our facebook friends lists, but it turns out we both have our security settings too high - he couldn't find me when he tried to look me up on their computer in the store, and I couldn't find him when I got home and looked him up.  Ah, well!  I'll just have to meet up with him again at the store.

After getting her guitar fixed, my daughter and I went for lunch in the mall this store was at.  Walking back through the mall later on, she heard someone going by in the other direction call out "stupid hat!"

She just laughed at him and proudly kept wearing it!

Y'know, when I was her age, I wouldn't have had the guts to wear this (and I did wear some pretty unusual things back then - usually involving chains).  If I did manage to wear something this outlandish and someone said something like that, I would have been humiliated.  My daughter is a lot stronger and more self-assured than I was at her age!

So this is my first experiment with a pixie hat.  I think it looks a lot like a trumpet shaped flower - like a Morning Glory - turned upside down.

After finishing it, I could think of a few things I'd change about it (I mean, besides the colours... LOL).  I'd worked in rounds, which left a seam, and I figured working in a spiral would be better.  I thought about different ways to change the shape as well.

My kids are saying I should make another one like this, except with a much longer "tail."  They even want me to use garish, variegated colours again, too!

Well, I didn't make another one quite like this, but I did play around with the idea some more, which I will write about in my next post.

Tuesday, April 12, 2011

Work in progress - embroidery for framing

First a quick update.  I haven't been posting much there, but I have been working on various projects.  I'm finally catching up with taking photos and should be able add posts about them frequently over the next few days.

One of those projects is a work in progress.  I picked up a table top embroidery frame ages ago but haven't used it yet.  Now, I finally am!  What I'll be doing is slowly posting about this project to show the process I've been going through.

Aside from wanting to use the table top frame, I've had these sitting around.

Embroider wool

This is one of those Goodwill treasures.  Two bags full of embroidery wool.  There are several brands, all 100% wool.  Between the two bags, I paid about $5-$6.  About 6 or 8 of them show signs of any use.  The rest are in store-bought condition.  I still don't know what I'll be doing with them, but I was thinking of using them with tambour work.

But what?

With wanting to use my table frame, the wool and tambour embroidery all tumbling about in the back of my head, I decided I wanted to try making something I could frame.  I do very little that's purely decorative like that.  With embroidery, I'm more likely to work on an item of clothing, napkins or table cloths - items that are meant to be used, not just looked at.

When visiting a local Michaels a while back, I found myself looking at self-adhesive mounting boards (similar to this).  I ended up buying a package of two 5x7 inch mounting boards and some 18 count Aida cloth.

At this point, I am now thinking of doing some sort of, possibly floral, design in wool using tambour hook embroidery (using a crochet hook, though, because I don't have a proper latched tambour hook) as a matched pair for framing.

Embroidery prep

Here is my set up.  Because of the size of the frame, I could fit both at once in portrait orientation.  The pencilled lines are the 5x7 inches I need to work inside.

Once I got the fabric mounted, I experimented with a small crochet hook.  The first problem was discovering 18 count Aida cloth was a bit too fine for any of the hooks that I had.  The hooks were distorting the warp and weft too much for my taste.  So I found myself a 1mm hook and tried again.  This time, I could get the hook through better, but because of the lack of a latch, I was having difficulty getting the yarn back up to the surface.  It wasn't pulling the loop through the fabric that was the problem.  It was pulling the new loop through the old loop to make the chain stitch.  The yarn kept catching and snagging.

I also felt that the thickness of the yarn was a bit much for this cloth.  I think a 14 count would have been better for this thickness of wool.

The wool was set aside for another time.

I then experimented with other yarns and threads.  In the end, I decided that tambour embroidery was not going to work out the way I liked on this.

The hooks were also set aside.

So, at this point, I'm down to some sort of embroidery for framing, but nothing at all like I originally thought of.

I still don't know, but I did design on a "frame" for whatever design I do decide on.  Here's what I have so far.

Embroidery - beginning pieces for framing


First, note that this is currently being worked on upside down.

At the top of this photo (bottom of the project) you can see a few stitches I'd done using the wool in tambour stitch.  I did a few other stitches in tent stitch to see if maybe I could just freestyle it with a needle instead of a hook, but I still felt the wool was too thick.  If this were not meant to be framed, I probably would have been okay with it, but it just seemed... disproportionate.


I then spent the next while going through my various embroidery books for inspiration.  Quite a few designs appealed to me, but not as something I would want to frame and hang on a  wall. 


I  found my inspiration elsewhere.  Tucked away in a bookshelf, I have a copy of The Arabian Nights: Tales of Wonder and Magnificence.  It's one of the earlier translations, with my copy being a 5th edition (1930) of the 1923 copyright.  The book is filled with fantastic images.  Some of the plates are images identified as "A Persian lady's mirror" or "from a Chinese bronze."

I wasn't going to try and copy any of these intricate designs, but I liked the feel of them.  I still didn't know what image I want as the focal point, but I decided to frame both pieces in such a way that, even if I decided on two wildly different focal designs, they would still work well together as a pair.

I started off by doing an outline of backstitch just inside the 5x7 marked in pencil.  Another outline was worked with the peak at the top and the "legs" at the bottom.  I used a black and silver metallic crochet thread for the outline. 

When it came time to fill the top, I flipped the frame up so I could reach the stitching area better.  For this first one, I am filling the area with metallic silver crochet thread.  I'm using tent stitch with the rows in alternating directions for maximum reflection.  The other piece will be done the same, except I'll be using a gold instead of silver.  The curved space inside the "legs" will also be filled.


This is as far as I've gone so far.  It's been a lot slower than I expected it to be, but then nothing about this project has been turning out the way I expected!


I'm looking forward to finding out what it's going to be in the end. *L*