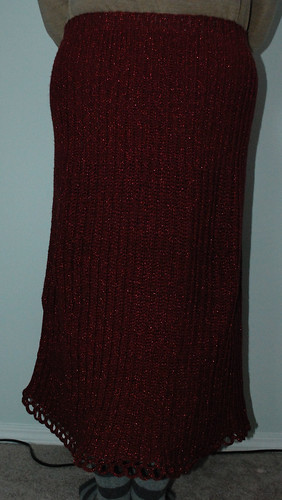
I'm finally getting the photos up of the finished
Shimmer Skirt I made for my younger daughter. It was one of those projects that kept getting set aside, for some reason - even after it was done and the pictures were taken! *L*
The basic construction of the skirt was very simple, so I didn't take pictures of the process (follow the link above for more details). When I got to the end, I slip stitched it closed a couple of times to get my daughter to try it on. I found myself taking out several rows before I got the fit she wanted.
(remember, if you want to see more details in the photos, click on the images to go to my flickr page, where you'll have larger options available)

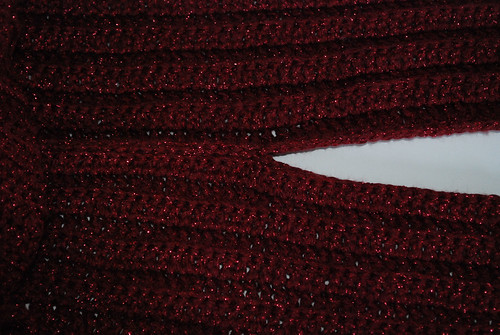
This is a view of the outside seam. In deciding where to make the stitch changes, I held the foundation chain from the side of her waist, then used stitch markers to bracket the hip area, which is where the hdc stitches are done. The waist band ended up being 10 sc wide, the hip area 49 hdc wide (yeah, I could have gone with 50, but I didn't actually count the number of stitches until quite a bit was worked up, and at that point, I wasn't going to change it just to get a round number. *L*). The rest of the skirt is done in dc, and I have no idea how many stitches long it is. I never bothered to count.
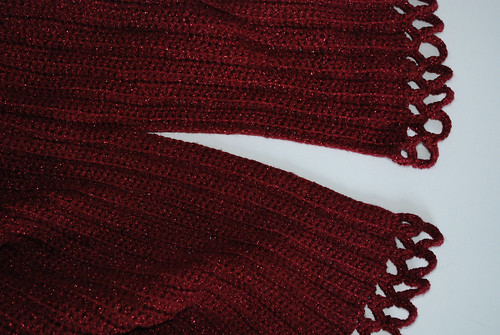
Here is a view of the inside seam at the split, which is at about knee height. Again, I simply used stitch markers at the height she wanted the split to reach, rather than counting stitches.
In closing up the seam to look unobtrusive, there needs to be an even number of rows to line up the hills and valleys of the back loop stitches. As there is no real difference between the inside and the outside of the skirt, the outside was determined by making sure the seam would be hidden in a valley. Because I started the first row of the skirt at the bottom, this meant the last row ended at the bottom of the skirt. Working from the inside, I slip stitched the split up to the marker. This tightened up the tops of the stitches, which hung rather looser than the first row worked into the foundation chain, so that they were even again, as well as getting it to match the look of the first row being worked into the back loops of the foundation chain.
On reaching the marker, I slip stitched the seam closed to the top.
As you could see from the first photo, we ended up going with an elastic waist. The waist band actually fit rather well, but the weight of the skirt itself tend to pull it down. I'd thought of putting in buttons or something, but my daughter didn't want anything of the sort, so elastic it was.
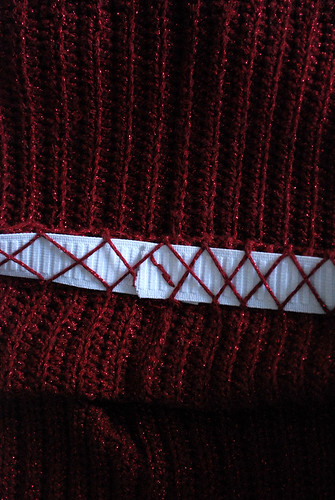
To put in the elastic, after measuring it against my daughter's waist, I stitched it into a loop with the same yarn I used to make the skirt. Working with the skirt inside out, I placed the elastic into position long the waist band and pinned it evenly into place, then used a
herringbone stitch, going around the waist twice, to stitch it into place. I chose to encase the elastic in the herringbone stitch, rather than stitch it directly to the skirt, for a couple of reasons. Because of the high level of stretch and flexibility in the skirt itself, due to working in back loops only, I didn't want to mess with it by sewing the elastic directly to it. Also, should we for some reason need to replace the elastic, it will be easier to do so.
Here's a view of the finished seam from the outside.
At that point, the whole thing looked a touch unfinished, so we decided to add something extra to the bottom. After going through a book of edging patterns I had from the library at the time, we settled on what you see now.
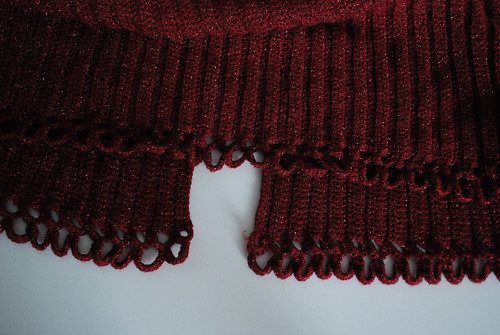
Here's a view of both the inside and outside of the edging, with the inside view underneath, with the split.
This was worked by first working a series of 5 chain loops from the inside of the skirt, starting at the split, with a single crochet worked into the top of each valley from the inside, which meant that they were on the hills when right side out. On reaching the other end, I turned to work from the outside of the skirt, doing 7 sc into each loop, but not working anything into the single crochets. Back at the beginning, I turned to work on the inside again, then did another series of loops, this time of 7 ch, with a sc worked into the 4th sc of the previous loops. Turning back to the outside of the skirt again at the end, the final row was working 9 sc into each 7 ch loop, again skipping all the sc.
Next up, how it looks while worn.