
Saturday, December 31, 2011
Another quick one...
Wednesday, December 28, 2011
First use

It occurred to me recently that having extras to keep in my purse or pockets would be useful, so I made several last night. These are handy and quick little projects to experiment with. For this one, I got to play with making diamonds, as well as figuring out how to adjust for increasing the size of the cozie at the top to better fit the cup.
I think it turned out all right. :-)
Tuesday, December 27, 2011

Saturday, December 24, 2011
Merry Christmas

Sunday, December 18, 2011
Monday, December 12, 2011
Get Spicy
Ah, finally. Some photos of this year's Christmas decorations!
This is not the project I originally intended to do, but lack of space in the kitchen for such a project left me searching for another option. As I was going through Michaels one day, looking for inspiration, I decided to try something with these.

Papier Maché forms, pre-strung for hanging. Getting the bar code stickers off was a bit of an issue, but I hoped that would get covered over.
For the past few years, my annual decorations have leaned towards things that reflect light. Beads, mirrors, metallics, craft gems and more, with the idea of having them reflect the lights on our tree. This year I decided to go for more scent, and a more organic, natural look. I still wanted a bit of shine, though.
With that in mind...
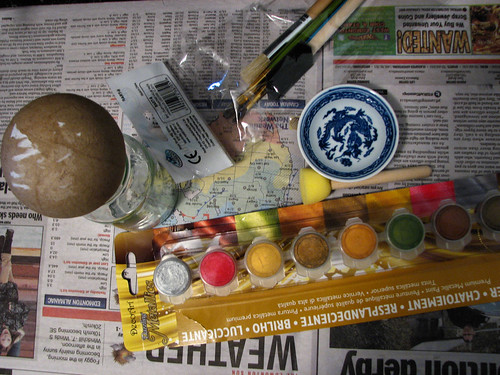
I also picked up a cheap package of craft brushes and some enamel paint in 8 metallic colours. I used a small jar (from some Devonshire cream... yum!) to hold the spheres while they were being worked on. Not shown is some Tacky Glue that I picked up. I had a definite need for a glue that would hold weight while wet, and would dry clear.
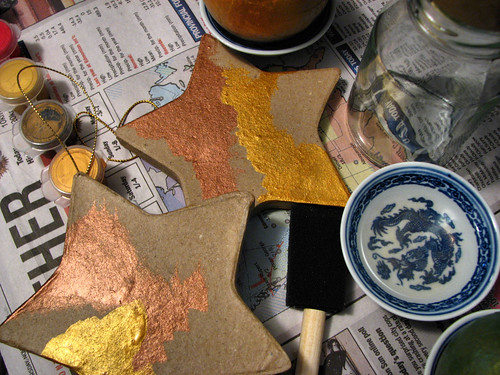
The first step was to cover the forms with the metallic paint.

I did two spheres and two stars in the same four colours, then the remaining forms in another four colours, starting off with just 2 colours. I wanted to use the little yellow sponge on a stick that you see in the previous photo, but it didn't fit in the pots very well, so I used the black sponge, instead. I used very little water and just one corner of the tip to dab the colours on, then used the try opposite corner of the tip to feather the edges, especially where the two colours met. I tried to make the placement of colours look fairly random. I also chose to dab with the sponge, rather than spread, as I wanted that hint of texture; another reason I used very little water.
While the first 4 forms dried, I worked on the next four. The paint dries fairly quickly, though I did still need to give the first batch a few more minutes longer than it took me to finish the second batch.

Once the first pair of colours were done, I did the next two colours. With the spheres, I did need to give a couple of them time to dry on one side before I could finish the other.
Personally, I like the ones with green in them better then the ones with red. At this point, I wasn't sure how much of the paint would even be showing when they were done.
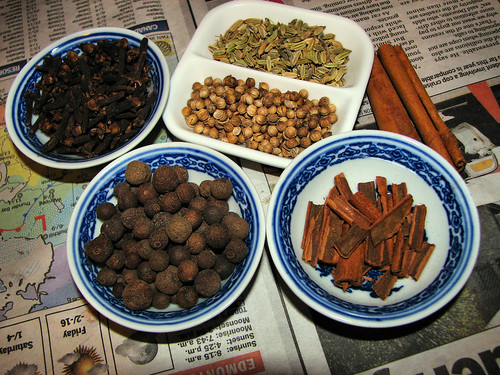
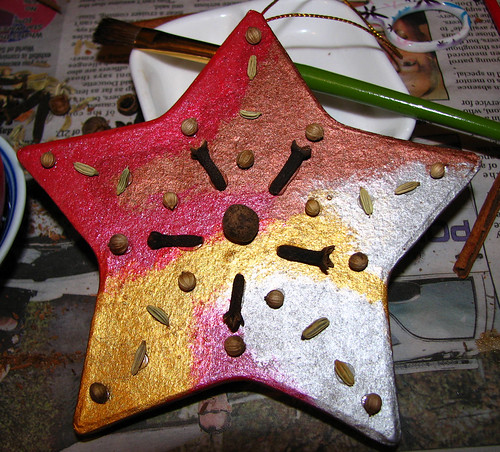
Next up, some aromatic spices. In the round little bowls are whole cloves and whole allspice on the left, and broken up cinnamon sticks on the right. In the divided dish there's fennel seeds at the top and coriander seeds at the bottom.
I did two of the decorations myself, then the girls did the remaining six. I started with a sphere, since I knew it would need drying time in between.
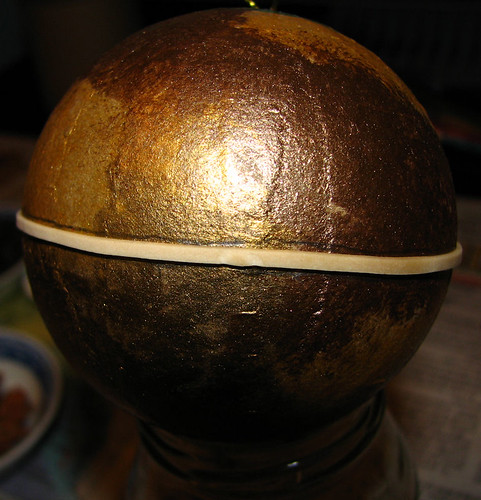
I used an elastic to mark off guidelines at the equator for my first one.

It didn't need to be perfectly straight; I just needed enough to make sure I didn't go all wonky while gluing.

With this one, I had to do it in quite a few stages, staring with the whole cloves and lots of glue!
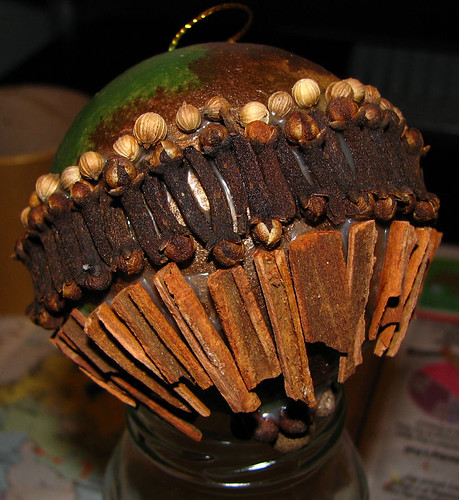
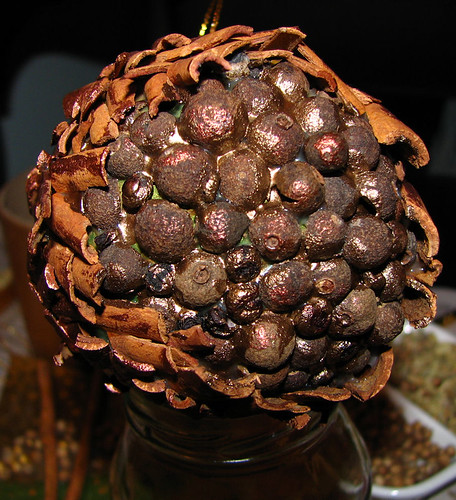
This is the finished sphere with cinnamon pieces and coriander seeds with the cloves...
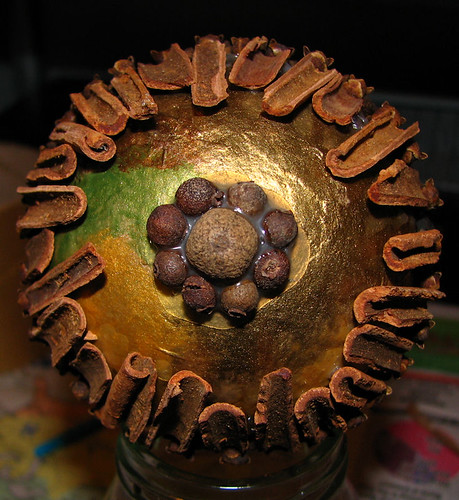
While on the bottom, I chose one very large piece of allspice and surrounded it with 8 of the smallest allspice I could find. As you can see, the glue still isn't completely dry in this photo, and this is after a full day and a half! With the allspice being round, rather large, and being glued to a curved surface, I figured a lot of glue wouldn't be amiss! *L*
Here are the rest of them...

I had just finished this one when I took the photo.
My younger daughter did this one. After taking the photo, I actually added more glue around the allspice pieces. Just to be safe. *L*
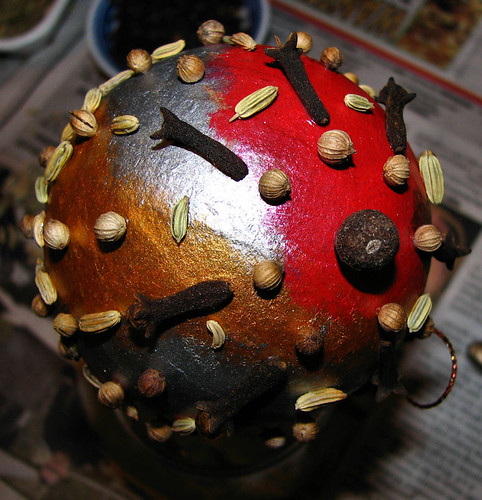
Another one by my younger daughter. The other side matches this one, so that when hung, there's a single allspice in the centre of each side.
One more done by my younger daughter.
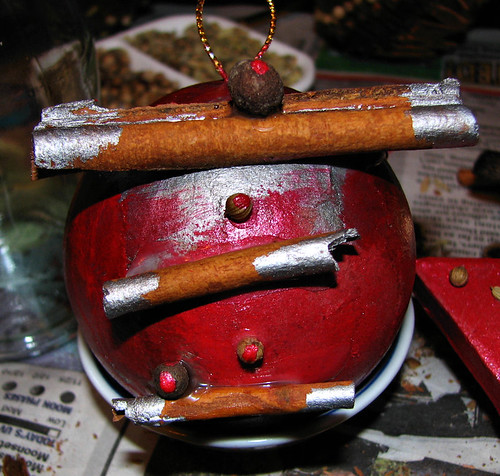
One of the spheres done by my older daughter. She repainted the back so that it was all red.
Getting a good shot of this one was rather difficult. *L* Another from my older daughter, the back is actually blank. It's done to look like the one side is bursting open to reveal the inside. For this, she cut the allspice in half to have a flat surface to glue against the sphere. Once glued in place and dry enough, she used some paint on them as well.
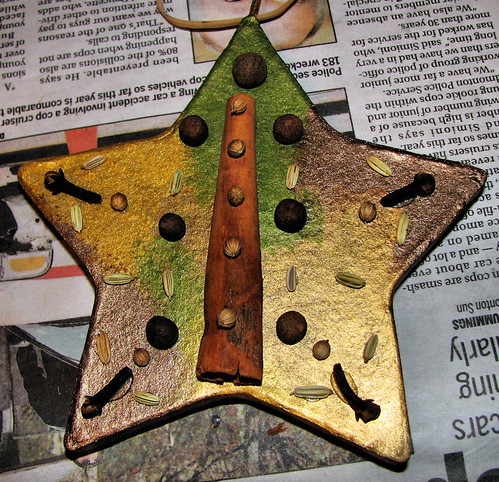
My older daughter also did a star shape, but for some odd reason, I don't have a photo of it! I'm not sure how I missed it. I did get this shot...
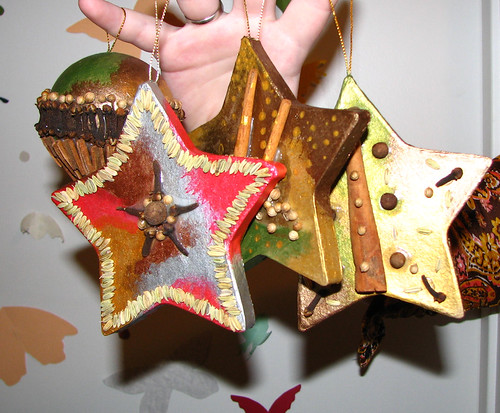
Of course, there's another one in front of it. Oops. It's the middle one of the three stars. After gluing on the cinnamon sticks and coriander, she added spots of paint as well.
I did get a picture of the other four finished decorations, but it didn't turn out. I'll see if I can get more photos later.
When I first painted these, I'd left the backs of the stars unpainted. I had thought to leave them that way, but the remains of the bar code stickers wasn't very nice, so once the glue was dry, I painted the backs. For the ones with green on them, I painted the backs in the lighter gold while the ones with the red on them were painted with the darker gold. For that part, I watered down the paint more and brushed rather then dabbed for a smooth and even surface.
We're all quite happy with how these turned out. They were fun to do, easy and relatively quick. Their scent is noticeable, but not overpowering. Before Christmas, we'll pick up more forms and do others. I seem to remember they had flat circles in stock.
If you want to make your own version of these and time is a concern, do just flat pieces, as you won't have to do them in sections and wait for the glue to dry, the way we had to do with the spheres. Other then that, they are really quick to do, and it's fun to try and figure out interesting ways to arrange the spices.
This is not the project I originally intended to do, but lack of space in the kitchen for such a project left me searching for another option. As I was going through Michaels one day, looking for inspiration, I decided to try something with these.
Papier Maché forms, pre-strung for hanging. Getting the bar code stickers off was a bit of an issue, but I hoped that would get covered over.
For the past few years, my annual decorations have leaned towards things that reflect light. Beads, mirrors, metallics, craft gems and more, with the idea of having them reflect the lights on our tree. This year I decided to go for more scent, and a more organic, natural look. I still wanted a bit of shine, though.
With that in mind...
I also picked up a cheap package of craft brushes and some enamel paint in 8 metallic colours. I used a small jar (from some Devonshire cream... yum!) to hold the spheres while they were being worked on. Not shown is some Tacky Glue that I picked up. I had a definite need for a glue that would hold weight while wet, and would dry clear.
The first step was to cover the forms with the metallic paint.
I did two spheres and two stars in the same four colours, then the remaining forms in another four colours, starting off with just 2 colours. I wanted to use the little yellow sponge on a stick that you see in the previous photo, but it didn't fit in the pots very well, so I used the black sponge, instead. I used very little water and just one corner of the tip to dab the colours on, then used the try opposite corner of the tip to feather the edges, especially where the two colours met. I tried to make the placement of colours look fairly random. I also chose to dab with the sponge, rather than spread, as I wanted that hint of texture; another reason I used very little water.
While the first 4 forms dried, I worked on the next four. The paint dries fairly quickly, though I did still need to give the first batch a few more minutes longer than it took me to finish the second batch.
Once the first pair of colours were done, I did the next two colours. With the spheres, I did need to give a couple of them time to dry on one side before I could finish the other.
Personally, I like the ones with green in them better then the ones with red. At this point, I wasn't sure how much of the paint would even be showing when they were done.
Next up, some aromatic spices. In the round little bowls are whole cloves and whole allspice on the left, and broken up cinnamon sticks on the right. In the divided dish there's fennel seeds at the top and coriander seeds at the bottom.
I did two of the decorations myself, then the girls did the remaining six. I started with a sphere, since I knew it would need drying time in between.
I used an elastic to mark off guidelines at the equator for my first one.
It didn't need to be perfectly straight; I just needed enough to make sure I didn't go all wonky while gluing.
With this one, I had to do it in quite a few stages, staring with the whole cloves and lots of glue!
This is the finished sphere with cinnamon pieces and coriander seeds with the cloves...
While on the bottom, I chose one very large piece of allspice and surrounded it with 8 of the smallest allspice I could find. As you can see, the glue still isn't completely dry in this photo, and this is after a full day and a half! With the allspice being round, rather large, and being glued to a curved surface, I figured a lot of glue wouldn't be amiss! *L*
Here are the rest of them...
I had just finished this one when I took the photo.
My younger daughter did this one. After taking the photo, I actually added more glue around the allspice pieces. Just to be safe. *L*
Another one by my younger daughter. The other side matches this one, so that when hung, there's a single allspice in the centre of each side.
One more done by my younger daughter.
One of the spheres done by my older daughter. She repainted the back so that it was all red.
Getting a good shot of this one was rather difficult. *L* Another from my older daughter, the back is actually blank. It's done to look like the one side is bursting open to reveal the inside. For this, she cut the allspice in half to have a flat surface to glue against the sphere. Once glued in place and dry enough, she used some paint on them as well.
My older daughter also did a star shape, but for some odd reason, I don't have a photo of it! I'm not sure how I missed it. I did get this shot...
Of course, there's another one in front of it. Oops. It's the middle one of the three stars. After gluing on the cinnamon sticks and coriander, she added spots of paint as well.
I did get a picture of the other four finished decorations, but it didn't turn out. I'll see if I can get more photos later.
When I first painted these, I'd left the backs of the stars unpainted. I had thought to leave them that way, but the remains of the bar code stickers wasn't very nice, so once the glue was dry, I painted the backs. For the ones with green on them, I painted the backs in the lighter gold while the ones with the red on them were painted with the darker gold. For that part, I watered down the paint more and brushed rather then dabbed for a smooth and even surface.
We're all quite happy with how these turned out. They were fun to do, easy and relatively quick. Their scent is noticeable, but not overpowering. Before Christmas, we'll pick up more forms and do others. I seem to remember they had flat circles in stock.
If you want to make your own version of these and time is a concern, do just flat pieces, as you won't have to do them in sections and wait for the glue to dry, the way we had to do with the spheres. Other then that, they are really quick to do, and it's fun to try and figure out interesting ways to arrange the spices.
Monday, December 5, 2011
Gillian's Hat
Okay, it's finally done! Some time ago, I got a custom order from one of my neighbours. It took me way too long to get to it. For those interested in my process in coming up with a custom design, this post is for you.
The goal: to make a hat with scarf flaps. The hat had to have a custom fit, the scarf flaps had to have keyholes, and my neighbour had to be able to put it on herself by holding the scarf flaps and tossing it over her head. It also had to fit over either a braid or ponytail.
Normally when I make a hat, I can just try it on my own head as I go along to make sure things are shaping up the way they should. Since this was not an option for the hat I was making, I took a whole bunch of measurements. I took far more than I probably needed, but better to have more information then not enough.
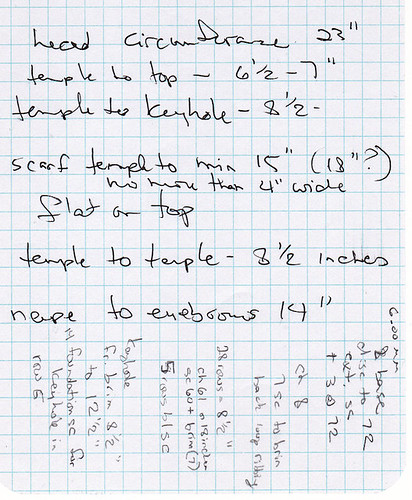
The notes written in a different direction are those I took when I first started working it up.
I also did a rough sketch of a variation of my basic hat with scarf flaps located over the ears.

I started experimenting with a mock up version using two strands of Bernat Satin on a 6.00 mm hook.
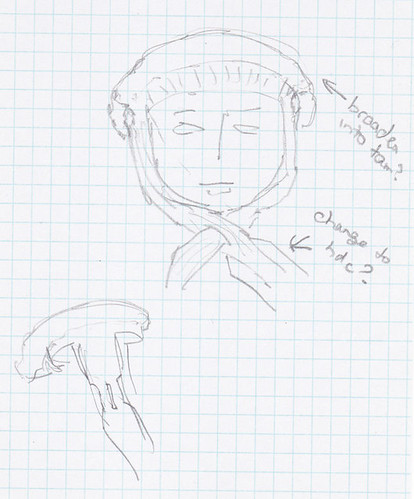
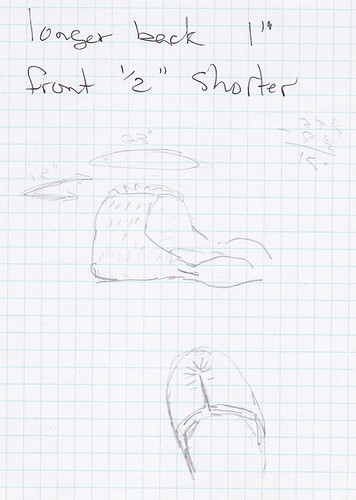
I also did a couple more sketches of possible variations. As I worked the mock up to the measurements I had, the design started looking a lot more like a tam than the sort of hats I usually do, so I figured that was something I could run with.
After I worked up the first mock up, I tried to test it myself by holding my elbows close to my sides and trying to toss it over my head. The hat just flopped into itself and, no matter how I wiggled the scarf flaps, would not position properly on my head. I took it to Gillian to test it out, in case it would work better for her, but it clearly was not going to work. It was a total flop. Literally. Unfortunately, I neglected to take photos of this first mock up, but it wasn't too far from the diagrams I sketched out.
One thing became very clear when Gillian tried the hat on. It wasn't a really hat we were after, but a hood. Time to take a few new measurements and go back to the drawing board!
I already had most of my measurements to work with, but the position of the scarf flaps in relation to the hood changed things a bit, including where to put the keyholes.
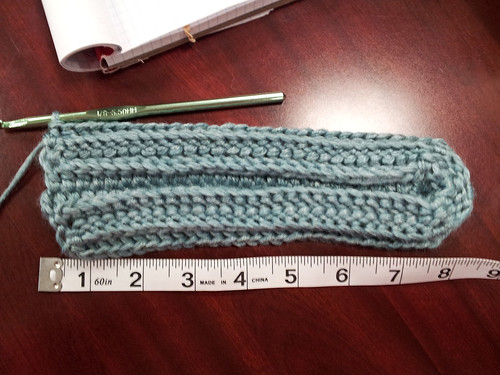
I did the mock up with a 6.00 mm hook and two strands of yarn again. I needed to use a stitch that would make for a denser fabric that would hold itself up to a certain extent, yet still be flexible and comfortable to wear. I decided to work in front and back post double crochet stitches. In comparing the Bernat Satin to the Paton's Silk Bamboo the final hat would be made out of, I knew I would need to reduce the hook size, and perhaps work with 3 strands on the hook instead of 2. Here is how the mock up turned out.

I had originally intended for this to be the outside of the hat, though I figured it would also be reversible. When this side was out, however, I noticed it lay very flat, which I could see as being a potential problem when putting it on. Flipped the other way, however....
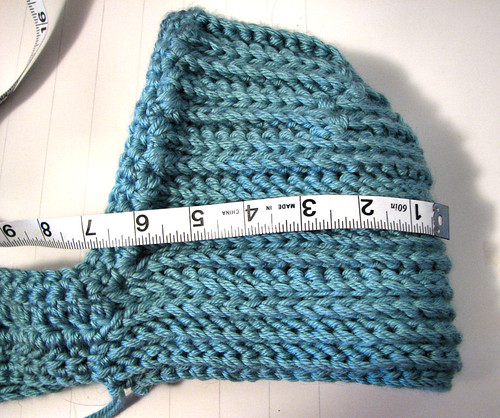
... and the post stitches helped keep the hat slightly open. I felt it looked attractive either way, so switching made little difference.
At this point, I didn't even try to put in the keyholes. I just wanted to make sure Gillian could put it on. This time, it worked. Through the size and measurements on the mock up were off, she was able to put it on.

With my new measurements verified, I fleshed out my design sketch with more detail and got started on the final version in the Patons Silk Bamboo. I knew I wanted to go down a hook size, but wasn't sure if I'd increase the number of strands on the hook, too. I ended up sticking to two strands on a 5.50 mm hook.
I started off with a foundation chain slightly shorter than the length I needed, as an edging would be added later, then worked a few increase rows to get it to the measurement I needed. After that, it was just basic front or back post double crochet stitches, starting and ending each row with a half double crochet stitch.
I worked the hood portion, then the scarf flaps (more details later), until I was almost ready to do the keyholes. At that point, I wanted to double check my measurements and see how it would fit on Gillian.

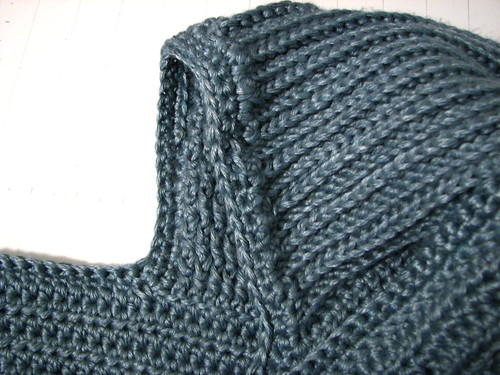
Here's the side view. The edge of the hood is rolling back on itself quite a bit, which gets fixed with the edging, and at this point, she could not put it on by herself. There just wasn't enough substance to the scarf flaps yet. I double checked the length at the back to verify how wide the scarf portion would need to be in total, which also told me how many more rows I'd need to do before working the keyholes.
Here I've verified and marked where the keyholes were going to go. The width of the scarf portion would also determine how large the keyhole openings would need to be. I just had to make sure the centres of the keyholes were at my marks.
I was slightly concerned that it would not hold itself open properly when she tried to put it on. The Silk Bamboo has a completely different drape then the Bernat Satin I used for the mock up. I did expect that, but it was also turning out much heavier than I expected. I was thinking that the hat would collapse under its own weight while being flung over and ending up bunched up behind her head instead. I started to brainstorm some way to add something to the hat later on that would force the hat to stay open, while still being flexible enough to be comfortable, and to bend when the scarf was pulled tight. I wouldn't know if that would be needed until it was done, though.
Time to finish the hat.

Here is the view from the inside, before the edging was done. When the hood portion got to the size I wanted and I started on the scarf portion, I switched from working post double stitches to half double crochet stitches. This made the scarf portion thinner and more flexible than the hood portion.
To work the scarf flaps, after finishing the last row of post stitches, I did a foundation chain of 50 stitches, then worked hdc into the foundation chain and around the bottom of the hood. For the opposite flap, I worked 50 foundation half double stitches.
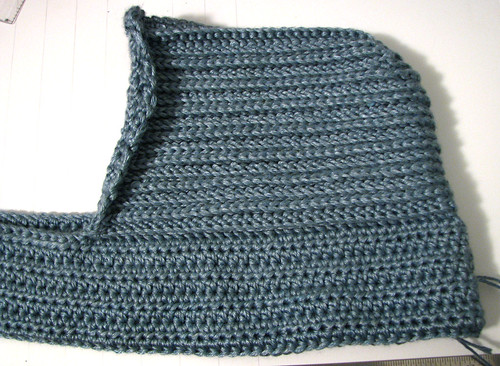
Here is what it looked like on the outside, with that curling edge waiting to be finished. The first and last stitch of each post row is a half double stitch instead of a post stitch to make working the edge easier. I planned to work one edge stitch into the side of each hdc which, due to the height of the hdc stitches, I knew would cause it to cup slightly. I wanted it to be pulled in a bit to increase facial protection.
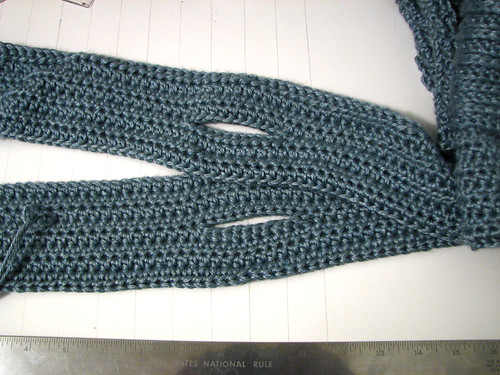
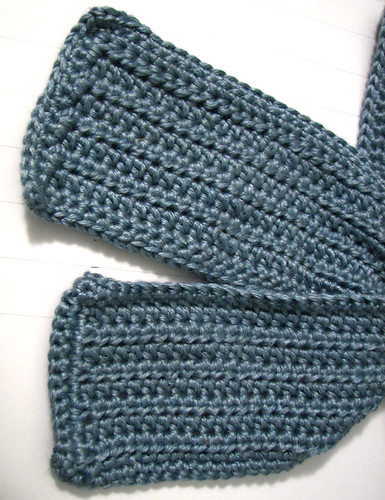
A view of the keyhole openings. These were done by working foundation half double stitches. As the scarf portion worked out to be a total of 8 rows of hdc stitches, plus the edging, I made the keyhole openings 10 stitches wide.
Time to work the edging.
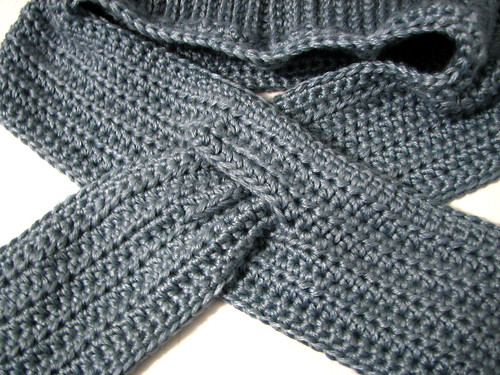
Here's how the edged scarf portion fit through the keyhole. Slightly snug, with no gaps. For the edge, I worked single crochet around the edges of the scarf flaps, the base of the hood portion, and part of the hood opening.
The corners were turned with a [1sc, 1ch, 1sc].
To extend the top of the hood slightly, the front of the hood was edged with a few stitches of sc at the bottom, then a few hdc, then joined dc stitches across the top, then matching numbers of hdc and sc back to the scarf portion.
I tried to find a link to explain what a joined dc stitch would be, but can't find one, so I'll do my best to explain it here. It starts with a dc worked as normal.
Yarn over hook (yoh)
insert hook into designated stitch (in this case, around the post of an hdc stitch in the hood)
yoh and draw loop through (3 loops on hook)
yoh and draw through 2 loops (2 loops on hook)
you and draw through 2 loops (1 loop on hook)
To work joined dc
insert hook under one strand of yarn in the post of first dc stitch worked
yoh and draw loop through (2 loops on hook)
insert hook into next designated stitch (around the post of next hdc stitch in the hood)
yoh and draw loop through (3 loops on hook)
yoh and draw through 2 loops (2 loops on hook)
yoh and draw through 2 loops (1 loop on hook)
This will leave a distinctive horizontal bar joining the two stitches. To work the next joined dc, insert hook under this horizontal bar.
yoh and draw loop through (2 loops on hook)
insert hook into next designated stitch
yoh and draw loop through (3 loops on hook)
yoh and draw through 2 loops (2 loops on hook)
yoh and draw through 2 loops (1 loop on hook)
In essence, what is being worked here is a really, really short Tunisian simple stitch, if that helps make any more sense.
After finishing the hat, I tested it out again on myself. Remember my concern about the hat not staying open while being tossed into position? How I was concerned that, between the weight and the drape of the yarn, it would just collapse on itself?
The exact opposite is what happened! When I tossed it up, the hood portion just opened right up and it landed perfectly in place! I did it again, several times, just to make sure it wasn't a fluke, and it was perfect every time!
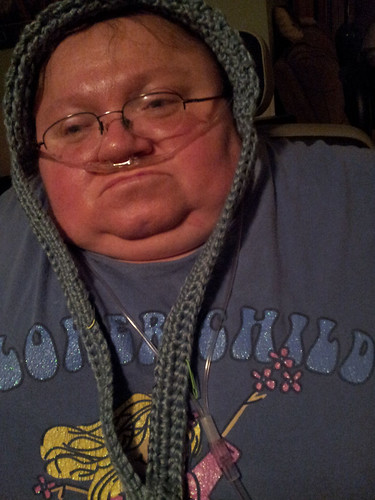
Time for Gillian to try it out!
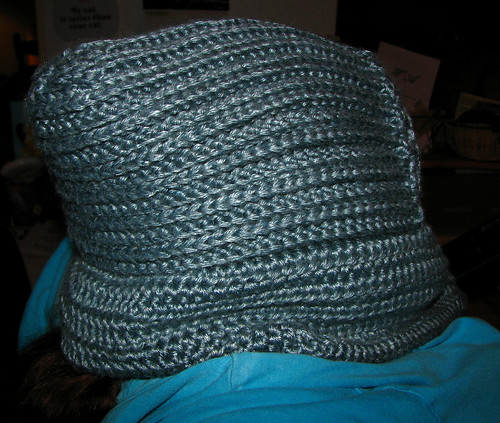
Check it out! It worked perfectly for her as well! She had her hair in a ponytail that day, and it fit easily over it. The denser post stitches help hold the shape while the softer hdc stitches in the scarf portion make for more flexibility at base of her head and neck.

She was also able to put the scarf end through the keyhole and pull it tight without any problems. A keyhole in each flap makes it reversible for her, too. The edging tucks in around her face for extra protection against the wind, just as I hoped it would. I am so tickled with how well it worked out! Her choice of yarn was perfect for this. Though the Bernat Satin I used for the mock up would also have worked, it would not have worked as well as the Silk Bamboo did.
Most importantly, Gillian is happy with her new hat, too. :-D
The goal: to make a hat with scarf flaps. The hat had to have a custom fit, the scarf flaps had to have keyholes, and my neighbour had to be able to put it on herself by holding the scarf flaps and tossing it over her head. It also had to fit over either a braid or ponytail.
Normally when I make a hat, I can just try it on my own head as I go along to make sure things are shaping up the way they should. Since this was not an option for the hat I was making, I took a whole bunch of measurements. I took far more than I probably needed, but better to have more information then not enough.
The notes written in a different direction are those I took when I first started working it up.
I also did a rough sketch of a variation of my basic hat with scarf flaps located over the ears.
I started experimenting with a mock up version using two strands of Bernat Satin on a 6.00 mm hook.
I also did a couple more sketches of possible variations. As I worked the mock up to the measurements I had, the design started looking a lot more like a tam than the sort of hats I usually do, so I figured that was something I could run with.
After I worked up the first mock up, I tried to test it myself by holding my elbows close to my sides and trying to toss it over my head. The hat just flopped into itself and, no matter how I wiggled the scarf flaps, would not position properly on my head. I took it to Gillian to test it out, in case it would work better for her, but it clearly was not going to work. It was a total flop. Literally. Unfortunately, I neglected to take photos of this first mock up, but it wasn't too far from the diagrams I sketched out.
One thing became very clear when Gillian tried the hat on. It wasn't a really hat we were after, but a hood. Time to take a few new measurements and go back to the drawing board!
I already had most of my measurements to work with, but the position of the scarf flaps in relation to the hood changed things a bit, including where to put the keyholes.
I did the mock up with a 6.00 mm hook and two strands of yarn again. I needed to use a stitch that would make for a denser fabric that would hold itself up to a certain extent, yet still be flexible and comfortable to wear. I decided to work in front and back post double crochet stitches. In comparing the Bernat Satin to the Paton's Silk Bamboo the final hat would be made out of, I knew I would need to reduce the hook size, and perhaps work with 3 strands on the hook instead of 2. Here is how the mock up turned out.
I had originally intended for this to be the outside of the hat, though I figured it would also be reversible. When this side was out, however, I noticed it lay very flat, which I could see as being a potential problem when putting it on. Flipped the other way, however....
... and the post stitches helped keep the hat slightly open. I felt it looked attractive either way, so switching made little difference.
At this point, I didn't even try to put in the keyholes. I just wanted to make sure Gillian could put it on. This time, it worked. Through the size and measurements on the mock up were off, she was able to put it on.
With my new measurements verified, I fleshed out my design sketch with more detail and got started on the final version in the Patons Silk Bamboo. I knew I wanted to go down a hook size, but wasn't sure if I'd increase the number of strands on the hook, too. I ended up sticking to two strands on a 5.50 mm hook.
I started off with a foundation chain slightly shorter than the length I needed, as an edging would be added later, then worked a few increase rows to get it to the measurement I needed. After that, it was just basic front or back post double crochet stitches, starting and ending each row with a half double crochet stitch.
I worked the hood portion, then the scarf flaps (more details later), until I was almost ready to do the keyholes. At that point, I wanted to double check my measurements and see how it would fit on Gillian.
Here's the side view. The edge of the hood is rolling back on itself quite a bit, which gets fixed with the edging, and at this point, she could not put it on by herself. There just wasn't enough substance to the scarf flaps yet. I double checked the length at the back to verify how wide the scarf portion would need to be in total, which also told me how many more rows I'd need to do before working the keyholes.
Here I've verified and marked where the keyholes were going to go. The width of the scarf portion would also determine how large the keyhole openings would need to be. I just had to make sure the centres of the keyholes were at my marks.
I was slightly concerned that it would not hold itself open properly when she tried to put it on. The Silk Bamboo has a completely different drape then the Bernat Satin I used for the mock up. I did expect that, but it was also turning out much heavier than I expected. I was thinking that the hat would collapse under its own weight while being flung over and ending up bunched up behind her head instead. I started to brainstorm some way to add something to the hat later on that would force the hat to stay open, while still being flexible enough to be comfortable, and to bend when the scarf was pulled tight. I wouldn't know if that would be needed until it was done, though.
Time to finish the hat.
Here is the view from the inside, before the edging was done. When the hood portion got to the size I wanted and I started on the scarf portion, I switched from working post double stitches to half double crochet stitches. This made the scarf portion thinner and more flexible than the hood portion.
To work the scarf flaps, after finishing the last row of post stitches, I did a foundation chain of 50 stitches, then worked hdc into the foundation chain and around the bottom of the hood. For the opposite flap, I worked 50 foundation half double stitches.
Here is what it looked like on the outside, with that curling edge waiting to be finished. The first and last stitch of each post row is a half double stitch instead of a post stitch to make working the edge easier. I planned to work one edge stitch into the side of each hdc which, due to the height of the hdc stitches, I knew would cause it to cup slightly. I wanted it to be pulled in a bit to increase facial protection.
A view of the keyhole openings. These were done by working foundation half double stitches. As the scarf portion worked out to be a total of 8 rows of hdc stitches, plus the edging, I made the keyhole openings 10 stitches wide.
Time to work the edging.
Here's how the edged scarf portion fit through the keyhole. Slightly snug, with no gaps. For the edge, I worked single crochet around the edges of the scarf flaps, the base of the hood portion, and part of the hood opening.
The corners were turned with a [1sc, 1ch, 1sc].
To extend the top of the hood slightly, the front of the hood was edged with a few stitches of sc at the bottom, then a few hdc, then joined dc stitches across the top, then matching numbers of hdc and sc back to the scarf portion.
I tried to find a link to explain what a joined dc stitch would be, but can't find one, so I'll do my best to explain it here. It starts with a dc worked as normal.
Yarn over hook (yoh)
insert hook into designated stitch (in this case, around the post of an hdc stitch in the hood)
yoh and draw loop through (3 loops on hook)
yoh and draw through 2 loops (2 loops on hook)
you and draw through 2 loops (1 loop on hook)
To work joined dc
insert hook under one strand of yarn in the post of first dc stitch worked
yoh and draw loop through (2 loops on hook)
insert hook into next designated stitch (around the post of next hdc stitch in the hood)
yoh and draw loop through (3 loops on hook)
yoh and draw through 2 loops (2 loops on hook)
yoh and draw through 2 loops (1 loop on hook)
This will leave a distinctive horizontal bar joining the two stitches. To work the next joined dc, insert hook under this horizontal bar.
yoh and draw loop through (2 loops on hook)
insert hook into next designated stitch
yoh and draw loop through (3 loops on hook)
yoh and draw through 2 loops (2 loops on hook)
yoh and draw through 2 loops (1 loop on hook)
In essence, what is being worked here is a really, really short Tunisian simple stitch, if that helps make any more sense.
After finishing the hat, I tested it out again on myself. Remember my concern about the hat not staying open while being tossed into position? How I was concerned that, between the weight and the drape of the yarn, it would just collapse on itself?
The exact opposite is what happened! When I tossed it up, the hood portion just opened right up and it landed perfectly in place! I did it again, several times, just to make sure it wasn't a fluke, and it was perfect every time!
Time for Gillian to try it out!
Check it out! It worked perfectly for her as well! She had her hair in a ponytail that day, and it fit easily over it. The denser post stitches help hold the shape while the softer hdc stitches in the scarf portion make for more flexibility at base of her head and neck.
She was also able to put the scarf end through the keyhole and pull it tight without any problems. A keyhole in each flap makes it reversible for her, too. The edging tucks in around her face for extra protection against the wind, just as I hoped it would. I am so tickled with how well it worked out! Her choice of yarn was perfect for this. Though the Bernat Satin I used for the mock up would also have worked, it would not have worked as well as the Silk Bamboo did.
Most importantly, Gillian is happy with her new hat, too. :-D
Thursday, November 24, 2011
Quick and Easy Garland
Here's a garland I made up using the new Martha Stewart yarn, Glitter Eyelash.
When I first saw the new line of Martha Stewart yarns, I have to admit I had low expectations for the eyelash yarn. That's because I have low expectation for eyelash yarn in general. I find them a major pain to work with, and heaven help you if you make a mistake and need to undo it!
I was impressed with this yarn, however. First off, there's a nice range of colours with marvelous sparkle to them. Then I actually picked up a ball. I had expected it to be scratchy from the glitter strands, but it was surprisingly soft. I was impressed.
So when I decided to make a last minute decoration for the staff decorated tree at the Michaels I teach at, I picked up a couple of balls in Blue Topaz. I decided to make a garland similar to one I have made before, using glow in the dark yarn.
Once actually working with the yarn, I was again impressed. It was smooth to work with and there was no tangling of any kind. Very nice.
For the garland pictured below, I used a 5.00mm hook and some white yarn I had on hand (Loops and Threads Impeccable) along with the Glitter Eyelash.
To start, make a chain to the desired length. I never measured the final length for this, but I'm guessing it was about 13-15 feet long.
To make a gentle spiral, two stitches are worked into each chain in the foundation.
Start by making a loop by working a sc into the 6th chain from the hook, or whatever number of chains for the size of loop you want. Work 1 hdc in the next ch.
Place a stitch marker at the opposite end of the foundation chain, 7 ch from the end or the number of ch in your loop plus 2.
Work 2 dc into each ch to the marker. Work 1 hdc into the ch the marker is in. Create a loop by working a sc into the next ch and the last chain together.
Fasten off yarn.
Join with Glitter Eyelash into the hdc stitch at either end of the garland. Work 1 sc into each stitch to the hdc at the opposite end.
Fasten off yarn.

When I first started this, I had intended to make a denser glitter row by working 1 ch in between each sc. It was looking great, but used far more yarn than I had. Unfortunately, I had already worked about 1 3/4 balls of Glitter Eyelash before I realized there was no way I had enough to finish the entire garland. I would have needed almost 4 balls to finish it that way (which, by the way, I recommend as a variation. Just make sure you have lots of Glitter Eyelash).
I had to do the one thing I dreaded most with an eyelash yarn. I would need to undo nearly two balls worth.
Much to my surprise, it came undone as smoothly as any basic yarn! There were no tangles at all, no catches, no twisting. It was beautiful!

To store the garland, wrap it around a core of some kind. I used the thick cardboard tube from a package of extra wide aluminum foil. There's a couple of spots of sticky glue where the foil was attached to the tube, which I covered with tape. Just hook the loop around one end of the tube, then wind the garland around it. To fit this garland onto the tube, I had to jam it together pretty tightly. The tube also makes it easier to place the garland on your tree. Just hook a loop onto your tree, then unwind it as you go.
This garland took me about 3 hours to do, including the time it took to rip all the eyelash yarn and work it back up again. This can easily be worked up in a single evening.
As for the Glitter Eyelash yarn from Martha Stewart, I definitely recommend it! It's got great colours, lovely sparkle, a soft texture, is lovely to work with, and is even a delight to undo if you make a mistake. Fantastic stuff!
When I first saw the new line of Martha Stewart yarns, I have to admit I had low expectations for the eyelash yarn. That's because I have low expectation for eyelash yarn in general. I find them a major pain to work with, and heaven help you if you make a mistake and need to undo it!
I was impressed with this yarn, however. First off, there's a nice range of colours with marvelous sparkle to them. Then I actually picked up a ball. I had expected it to be scratchy from the glitter strands, but it was surprisingly soft. I was impressed.
So when I decided to make a last minute decoration for the staff decorated tree at the Michaels I teach at, I picked up a couple of balls in Blue Topaz. I decided to make a garland similar to one I have made before, using glow in the dark yarn.
Once actually working with the yarn, I was again impressed. It was smooth to work with and there was no tangling of any kind. Very nice.
For the garland pictured below, I used a 5.00mm hook and some white yarn I had on hand (Loops and Threads Impeccable) along with the Glitter Eyelash.
To start, make a chain to the desired length. I never measured the final length for this, but I'm guessing it was about 13-15 feet long.
To make a gentle spiral, two stitches are worked into each chain in the foundation.
Start by making a loop by working a sc into the 6th chain from the hook, or whatever number of chains for the size of loop you want. Work 1 hdc in the next ch.
Place a stitch marker at the opposite end of the foundation chain, 7 ch from the end or the number of ch in your loop plus 2.
Work 2 dc into each ch to the marker. Work 1 hdc into the ch the marker is in. Create a loop by working a sc into the next ch and the last chain together.
Fasten off yarn.
Join with Glitter Eyelash into the hdc stitch at either end of the garland. Work 1 sc into each stitch to the hdc at the opposite end.
Fasten off yarn.
When I first started this, I had intended to make a denser glitter row by working 1 ch in between each sc. It was looking great, but used far more yarn than I had. Unfortunately, I had already worked about 1 3/4 balls of Glitter Eyelash before I realized there was no way I had enough to finish the entire garland. I would have needed almost 4 balls to finish it that way (which, by the way, I recommend as a variation. Just make sure you have lots of Glitter Eyelash).
I had to do the one thing I dreaded most with an eyelash yarn. I would need to undo nearly two balls worth.
Much to my surprise, it came undone as smoothly as any basic yarn! There were no tangles at all, no catches, no twisting. It was beautiful!
To store the garland, wrap it around a core of some kind. I used the thick cardboard tube from a package of extra wide aluminum foil. There's a couple of spots of sticky glue where the foil was attached to the tube, which I covered with tape. Just hook the loop around one end of the tube, then wind the garland around it. To fit this garland onto the tube, I had to jam it together pretty tightly. The tube also makes it easier to place the garland on your tree. Just hook a loop onto your tree, then unwind it as you go.
This garland took me about 3 hours to do, including the time it took to rip all the eyelash yarn and work it back up again. This can easily be worked up in a single evening.
As for the Glitter Eyelash yarn from Martha Stewart, I definitely recommend it! It's got great colours, lovely sparkle, a soft texture, is lovely to work with, and is even a delight to undo if you make a mistake. Fantastic stuff!
Sunday, November 20, 2011
At the RAM
Been doing a lot of dashing around in between projects, which has left me wth lots to post about, but little time to actually do the the posting. So I am taking a moment to write this from the Royal Alberta museum, while we pause at the Museum Cafe before heading out.
One of my favourite sections of the museum is in the First Nations area. Specifically, the area showcasing exquisite bead, quill and embroidry work. It's the silk embroidery that really blows me away. The stitchery alone is amazing, with the incredibly perfect technique, design balance and use of colour. That such fine, miniscule stitchery also happens to be stitched directly on thick leather or suede makes me appreciate the skills of the unknown artists even more. It never ceases to blow me away when I look at them!
If you ever find yourself in Edmonton, I highly recommend checking out the RAM and seeing this display. I look forward to seeing how the rework this section when they're new building is built, hopefully to open in 2015.
Happy crafting!
Wednesday, November 16, 2011
Am I in your way?
This month has been particularly hectic for me. Aside from trying to get various craft projects finished, taking on NaNoWriMo and the usual errands, I've found myself running around and aweful lot these days and falling behind.
Oh, and then there's this.
I was working on a custom hat when the kitten we've taken in decided I didn't really need to use my arm after all.
More adoreable kitten pictures here.
Oh, and then there's this.
I was working on a custom hat when the kitten we've taken in decided I didn't really need to use my arm after all.
More adoreable kitten pictures here.
Sunday, November 6, 2011
Special Olympics Canada scarf and pattern
Special Olympics Canada,
Vertical Stripe Scarf
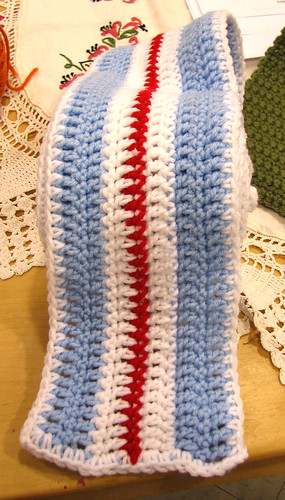
This is an easy scarf design worked in Special OlympicsCanada colours. Donated scarves are
given to all the athletes, their families, coaches and volunteers. Extra scarves are donated to those in need. This scarf is done in just single and double
crochet stitches and can be worked up quickly.
Make a few and donate them to worthy cause!
Yarn: Medium (4) weight acrylic yarn in any blue similar to
the Special Olympics Canada logo, white and maple leaf red.
Hook: 5.00mm
Foundation chain in blue: work a chain about 6 feet in length (about 250 stitches;
I worked mine in 270 stitches for a longer scarf) + 2 for turning chain.
Turning chains are not counted as a stitches in this
pattern.
Row 1: Work dc in third chain from the hook. Continue working Dc to end of foundation
chain. Ch 1. Turn.
Row 2: Sc in each Dc to end.
Ch 2 loosely. Turn.
Row 3: Dc in each Sc to end changing colour to white at last
stitch. Ch 1. Turn.
Row 4: In white, Sc in each Dc to end. Ch 2 loosely.
Turn
Row 5: Dc in each Sc to end, changing colour to red at the
last stitch. Ch 1. Turn.
Row 6: In Red, Sc in each Dc to end, changing to white at
the last stitch. Ch 2 loosely. Turn.
Row 7: In white, Dc in each Sc to end. Ch 1.
Turn.
Row 8: In white, Sc in each Dc to end, changing to blue in
last stitch. Ch 2 loosely. Turn.
Row 9: In blue, Dc in each Sc to end. Ch 1.
Turn.
Row 10: Sc in each Dc to end. Ch 2 loosely.
Turn.
Row 11: Dc in each Sc to end. Finish off and weave in end.
Join white into a right hand corner of either narrow end, in
between the last two Dc on the long side.
Sc into same spot as join. Ch 2
to turn corner. Work 2 Sc around Dc post
on the short edge. Continue working
evenly along edge with 1 Sc into an Sc row and 2 Sc around Dc posts (including
any turning chains) to next corner.
There will be 2 Sc worked around the last Dc post. Ch 2 to turn corner and work 1 more Sc in the
space between the last Dc post worked around and the next Dc stitch on the long
side. There should be 17 Sc between the
Ch 2 spaces, plus one Sc worked on the long side of each corner.
Work Sc in between the Dc stitches to the end of the
scarf. At the end, Ch 2 to turn
corner. Work 17 Sc across the end in the
same manner as at the beginning. Ch 2 to
turn corner and work Sc into the space between the last Dc post worked around
and the next Dc. Continue working Sc in
between the Dc stitches to the end, slip stitching into the beginning Sc.
Finish off yarn and weave in ends.
Special Olympics Canada - Tunisian scarf
It took me a while, but I finally finished the scarf I was making for Special Olympics Canada Winter Games, and here it is!

I was able to use my Denise Interchangable Crochet Hooks for the first time for this project. It's the first time I've ever seen an 8mm hook, so that's the size I chose to make this. I worked it using a Tunisian double crochet, however I worked the hook as with the Tunisian Stockinette stitch, in between the vertical bars from front to back instead of the front only. Between the size of the hook and the stitch, it made for a very open fabric.
Tunisian stitch naturally tends to go on the diagonal, which can be blocked straight. I used that tendancy as part of the design, instead.
I'm really happy with how it turns out, but would never do a scarf like this again! With all the colour changes, there were so many ends to work in; two for every band of colour for a scarf that ended up being more than 6 feet long! Not an easy thing to hide and anchor all those ends in such an open design.
I'm happy with how it turned out, though, and I hope whoever recieves it enjoys it. :-)
I was able to finish a second scarf before I finished stitching this one. I will be writing that one up as a free pattern in another post.
Michaels and Blankets for Canada
What a terrific afternoon we had today!
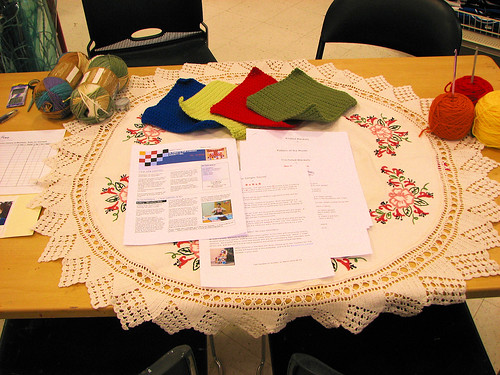
I was able to set up a display at a table near the door, happy to use the embroidered and crocheted cloth I inherited as part of the display. I picked up some variegated yarn to work with and set out 4 of the 5 panels I've done so far, with extra hooks and yarn at the ready. I was joined by three lovely ladies and would have loved to go longer than the time I was allotted. We got so busy crocheting and chatting, I completely forgot to try and get the group photo I had planned on!
Remember, 8"x8" panels for Blankets for Canada can be dropped off at any Michaels. I will be organizing a joining party for the end of Jan/start of Feb at the Clareview branch to help piece the donated squares together into blankets.
Have fun stitching!
Saturday, November 5, 2011
Blankets for Canada
Just a quick reminder that Michaels, Discover Knit and Crochet and Blankets for Canada have their event this Sunday, from 1-3pm. Stop by the Edmonton, Clareview location and join me, making panels for Blankets for Canada. We'll be using medium (4) weight yarn and 5.00 mm hooks and needles. I hope to see you there!
Wednesday, November 2, 2011
Temari - finishing the 16 point star
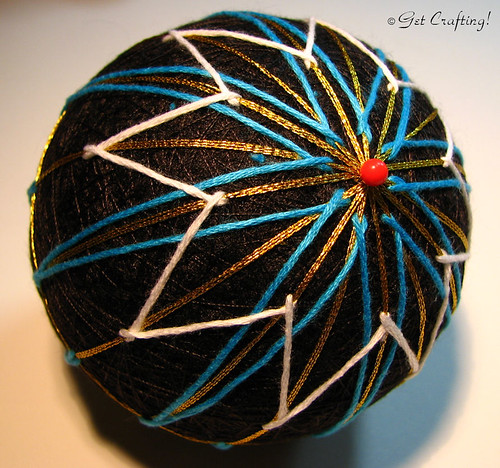
Now that the initial 8 pointed star is worked, it's time to start the overlapping star, then add more colours.
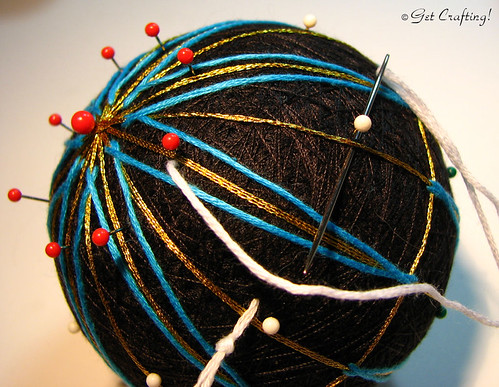
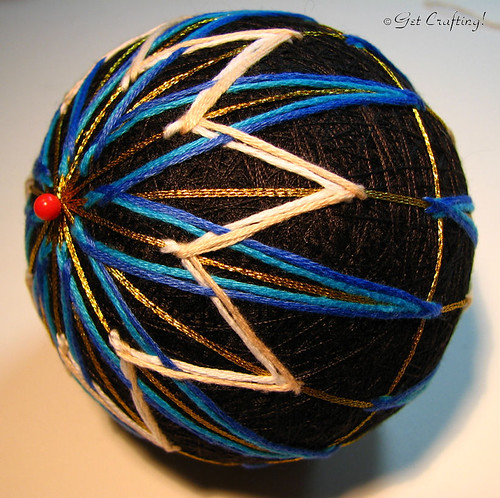
For the overlapping star, I chose to use white and a pale beige. The needle is brought up next to one of the pins in the inner ring, to the left of the guideline, then brought down to the next guideline's pin in the outer ring.
Continue working around the mari, removing the pins as you go.
After working 1 round, finish off the thread. Repeat on the other side of the mari.
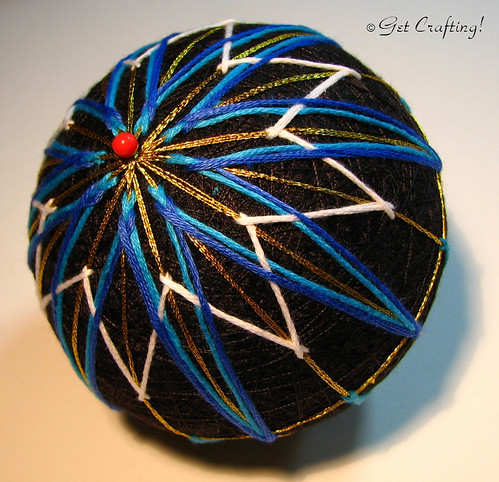
Go back to the first, elongated star and add a round in the next colour; in this case a darker blue. After one round, finish off the thread and repeat on the other side.
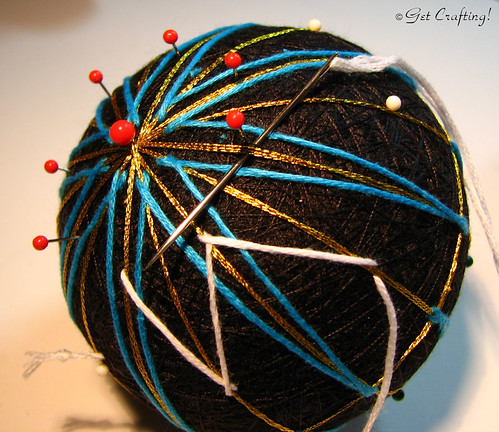
Work a second round of colour in the shorter overlapping star.
Continue working the pattern by adding another round of floss in the light blue to the elongated star, then another round in white in the overlapping star. Complete these rounds on both hemispheres.
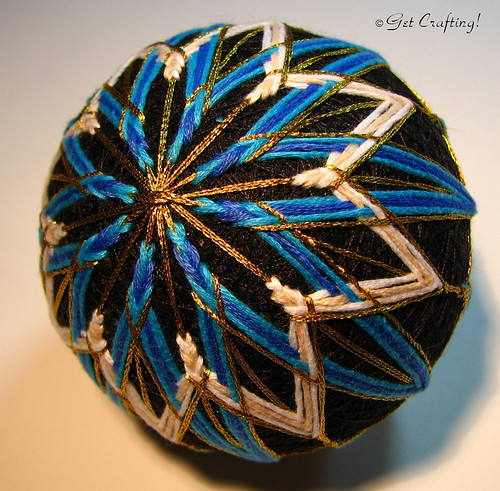
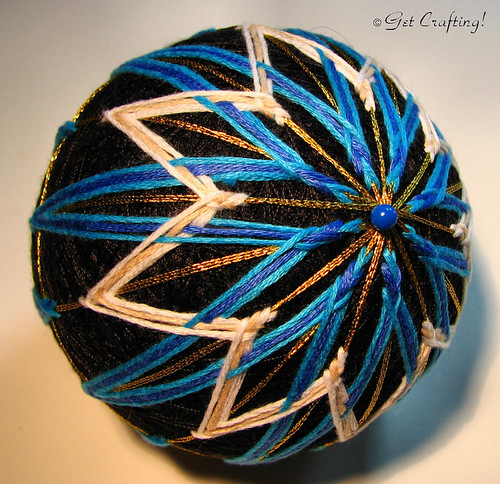
Switch to the metallic thread (3 strands on the needle) and work around all 16 points in both hemispheres to finish the temari.
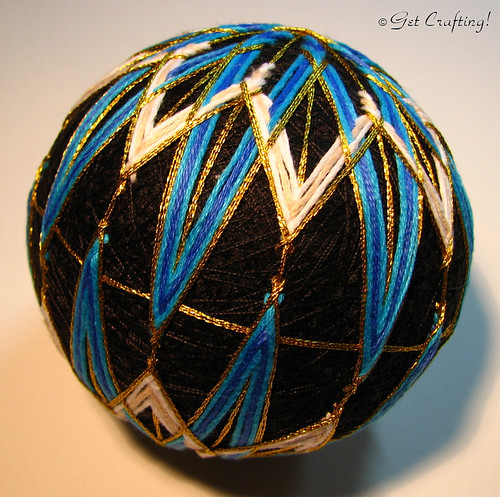
Here's a look at the point overlapping at the equator.
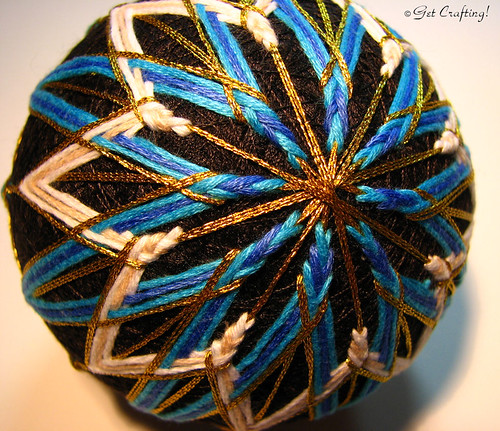
Another view of the finished temari.
This one got a hanger as well. I chose to braid lengths of the dark blue, white and cold threads to make a cord to tie into a loop.
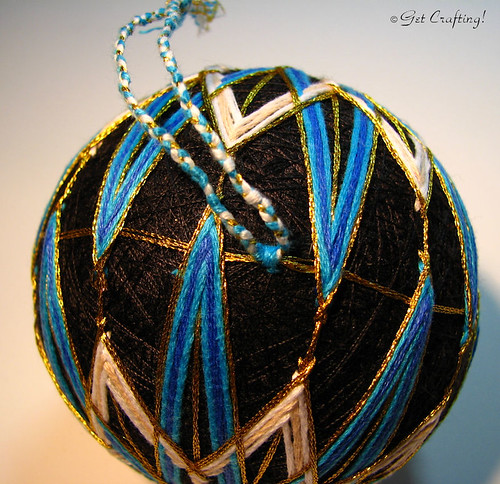
The loop got sewn in place at the equator, between a pair of points.
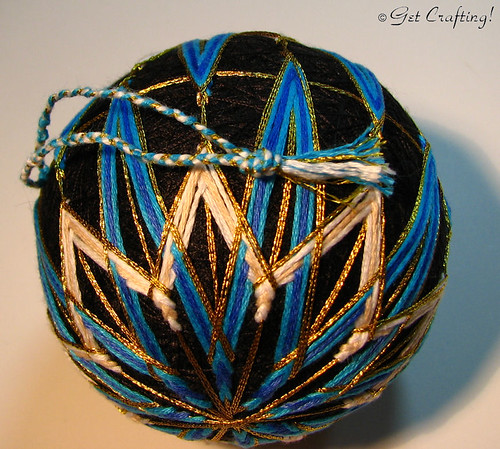
With the knotted end trimmed and fringed.
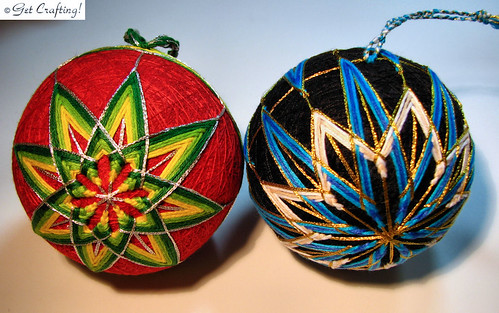
The two finished temari.
The interesting thing about temari is that it doesn't take much to get completely different looks. These two patterns are basically the same thing; a pair of overlapping stars. Changes in colour and the location of the inner and outer points can change the finished result dramatically, even though they are essentially worked the same way.
I hope these photos will be useful for you to make your own temari. Later on, I will be doing versions with more centres.
For the overlapping star, I chose to use white and a pale beige. The needle is brought up next to one of the pins in the inner ring, to the left of the guideline, then brought down to the next guideline's pin in the outer ring.
Continue working around the mari, removing the pins as you go.
After working 1 round, finish off the thread. Repeat on the other side of the mari.
Go back to the first, elongated star and add a round in the next colour; in this case a darker blue. After one round, finish off the thread and repeat on the other side.
Work a second round of colour in the shorter overlapping star.
Continue working the pattern by adding another round of floss in the light blue to the elongated star, then another round in white in the overlapping star. Complete these rounds on both hemispheres.
Switch to the metallic thread (3 strands on the needle) and work around all 16 points in both hemispheres to finish the temari.
Here's a look at the point overlapping at the equator.
Another view of the finished temari.
This one got a hanger as well. I chose to braid lengths of the dark blue, white and cold threads to make a cord to tie into a loop.
The loop got sewn in place at the equator, between a pair of points.
With the knotted end trimmed and fringed.
The two finished temari.
The interesting thing about temari is that it doesn't take much to get completely different looks. These two patterns are basically the same thing; a pair of overlapping stars. Changes in colour and the location of the inner and outer points can change the finished result dramatically, even though they are essentially worked the same way.
I hope these photos will be useful for you to make your own temari. Later on, I will be doing versions with more centres.
Subscribe to:
Posts (Atom)