With next week's Feature Friday falling in Good Friday (I may not be posting that day), I thought it would be fun to pass on some ideas for decorating Easter eggs.
For a lot of people - especially living where I do - the first thing that comes to mind when it comes to decorated Easter eggs are Ukrainian Easter eggs. The wax resist style of egg decorating, however, is common to the entire region, each with their own traditional designs, as well as common symbols and themes. Here are some other samples.
Hungarian
Polish (wood eggs)
Lithuanian
Romanian
German (egg tree)
Russian
Czech
I'm sure I'm missing many others!
Wax resist is just one way to prepare eggs for baskets. Eggs can be dyed with basic food colouring, plus there are a variety of natural dyes that can be used as well. A favorite of mine is making kraszanki, dyed with onion skins. This year, I'd like to try my hand at making drapanki with some of them.
A range of materials can be used to dye eggs in various colours. Different methods will give some lovely results.
Eggs can also be beaded, or carved. Here are a couple of beaded eggs I made, plus a couple of temari eggs.
For some lovely peeled eggs, I like to make Dragon's Eggs, a variation of tea dyed eggs. The eggs are first boiled for about 15 minutes, then allowed to cool until they can be handled. The back of a spoon is then used to gently crack the shells all over before they are returned to a pot of water, together with:
3 T black tea
1 T Chinese five-spice powder
1/2 C soy sauce
1 tsp sugar
The eggs are then cooked for another 3 hours.
Have fun trying some of these ideas out!
Friday, March 26, 2010
Tuesday, March 23, 2010
Easter card step-by-step: part five
On to the final assembly!
For this, I went out and bought some spray glue. Just some generic multi-purpose stuff, nothing fancy. I needed the more delicate parts of the design to adhere to the backing paper, and spray adhesive is the best way to do that.
First, I had to protect my surfaces.
Photo
I taped two sheets of paper to my work surface. The back of the card is slipped under one and the card's crease was jammed right up against it, so that no adhesive gets on the back. The other paper is to protect my work surface.
Photo
The corners would be affixed first, with small blasts of adhesive, trying not to spray too much of the design area.
Photo
Spraying, then placing each corner one at a time, I carefully used the guidelines I'd pencilled in before to position the pieces, smoothing them out to make sure they were well adhered.
Photo
Then I closed the card so they wouldn't stick to the paper underneath. You can see a faint outline of the spray glue on the paper
Photo
Positioning the green backing was done differently. First, after making sure the card's crease was tight against the protective paper, I made sure the green backing was lined up with the design. A new sheet of paper was placed on the other side to cover the spray adhesive from the corners.
Photo
After carefully opening the card to make sure the green paper didn't shift, I covered it with another piece of scrap paper, so the only surface to get sprayed would be the back of the cut design. This time, I made sure the entire back was evenly sprayed.
Photo
Then I carefully removed the paper covering the green backing paper and gently closed the card before smoothing out the front of the card against the backing. I paid extra attention to the thinnest, most delicate parts of the design to make sure they hadn't been shifted or damaged in any way.
Photo
Finally, the finished card!
Photo
All it needs now is to write something inside. I left the card standing up for a while, giving the adhesive time to set and dry for a permanent bond.
Easter card step-by-step: part 4
Finally, after much delay, I've finished the Easter card I started! I'd lost access to my work space. :-P You can click on the following links to recap what I did previously.
Part One
Part Two
Part Three
Because of the number of photos I took, I'm splitting this up into two more parts.
(Unfortunately, the new blogger layout is still buggy, and the image shows up as code. I will put links to the images instead until I figure this out)
Photo
The first thing I worked on was adding the embossing powder to the dark green background paper. I didn't need to get fancy with positioning, as I just needed to push the green paper into the crease of the closed card and it stayed in place fine on its own. I went with silver embossing powder, for its higher contrast, and because the predominant colour on the white portion of the card is the gold.
After using the calligraphy pen and clear ink to make my lines, I removed the backing paper and added the embossing powder.
Photo
The corner pieces needed a bit more work. After careful positioning and a bit of masking tape to hold the pieces where they needed to go, I numbered the backs in sequence, then lightly penciled in some lines around the edges, so I could position them properly later on.
Photo
Here they are, positioned and ready for the clear ink.
Unfortunately, the extra time it took to remove the inked pieces and remove the masking tape was a bit too long. Less of the embossing powder stuck to the drying ink that usual. Since the petal openings are so small, though, it actually worked out a bit better, I think.
Photo
Here are the pieces after heat was applied. They sure don't look like much all on their own! *L*
Photo
While doing the green paper, I unfortunately had a bit of an accident. The paper slipped out of my fingers and fell face down onto the ironing board I was working above, smudging the still-liquid embossing powder, which you can see in this photo. I used a bit more of the clear in and some more powder to fix it. It's a bit messier than it should be. :-P
Next up: assembling the pieces.
Monday, March 22, 2010
Crochet hand bag - part three
Part one
Part two
These days, I tend to carry very little. Gone are the days of bags as big as suitcases, where I kept everything under the sun, including spare diapers and a change of clothes for the kids. *L* Now, I have my phone, my keys, and a few cards, which I usually keep in my jacket pocket when I go out. If, however, I don't have pockets, I need only a small bag, and I still want easy access to those core items.
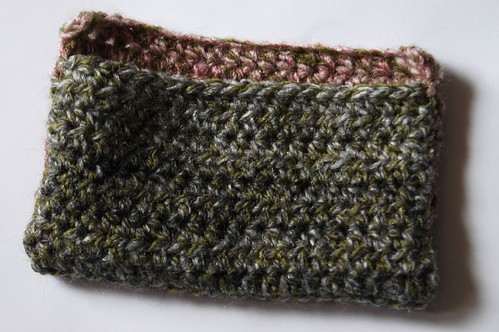
With the phone problem solved, I turned to a holder for my cards. I actually keep them in old bus pass holders, so that's what I used for my measurement. I made a simple rectangle using hdc stitches that would be folded off centre to make a pocket slightly larger than my card holder.
Here's what the front looks like.
Having the back slightly taller than the front makes for easier access.
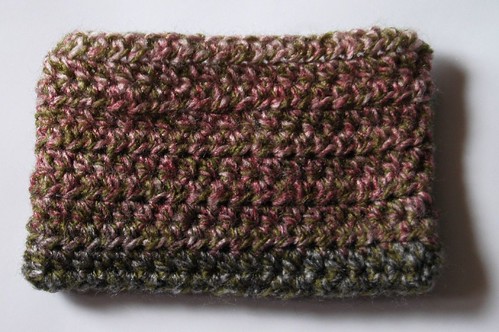
The colour change ended up being on the back.
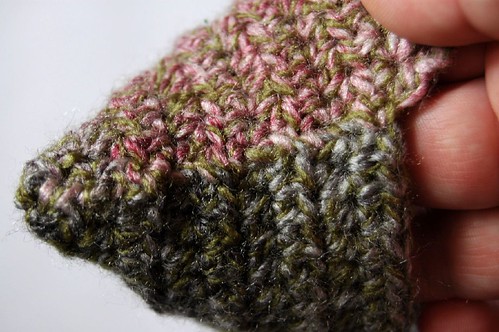
There are two ways I could have done up the sides. I could have stitched it on the outside, making a very flat pocket, or on the inside, where the seam would actually hold the sides apart slightly once flipped rightside out, giving the pocket depth. I decided to do with depth. Here, I'm showing what the whip stitched inside seam looks like.
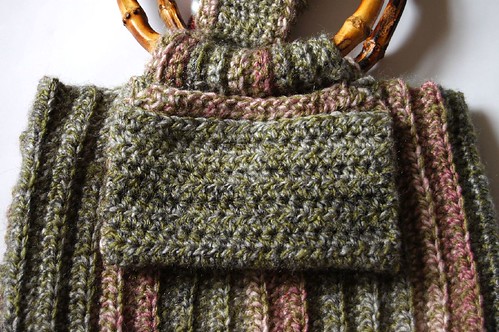
In attaching the pocket to the bag, I only tacked it in place at the top corners. The width happened to put the corners at the transition area of hdc to sc in the handle strap, so I used my stitches to strengthen that area slightly. Technically, you can see the stitches from the outside, but with the colours matching, you'd really have to be looking for them.
There is the finished bag, except for the liner, which I wasn't sure I was going to make yet. You can also see how much yarn I have left of the 1 ball I bought. This project turned out to be the perfect size for it.
After testing the bag out with the various items I would use it for, I decided it did need a liner after all. My keys would poke out between the stitches, and I didn't want that. So I went digging into our linen closet, searching through our bits and pieces of fabric, to find something suitable. What I found was some fabric my daughter had bought for something else entirely, and she generously said I could use it. :-D
Using the bag itself to measure, I cut a strip slightly wider than the bag, and about twice the length. I hand stitched the liner because I didn't think it was worth digging out and setting up the sewing machine for such a small project. *L* After sewing up the side seams, I basted the top hem in place before tucking it into the bag. I lined up the seams and corners, pinned the edges in place, slightly below the actual top edge of the bag, then flipped the bag inside out (which flipped the liner outside in) to make stitching easier. I used a blind hem stitch to sew it in place. I couldn't find my black sewing thread, so I hid the thread I did use in the yarn of the bag's body. Once it was stitched in place, I removed the basting stitches.
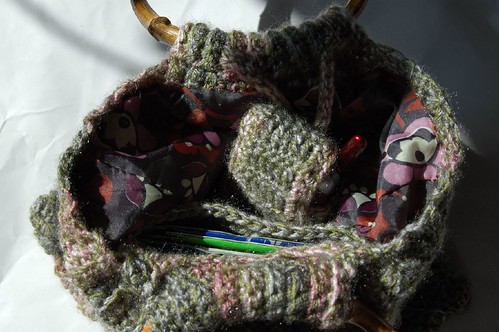
Here's the inside of the finished bag.
I'm rather pleased with the finished result. It was a good project to highlight the yarn, too.
Part two
These days, I tend to carry very little. Gone are the days of bags as big as suitcases, where I kept everything under the sun, including spare diapers and a change of clothes for the kids. *L* Now, I have my phone, my keys, and a few cards, which I usually keep in my jacket pocket when I go out. If, however, I don't have pockets, I need only a small bag, and I still want easy access to those core items.
With the phone problem solved, I turned to a holder for my cards. I actually keep them in old bus pass holders, so that's what I used for my measurement. I made a simple rectangle using hdc stitches that would be folded off centre to make a pocket slightly larger than my card holder.
Here's what the front looks like.
Having the back slightly taller than the front makes for easier access.
The colour change ended up being on the back.
There are two ways I could have done up the sides. I could have stitched it on the outside, making a very flat pocket, or on the inside, where the seam would actually hold the sides apart slightly once flipped rightside out, giving the pocket depth. I decided to do with depth. Here, I'm showing what the whip stitched inside seam looks like.
In attaching the pocket to the bag, I only tacked it in place at the top corners. The width happened to put the corners at the transition area of hdc to sc in the handle strap, so I used my stitches to strengthen that area slightly. Technically, you can see the stitches from the outside, but with the colours matching, you'd really have to be looking for them.
There is the finished bag, except for the liner, which I wasn't sure I was going to make yet. You can also see how much yarn I have left of the 1 ball I bought. This project turned out to be the perfect size for it.
After testing the bag out with the various items I would use it for, I decided it did need a liner after all. My keys would poke out between the stitches, and I didn't want that. So I went digging into our linen closet, searching through our bits and pieces of fabric, to find something suitable. What I found was some fabric my daughter had bought for something else entirely, and she generously said I could use it. :-D
Using the bag itself to measure, I cut a strip slightly wider than the bag, and about twice the length. I hand stitched the liner because I didn't think it was worth digging out and setting up the sewing machine for such a small project. *L* After sewing up the side seams, I basted the top hem in place before tucking it into the bag. I lined up the seams and corners, pinned the edges in place, slightly below the actual top edge of the bag, then flipped the bag inside out (which flipped the liner outside in) to make stitching easier. I used a blind hem stitch to sew it in place. I couldn't find my black sewing thread, so I hid the thread I did use in the yarn of the bag's body. Once it was stitched in place, I removed the basting stitches.
Here's the inside of the finished bag.
I'm rather pleased with the finished result. It was a good project to highlight the yarn, too.
Crochet hand bag - part two
Part one.
I spent a bit of time trying to decide what sort of phone pouch to make, and how I wanted it to be attached to the bag. For the pouch itself, I wanted a rather snug pocket that still had enough give that I could put it in and take it out easily. I decided I also wanted to have a flap closure to reduce any risk of the phone falling out. As for attaching it to the bag, I wanted more flexibility, and was trying to think of a way I could use it both inside and outside the bag.
Here's what I came up with, designed to fit my very basic Telus LG phone.
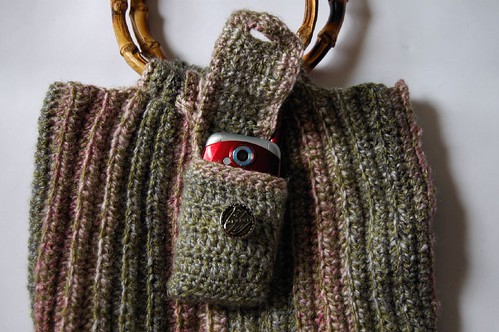
I started by making a flat base that more or less matched the bottom of my phone. Still using a 4.0mm hook, I started with an 8 ch foundation, plus 1 ch for turning. I did 2 rows of sc, but at the end of the second row, I turned the corner using (1 sc, 1 ch, 1 sc) in one stitch, then continued using sc around the remaining 3 sides. I then started the sides by doing a round of sc in the back loops only, skipping the 1 ch in each corner entirely, which worked out to a total of 24 stitches. Turning at each round, I did 1 more round of sc, then began alternating between dc and sc rounds until I reached the height I wanted, which was shorter than the actual height of my phone, finishing on a sc round. I turned and continued the pattern to make a flap that was narrower than the phone itself. In this case, the turning area happened to be in the right spot to start the flap. If it hadn't been, I would have ss'd a stitch or two to get to where I wanted. The flap turned out to be 10 stitches wide.
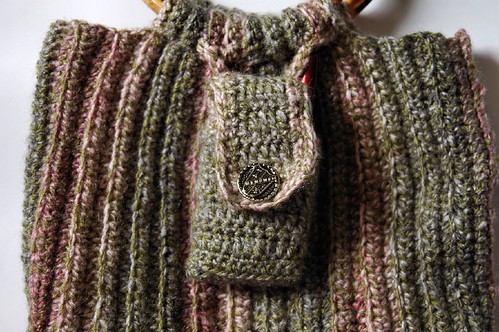
For the length of the flap, kept repeating the pattern until, with the phone in the pouch, it was just short of where I wanted to put a button. For the last row, I did 2 sc, 6 sc foundation chain, 2 sc to create a button hole to fit the button I'd already chosen from my daughter's stash. I then turned the corner (1 sc, 1 ch, 1 sc again), then followed the entire opening in sc to finish. Putting the phone in the bag, I worked out where to place the button, then sewed it in place.
To attach the phone, I first made a chain of the length I wanted, then ss back down the length of it to strengthen the ch and reduce stretch. I wove the resulting strap into first row of dc in the flap, then tacked the ends very thoroughly onto the inside of one of the handle straps, just above the stitching of the strap to the body. I can leave the phone hanging inside, as it is in this rather unfortunate photo, or it can be passed through the opposite handle. In that position, it does double duty. The phone, and its button closure, is easily accessible from the outside, while it holds the bag closed.
The only down side of this arrangement is that the weight of the phone does off-balance the bag a bit - the handle it's attached to tends to sag inwards when I try to access the inside. It's better than if I'd attached it to the side of the bag itself, though, as the handle adds extra support.
Once again, I could have called the purse finished here, but I still had some yarn left! So I decided to make an inside pocket.
On to part three! :-D
I spent a bit of time trying to decide what sort of phone pouch to make, and how I wanted it to be attached to the bag. For the pouch itself, I wanted a rather snug pocket that still had enough give that I could put it in and take it out easily. I decided I also wanted to have a flap closure to reduce any risk of the phone falling out. As for attaching it to the bag, I wanted more flexibility, and was trying to think of a way I could use it both inside and outside the bag.
Here's what I came up with, designed to fit my very basic Telus LG phone.
I started by making a flat base that more or less matched the bottom of my phone. Still using a 4.0mm hook, I started with an 8 ch foundation, plus 1 ch for turning. I did 2 rows of sc, but at the end of the second row, I turned the corner using (1 sc, 1 ch, 1 sc) in one stitch, then continued using sc around the remaining 3 sides. I then started the sides by doing a round of sc in the back loops only, skipping the 1 ch in each corner entirely, which worked out to a total of 24 stitches. Turning at each round, I did 1 more round of sc, then began alternating between dc and sc rounds until I reached the height I wanted, which was shorter than the actual height of my phone, finishing on a sc round. I turned and continued the pattern to make a flap that was narrower than the phone itself. In this case, the turning area happened to be in the right spot to start the flap. If it hadn't been, I would have ss'd a stitch or two to get to where I wanted. The flap turned out to be 10 stitches wide.
For the length of the flap, kept repeating the pattern until, with the phone in the pouch, it was just short of where I wanted to put a button. For the last row, I did 2 sc, 6 sc foundation chain, 2 sc to create a button hole to fit the button I'd already chosen from my daughter's stash. I then turned the corner (1 sc, 1 ch, 1 sc again), then followed the entire opening in sc to finish. Putting the phone in the bag, I worked out where to place the button, then sewed it in place.
To attach the phone, I first made a chain of the length I wanted, then ss back down the length of it to strengthen the ch and reduce stretch. I wove the resulting strap into first row of dc in the flap, then tacked the ends very thoroughly onto the inside of one of the handle straps, just above the stitching of the strap to the body. I can leave the phone hanging inside, as it is in this rather unfortunate photo, or it can be passed through the opposite handle. In that position, it does double duty. The phone, and its button closure, is easily accessible from the outside, while it holds the bag closed.
The only down side of this arrangement is that the weight of the phone does off-balance the bag a bit - the handle it's attached to tends to sag inwards when I try to access the inside. It's better than if I'd attached it to the side of the bag itself, though, as the handle adds extra support.
Once again, I could have called the purse finished here, but I still had some yarn left! So I decided to make an inside pocket.
On to part three! :-D
Crochet hand bag - part one
Ever since I picked up my hooks again, I've been eyeballing self-striping yarn. The brand I wanted to try was more expensive than I could justify getting, and now it's discontinued. Oh, well.
Another brand has popped up, though. Red Heart Collage. The price is pretty decent, so I picked up a ball to experiment with, choosing Landscape Green, though I was pretty torn between that and Wood Trail and Crimson Maple.
The yarn is made up of 2 strands. The primary colour - in this case a green - is a strand that stays the same throughout. The second strand has the graduated colour change. With this colourway, it ranged from pinks to greens to a pale, almost blue-green. It's a combination that's gone over rather well with everyone in our household.
It's a 100% acrylic yarn which, unfortunately, you can feel. There's a very slight scratchiness to it. Certainly better than many acrylics, but not quite the best, either. Care instructions are warm water wash, gentle cycle, and drier on low. The recommended hook size is 5.50mm or 6mm. The weight is rated as a 4, medium. One ball has 218 yards/200m
So I found myself with a single ball of yarn, and needing a project to use it for. I wanted to do something that would show off the self-striping effect, so I didn't want any fancy stitches or patterns to distract. I also didn't want to make something I'd wear, because of the slight scratchiness it has. It would probably be find in a hat, but I didn't like the idea of that texture around my neck in a scarf, for example.
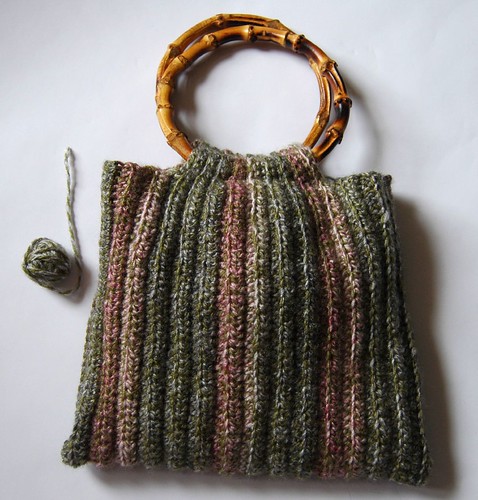
After hemming and hawing and digging through my craft supplies, I decided to make use of a pair of round bamboo handles I picked up at the Reuse Centre some time ago. I would make a small hand bag, worked vertically, using only hdc and sc stitches. Since I still wanted some texture, without detracting from the yarn itself, I decided on using the back loops only. I figured the resulting texture would accentuate the self-striping even more.
It worked our rather well, I think. :-D Here is my step by step process.
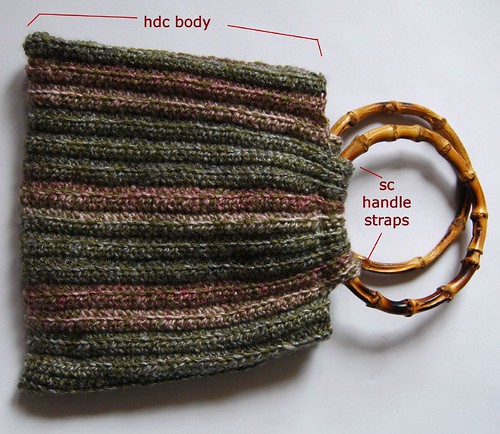
Here is the mostly finished bag. The body is worked in one piece, folded in half. I chose to use a 4.0mm hook to tighten up the resulting fabric, and I'm glad I did. I found the yarn didn't have a consistent width, and actually got rather thin at points, so using the smaller than recommended hook size was much more practical for a hand bag, where I wanted a sturdier fabric.
I started out with a foundation chain of 100 (leaving a long strand to sew up the side seam later), but felt it looked too long for what I wanted, and not quite in proportion to the size of handle rings I had. I brought it down to 75 stitches, and was much happier with it. So the foundation chain for this purse was 75 ch, plus 2 for turning.
The first 6 rows were done in hdc. In the 6th row, I chained another 11, turned, did 10 sc (turning chains are not counted in this project), went back to hdc for the 75 stitches of the body, then did 10 sc foundation chain to extend the handle strap. (Here's a good video tutorial on how to do that, though when I didn't work them into both loops of the foundation chain, as is demonstrated).
Counting that first row with sc in it, I did a total of 18 rows with the handle strap. On the last one, I ss'd 10 stitches back to the hdc section, then continued the 75 hdc body area for another 6 rows, finishing with a long strand of yarn left behind to sew up the side seam.
To sew up the side seams, I decided to go with a whip stitch instead of my usual choice, which is ss'ing the sides together.
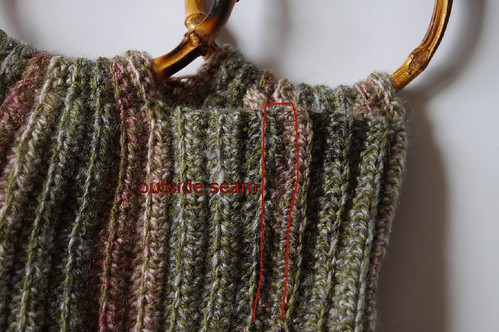
Here's what the side seam looks like from the outside. I chose this seam because you can actually see the stitches, due to the colour change. The other seam was pretty much invisible, and I found myself later having to look for it, even when working from the inside.
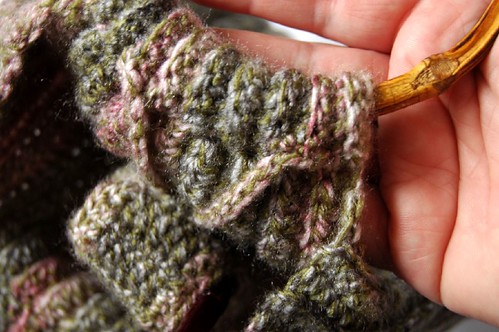
The next step was to attach the handles.
In retrospect, for the width of the handles I had, I probably should have made the sc handle straps slightly longer. It would at least have made sewing them around the handles a bit easier. On the other hand, I do like the snug fit. If I were to extend it, it wouldn't be by more than 2 stitches.
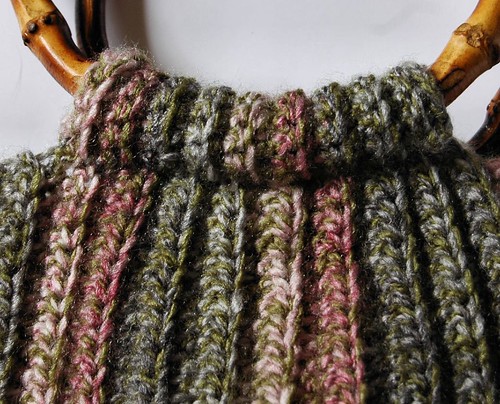
Like the side seams, I chose to whip stitch the handle straps in place, being careful to keep the stitches on the inside only, so they wouldn't be visible from the outside. With the colour change in the yarn, I didn't want to have horizontal colour changes visible on a vertical pattern. As you can see in this photo, it worked. The handles are securely attached, and there are no visible stitches on the outside.
I am quite happy with how the yarn looks. The colour change was more subtle than I expected, based on the project photo on the label, which I'm happy with.
I could have called the bag finished at this point, and just added a liner. I still had plenty of yarn, though, so I decided to add a pouch to hold my cell phone. I'll go through that in my next post.
Another brand has popped up, though. Red Heart Collage. The price is pretty decent, so I picked up a ball to experiment with, choosing Landscape Green, though I was pretty torn between that and Wood Trail and Crimson Maple.
The yarn is made up of 2 strands. The primary colour - in this case a green - is a strand that stays the same throughout. The second strand has the graduated colour change. With this colourway, it ranged from pinks to greens to a pale, almost blue-green. It's a combination that's gone over rather well with everyone in our household.
It's a 100% acrylic yarn which, unfortunately, you can feel. There's a very slight scratchiness to it. Certainly better than many acrylics, but not quite the best, either. Care instructions are warm water wash, gentle cycle, and drier on low. The recommended hook size is 5.50mm or 6mm. The weight is rated as a 4, medium. One ball has 218 yards/200m
So I found myself with a single ball of yarn, and needing a project to use it for. I wanted to do something that would show off the self-striping effect, so I didn't want any fancy stitches or patterns to distract. I also didn't want to make something I'd wear, because of the slight scratchiness it has. It would probably be find in a hat, but I didn't like the idea of that texture around my neck in a scarf, for example.
After hemming and hawing and digging through my craft supplies, I decided to make use of a pair of round bamboo handles I picked up at the Reuse Centre some time ago. I would make a small hand bag, worked vertically, using only hdc and sc stitches. Since I still wanted some texture, without detracting from the yarn itself, I decided on using the back loops only. I figured the resulting texture would accentuate the self-striping even more.
It worked our rather well, I think. :-D Here is my step by step process.
Here is the mostly finished bag. The body is worked in one piece, folded in half. I chose to use a 4.0mm hook to tighten up the resulting fabric, and I'm glad I did. I found the yarn didn't have a consistent width, and actually got rather thin at points, so using the smaller than recommended hook size was much more practical for a hand bag, where I wanted a sturdier fabric.
I started out with a foundation chain of 100 (leaving a long strand to sew up the side seam later), but felt it looked too long for what I wanted, and not quite in proportion to the size of handle rings I had. I brought it down to 75 stitches, and was much happier with it. So the foundation chain for this purse was 75 ch, plus 2 for turning.
The first 6 rows were done in hdc. In the 6th row, I chained another 11, turned, did 10 sc (turning chains are not counted in this project), went back to hdc for the 75 stitches of the body, then did 10 sc foundation chain to extend the handle strap. (Here's a good video tutorial on how to do that, though when I didn't work them into both loops of the foundation chain, as is demonstrated).
Counting that first row with sc in it, I did a total of 18 rows with the handle strap. On the last one, I ss'd 10 stitches back to the hdc section, then continued the 75 hdc body area for another 6 rows, finishing with a long strand of yarn left behind to sew up the side seam.
To sew up the side seams, I decided to go with a whip stitch instead of my usual choice, which is ss'ing the sides together.
Here's what the side seam looks like from the outside. I chose this seam because you can actually see the stitches, due to the colour change. The other seam was pretty much invisible, and I found myself later having to look for it, even when working from the inside.
The next step was to attach the handles.
In retrospect, for the width of the handles I had, I probably should have made the sc handle straps slightly longer. It would at least have made sewing them around the handles a bit easier. On the other hand, I do like the snug fit. If I were to extend it, it wouldn't be by more than 2 stitches.
Like the side seams, I chose to whip stitch the handle straps in place, being careful to keep the stitches on the inside only, so they wouldn't be visible from the outside. With the colour change in the yarn, I didn't want to have horizontal colour changes visible on a vertical pattern. As you can see in this photo, it worked. The handles are securely attached, and there are no visible stitches on the outside.
I am quite happy with how the yarn looks. The colour change was more subtle than I expected, based on the project photo on the label, which I'm happy with.
I could have called the bag finished at this point, and just added a liner. I still had plenty of yarn, though, so I decided to add a pouch to hold my cell phone. I'll go through that in my next post.
Friday, March 19, 2010
Friday Feature: reveling in geekdom
I am unashamedly a geek, nerd and technophile. Clearly, I am not alone! This week I will feature one of my favorite blogs. Geek Crafts; Where Geek and Crafts Collide.
Maintained by three people I'd love to sit down and share a non-denominational beverage with, this wonderful blog features crafts of all types. The only thing they have in common is that they all celebrate geekdom.
Are you a Firefly fan? You'll find amigurumi, cross stitch, models and more. Doctor Who? Pick your doctor, and you're sure to find something. Want to make a tardis or a dalek? You'll be inspired. Star Wars? Star Trek? They're there, and so many more.
Perhaps you'd like to check out a coffee molecule messenger bag, an embroidered map of Endeavor's de-orbit or Carl Sagan etched in glass? This is the place for you!
Are zombies, cthulu or monsters are more your thing? You'll be right at home.
Do you like gaming? You'll find plenty of your favorite games, new and old, represented.
I've found so many cool artists, crafters, blogs and websites through here, many of which I visit almost every day for inspiration.
Embrace your inner crafting geek and check it out! You'll be glad you did. :-D
Saturday, March 13, 2010
Friday Feature: Mariella's Unusual Fantasy Funny Animals
Yes, yes, I know... today is Saturday, not Friday. A day late and a dollar short. Make that more than $200 short. My monitor up and died a couple of days ago and we weren't able to replace it until yesterday. Ouch.
So here is the Friday Feature that should have been posted yesterday, and once again, I am featuring a crochet artist.
Allow me to introduce you to the amazing Mariella's Unusual Fantasy Funny Animals - aka MUFFA. Here's a sample of her work.
Amazingly, Mariella Vitale doesn't make these with a magnifying glass. She works with sewing thread and tiny hooks - think 0.50mm. Assembly requires the finest of sewing needles and dental floss, the plies of which she separates by hand. One of the magazines that has featured her work is Interweave Crochet (spring 2009 issue).
As someone who's merely dabbles in thread crochet so far, Mariella's work just blows me away. Making her creations is one thing, but some, like the tiny bear featured above, are fully articulated. Head and limbs all move!
Mariella, you're awesome!
So here is the Friday Feature that should have been posted yesterday, and once again, I am featuring a crochet artist.
Allow me to introduce you to the amazing Mariella's Unusual Fantasy Funny Animals - aka MUFFA. Here's a sample of her work.

Amazingly, Mariella Vitale doesn't make these with a magnifying glass. She works with sewing thread and tiny hooks - think 0.50mm. Assembly requires the finest of sewing needles and dental floss, the plies of which she separates by hand. One of the magazines that has featured her work is Interweave Crochet (spring 2009 issue).
As someone who's merely dabbles in thread crochet so far, Mariella's work just blows me away. Making her creations is one thing, but some, like the tiny bear featured above, are fully articulated. Head and limbs all move!
Mariella, you're awesome!
Wednesday, March 10, 2010
Easter card step-by-step: part 3
On to the next steps of the Easter card I'm making.
First up was choosing the background colour. I had a couple of packages of 8 1/2 x 11 cardstock with 10 colours. Five of them were "gem" paper, and had a metallic sort of finish to one side. With the girls to help me decide, I slipped one of each colour into the card to see which we liked best. In the end, I decided to go with two colours.
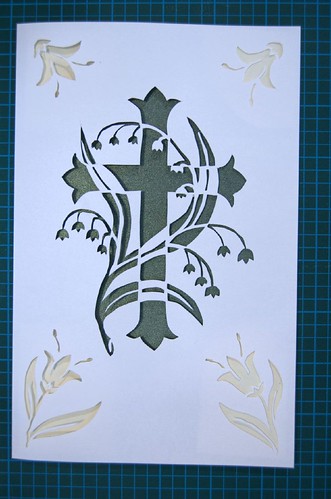
The dark green is a sheet of the glittery "gem" paper, while the corners are in plain cardstock in an off white. The corner pieces are cut just large enough to fit behind the cut outs, while the green piece was cut to just under the dimensions of the card. They're not fixed yet, as I'll need to be able to take them in and out, but when I'm done with them, I'll find a way to glue the corner pieces in place, then affix the green paper, which will cover the entire inside back of the cut area, covering up the small pieces of paper in the process. I'm still thinking of what to use to attach them. Ideally, I'd use a spray glue, but I don't have any. I think it would be worthwhile to go looking for some.
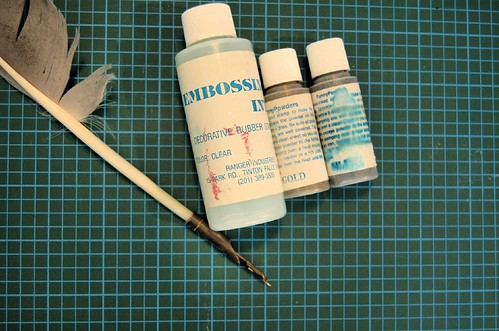
Next, my tools and materials. Yes, I have a real goose-quill calligraphy pen; a Christmas present from my wonderfully thoughtful family. (The nib on the quill in this photo is not the one I ended up using.) While the quill pen worked wonderfully, any fine pointed object can do the job. I seem to recall using a blunt ended tapestry needle the first time I tried this, ages ago.
The embossing ink is a refill for stamp pads. It, and the embossing powders, are actually quite old and I wasn't sure how they'd work out. I'd gone looking for more of the ink refill bottles but found nothing. In talking to a very helpful staff member at DeSerres, I was told that ox gall would work, as well as ordinary gelatin from the grocery store. As long as it could absorb into the paper well, and not dry too quickly, it would do that job.
For the embossing powders, I chose gold and silver, though there are a wide variety of colours available these days. Most craft stores have a decent selection.
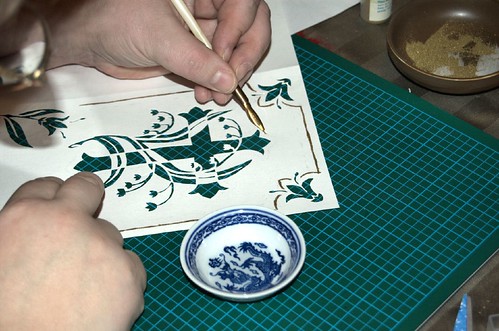
Courtesy of my daughter, here's a shot of me using the quill to apply the embossing ink. Yes, there is ink in that tiny little bowl! In this shot, I'd already done the outer lines and applied heat to melt the powder. I wanted to test it out as quickly as I could - if this part failed the entire card would be ruined. I don't have one of those little hand held heat guns that are available now, so I used my iron as a heat source to melt the embossing powder.

Once the lines were drawn in the clear ink, I put some paper under the card to catch the excess embossing powder, then sprinkled it over the ink. Once the lines were covered, I used a soft paintbrush I borrowed from my daughter to first brush the powder over any lines that looked like they could use some more. After tipping the card to tap off the excess powder, I used the brush again to take off any left behind. The powder is so fine, it sticks to everything! Once the excess powder was off, it was off to the hot iron.
I originally tried holding the iron over the embossing powder, but that didn't seem to do much of anything. I was also concerned that I'd accidentally touch the surface. I don't want embossing powder on my iron. What ended up working was to hold the iron with its heated surface up, then laying the back of the paper right on it. The iron doesn't get hot enough to burn paper, but there's enough heat to melt the powder through the paper. Not ideal, but better than using the burners on my oven, which I've done in the past. ;-)
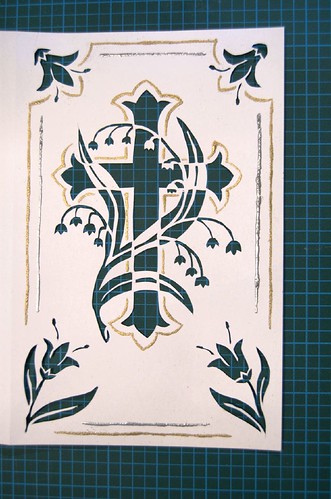
All done with this portion of the card! I am keeping things simple on the surface, as I will be using embossing powder on the background paper for more details.
First up was choosing the background colour. I had a couple of packages of 8 1/2 x 11 cardstock with 10 colours. Five of them were "gem" paper, and had a metallic sort of finish to one side. With the girls to help me decide, I slipped one of each colour into the card to see which we liked best. In the end, I decided to go with two colours.
The dark green is a sheet of the glittery "gem" paper, while the corners are in plain cardstock in an off white. The corner pieces are cut just large enough to fit behind the cut outs, while the green piece was cut to just under the dimensions of the card. They're not fixed yet, as I'll need to be able to take them in and out, but when I'm done with them, I'll find a way to glue the corner pieces in place, then affix the green paper, which will cover the entire inside back of the cut area, covering up the small pieces of paper in the process. I'm still thinking of what to use to attach them. Ideally, I'd use a spray glue, but I don't have any. I think it would be worthwhile to go looking for some.
Next, my tools and materials. Yes, I have a real goose-quill calligraphy pen; a Christmas present from my wonderfully thoughtful family. (The nib on the quill in this photo is not the one I ended up using.) While the quill pen worked wonderfully, any fine pointed object can do the job. I seem to recall using a blunt ended tapestry needle the first time I tried this, ages ago.
The embossing ink is a refill for stamp pads. It, and the embossing powders, are actually quite old and I wasn't sure how they'd work out. I'd gone looking for more of the ink refill bottles but found nothing. In talking to a very helpful staff member at DeSerres, I was told that ox gall would work, as well as ordinary gelatin from the grocery store. As long as it could absorb into the paper well, and not dry too quickly, it would do that job.
For the embossing powders, I chose gold and silver, though there are a wide variety of colours available these days. Most craft stores have a decent selection.
Courtesy of my daughter, here's a shot of me using the quill to apply the embossing ink. Yes, there is ink in that tiny little bowl! In this shot, I'd already done the outer lines and applied heat to melt the powder. I wanted to test it out as quickly as I could - if this part failed the entire card would be ruined. I don't have one of those little hand held heat guns that are available now, so I used my iron as a heat source to melt the embossing powder.
Once the lines were drawn in the clear ink, I put some paper under the card to catch the excess embossing powder, then sprinkled it over the ink. Once the lines were covered, I used a soft paintbrush I borrowed from my daughter to first brush the powder over any lines that looked like they could use some more. After tipping the card to tap off the excess powder, I used the brush again to take off any left behind. The powder is so fine, it sticks to everything! Once the excess powder was off, it was off to the hot iron.
I originally tried holding the iron over the embossing powder, but that didn't seem to do much of anything. I was also concerned that I'd accidentally touch the surface. I don't want embossing powder on my iron. What ended up working was to hold the iron with its heated surface up, then laying the back of the paper right on it. The iron doesn't get hot enough to burn paper, but there's enough heat to melt the powder through the paper. Not ideal, but better than using the burners on my oven, which I've done in the past. ;-)
All done with this portion of the card! I am keeping things simple on the surface, as I will be using embossing powder on the background paper for more details.
Saturday, March 6, 2010
Easter card step-by-step: part 2
Now we're down to the nitty gritty! :-D
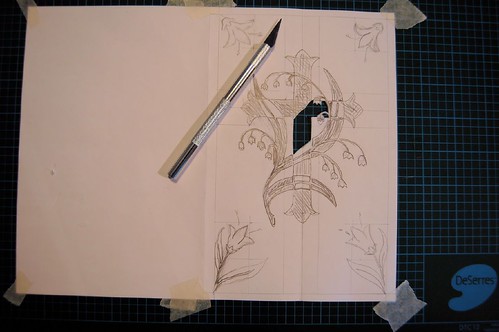
When cutting designs out, it helps to start from the middle and work outwards. It also helps to do the finer details first. Here, I'm doing both.
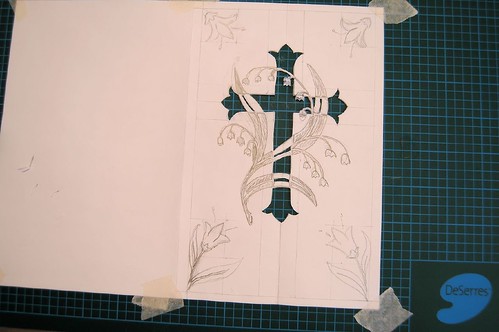
The cross is now completely cut out, leaving behind the overlapping portions of the flower parts.
The areas where stems and leaves overlapped tended to leave sections of the design rather fragile. There's going to be a backing used, though, so I'm not too worried about it. I'll just have to be careful until the backing is attached permanently.

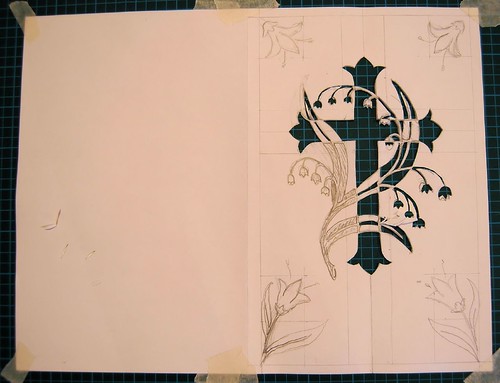
Here, all the cutting is done, and the sketched paper is still in place. With a less intricate design, I would have lightly drawn directly onto my cutting paper, then carefully erased the pencil when I was done. This design has just too many little pieces that would have been damaged by any attempt to erase.
In the past, I've taken advantage of some of the great fonts available by printung out text I wanted to cut into my design, then taping the printed paper over the cutting paper, just as I did here. It saved a lot of time and hassle.
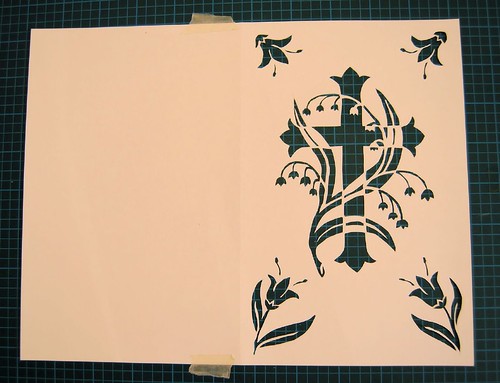
Time to remove the sketched paper, and there's my design, nice and clean. :-D
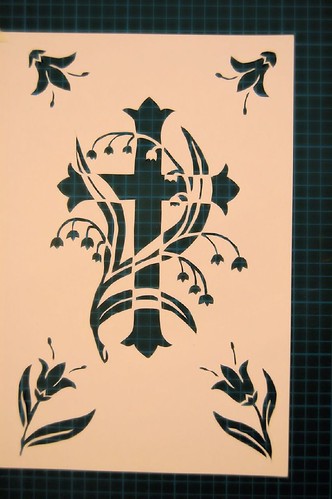
A closer view of the finished cutting. If you want to see the detail better, click on any of the images to get to my flickr page, where you can view larger images.
That's as far as I'm doing today. For now, the card has been carefully folded closed and placed into an envelope until I can get to the decorative details.
When cutting designs out, it helps to start from the middle and work outwards. It also helps to do the finer details first. Here, I'm doing both.
The cross is now completely cut out, leaving behind the overlapping portions of the flower parts.
The areas where stems and leaves overlapped tended to leave sections of the design rather fragile. There's going to be a backing used, though, so I'm not too worried about it. I'll just have to be careful until the backing is attached permanently.
Here, all the cutting is done, and the sketched paper is still in place. With a less intricate design, I would have lightly drawn directly onto my cutting paper, then carefully erased the pencil when I was done. This design has just too many little pieces that would have been damaged by any attempt to erase.
In the past, I've taken advantage of some of the great fonts available by printung out text I wanted to cut into my design, then taping the printed paper over the cutting paper, just as I did here. It saved a lot of time and hassle.
Time to remove the sketched paper, and there's my design, nice and clean. :-D
A closer view of the finished cutting. If you want to see the detail better, click on any of the images to get to my flickr page, where you can view larger images.
That's as far as I'm doing today. For now, the card has been carefully folded closed and placed into an envelope until I can get to the decorative details.
Easter card step-by-step: part 1
I admit it. Since we started using the internet regularly, back in '95 or '96, I've stopped mailing out cards. I haven't stopped sending them altogether - I do make a digital Christmas card every year and send it out by email. Otherwise, holidays, birthdays, etc. get their well wishes sent by email. This way, I actually sent these notes out - with snail mail, I tended to forget doing it completely.
My parents, however, don't have a computer. Every year, my mother sends us Christmas and Easter cards, and I never send any back. Phone calls don't quite cut it.
I decided to change that this year.
I've looked at commercial cards, and am not too taken by any of them. So I'm making one. It's going to involve a number of different techniques, starting with papercutting, and I started working on it today.
I planned the card out a while ago, with the help of one of my daughters, while we were out spending some quality time together. ;-) We scrawled the basic ideas out on a napkin, which I did keep, but it seems to have been thrown out. That's okay. I remember it well enough. :-D
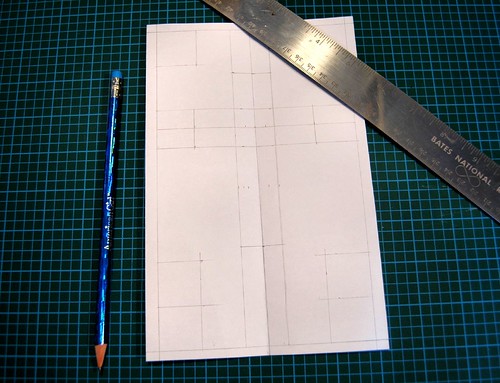
Here, I've got a very basic layout marked out with guidelines on some ordinary printer paper folded in half.
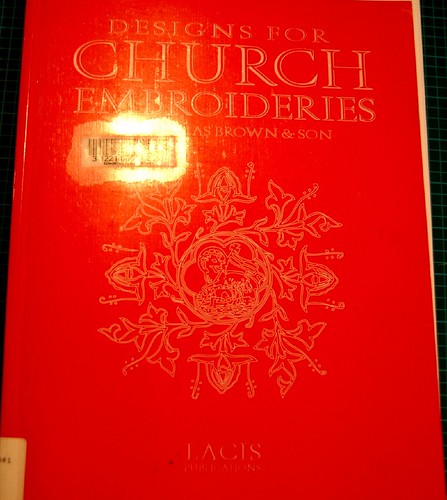
Since this is a religiously theme card, I turned to this book I found in the library for inspiration.
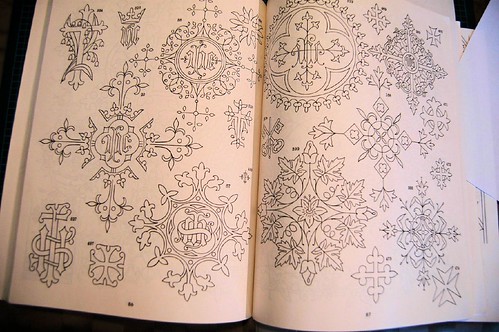
The pages are filled with simple line drawings of embroidery patterns for vestments, alter cloths, banners, etc. I ended up choosing the pattern in the top left corner of these pages.
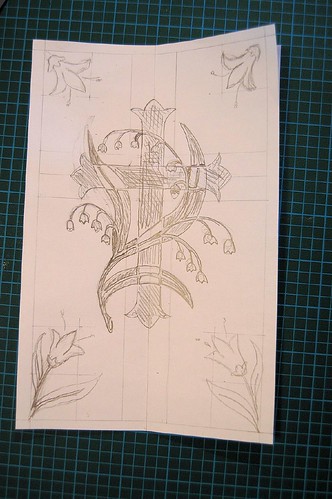
Then it was time to start sketching. After a simple outline sketch of all the elements, I spent more time working out what areas where the flower and cross overlap would be cut out, and which would be cut around, shading in the areas that would be cut out I didn't bother going that far with the corner designs, as I could work those out while cutting.
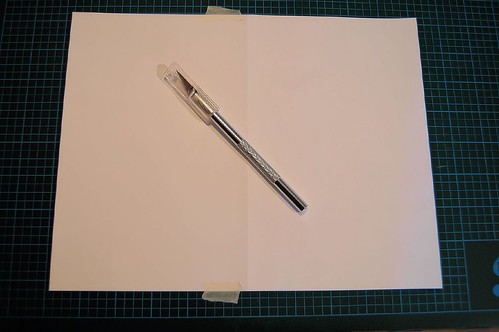
The card paper I'm using is actually designed for use in a printer - 8 1/2" x 11" card stock paper, pre-scored to fold in half, with matching envelopes. Here, I've taken a sheet and taped it directly to my self-healing cutting mat. Normally, I would never do this, as I would need to be able to move the paper around while cutting. Since I'm not sketching the design directly onto the card paper itself, I'll have to make do with moving the entire mat around. I was also careful to place the tape just off the area I'll be cutting in, and just enough to hold it in place, so as not to risk damaging the paper's surface.
As an aside, if you're thinking of trying paper cutting, a self healing mat is a necessity. Yes, you can get away with using something else for a while. When I first started paper cutting, I used cardboard as a cutting surface. It sucks. The mats are available in crafts stores, but most of them are ridiculously expensive. I found mine at DeSerres, which has them at excellent prices. Office supply stores carry them, too, at very reasonable prices.
Also necessary is an Xacto type cutting knife. With scapbooking such a popular craft right now, there are lots of styles of cutting knives available, but there's no need to get fancy and expensive. As long as it's got a fine tip and it's sharp, it's good enough.
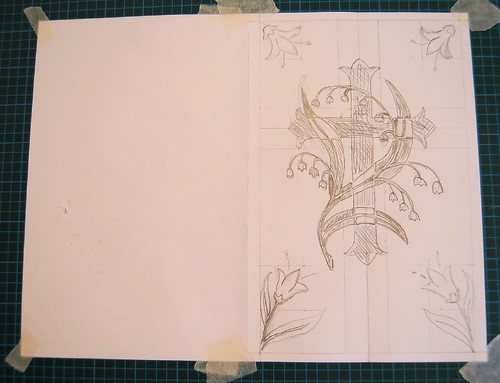
For the last step I'll be showing in this post, I've opened up the paper I drew the design on, then carefully taped it on top of the card paper, making sure all the edges lined up. Here, I've taped it down much more thoroughly, so there'd be no chance of the two pages mis-aligning.
Next post, time to start cutting!
My parents, however, don't have a computer. Every year, my mother sends us Christmas and Easter cards, and I never send any back. Phone calls don't quite cut it.
I decided to change that this year.
I've looked at commercial cards, and am not too taken by any of them. So I'm making one. It's going to involve a number of different techniques, starting with papercutting, and I started working on it today.
I planned the card out a while ago, with the help of one of my daughters, while we were out spending some quality time together. ;-) We scrawled the basic ideas out on a napkin, which I did keep, but it seems to have been thrown out. That's okay. I remember it well enough. :-D
Here, I've got a very basic layout marked out with guidelines on some ordinary printer paper folded in half.
Since this is a religiously theme card, I turned to this book I found in the library for inspiration.
The pages are filled with simple line drawings of embroidery patterns for vestments, alter cloths, banners, etc. I ended up choosing the pattern in the top left corner of these pages.
Then it was time to start sketching. After a simple outline sketch of all the elements, I spent more time working out what areas where the flower and cross overlap would be cut out, and which would be cut around, shading in the areas that would be cut out I didn't bother going that far with the corner designs, as I could work those out while cutting.
The card paper I'm using is actually designed for use in a printer - 8 1/2" x 11" card stock paper, pre-scored to fold in half, with matching envelopes. Here, I've taken a sheet and taped it directly to my self-healing cutting mat. Normally, I would never do this, as I would need to be able to move the paper around while cutting. Since I'm not sketching the design directly onto the card paper itself, I'll have to make do with moving the entire mat around. I was also careful to place the tape just off the area I'll be cutting in, and just enough to hold it in place, so as not to risk damaging the paper's surface.
As an aside, if you're thinking of trying paper cutting, a self healing mat is a necessity. Yes, you can get away with using something else for a while. When I first started paper cutting, I used cardboard as a cutting surface. It sucks. The mats are available in crafts stores, but most of them are ridiculously expensive. I found mine at DeSerres, which has them at excellent prices. Office supply stores carry them, too, at very reasonable prices.
Also necessary is an Xacto type cutting knife. With scapbooking such a popular craft right now, there are lots of styles of cutting knives available, but there's no need to get fancy and expensive. As long as it's got a fine tip and it's sharp, it's good enough.
For the last step I'll be showing in this post, I've opened up the paper I drew the design on, then carefully taped it on top of the card paper, making sure all the edges lined up. Here, I've taped it down much more thoroughly, so there'd be no chance of the two pages mis-aligning.
Next post, time to start cutting!
Friday, March 5, 2010
Feature Friday - WooWork
I'm going to try something new. Every Friday, I'm going to write a post featuring an artist, blog, craft, etc. that has caught my attention.
For my first Feature Friday, I would like to call your attention to the fabulously talented Howie Woo and his blog, WooWork. (He also has a flickr site well worth visiting, and is on facebook, too.)
I discovered this blog by following a link from another blog some months ago. It was to one of his Fridge Critter posts, and I've been hooked ever since! (no pun intended)
There are a lot of amigurumi creators out there, but WooWork really stands out. The items he makes are incredibly imaginative, his posts are humorous and often touching, as well. I love his writing style and quirky humour. His photos, illustrations and videos are always excellent. I even find myself looking forward to what new colour he'll have in his hair! *L* It doesn't hurt that, having lived in the Vancouver area before, with friends in and around the city, I recognise some of the places he talks about or features in his photos.
After following his blog for a while, I not only appreciate the artistic talent and craftsmanship of this artist, but I feel like Howie would be a person I'd love to spend a day hanging out with!
So, for my first Feature Friday, I heartily recommend spending some time at WooWork. It's well worth the visit!
Subscribe to:
Posts (Atom)