Pages

Monday, November 30, 2009

Dazzling Dahlia


pin
Originally uploaded by amkb

Here's a pin I made using the pattern, Dazzling Dahlia, in the Fall 2009 issue of Crochet Magazine.

There were a few changes I made. The metallic yarn I used was Phildar Sunset, which is about the same size as the superfine recommended. What I can't understand is how they used the recommended 3.5mm hook for this! I ended up using one of my much smaller thread crochet hooks. I think I ended up using a 2.35mm hook, but I can't remember exactly. It may have been a 1.5mm - I had several false starts, trying out different hook sizes, before I settled on one.

The Sunset yarn is a pain to work with - constantly splitting, catching and slipping. Especially when I tried to use the larger hook size. the end result is worth it, though.

Sunday, November 29, 2009

Ear warmers

Well, I've been busy for the last while. I'd been preparing for my first ever craft sale this past weekend. It was just a small sale within the housing co-op we live in - I didn't know until I set up my table that they hadn't even advertized it outside the co-op. I sold enough to pay for the materials I bought to make the stuff, plus a bit of profit, so that's encouraging.

One of the things that went over well is an ear warmer design I came up with for my husband. He's the sort that can't really wear hats, because his head overheats. He needs to keep his ears protected, though, because he gets massive earaches if the wind gets into them (a problem I have, too). Since he likes to walk to work every now and then, good ear protection is important this time of year. I tried a couple of different ideas before coming up with the pattern I'm happy with, and here's the final result.

Earwarmer

The yarn I'm using for these is Lion Brand Wool Ease Thick & Quick super bulky (6) yarn. I really enjoy working with this yarn! The hook size I used is a 9.00mm, and it's made using sc in the back loop only. Whatever size yarn is used, the narrow band at the forehead should be about 4 inches wide and about 6 or 7 inches long, depending on whether it's adult or child sized.

Hmmm... I'm doing this backwards. It actually starts in the middle of the back. More on that later.

Earwarmer

The ear flap at its widest point is twice the width of the forehead band, and about 2/3 the length. The row closest to the forehead band, however, is shortened by a stitch to give it a bit of a curve when it's finished.

Earwarmer

The back was the final tweak that made all the difference in this design. One of my husband's complaints about a prototype he tested for me was that the band would ride up at the back, and his ears would get uncovered. To solve that, I made it narrower at the back. The pattern starts in the middle of the back, is about half an inch wider than the forehead band (approx. 4 1/2-5 inches), and gradually increased to the full ear flap width.

So with the super bulky yarn, that meant I started at the back with 3 rows 8 sc wide, increased at one side of the next 4 rows to 12sc, did 7 rows at 12sc, reducing to 11sc in the 8th row, then doing rows of 6sc for the forehead band. There are 12 rows in the forehead band and, after the last row, I added a 5 ch foundation to work the 11 sc row of the ear flap, did another 7 rows at 12 sc, reduced over the next rows back down to 8sc, doing a total of 3 rows of 8sc to finish. If using a thinner yarn, just make sure the dimensions match, with one half being a mirror image of the other, and there is an even number of rows in total, so that the hills and valleys line up properly at the end.

To finish, I ss the two ends together, then did a round of sc around the edge with 1 sc into the end of each row. Then I cut and finished off the yarn, and re-attached on the other side to do another round of sc along the outer edge. There are no extra stitches when turning the corner at the ear flap (the 11sc row). This way, the flap hugs around the ear, keeping out all drafts. The woman who bought this earwarmer in particular wore it while out walking her dog. She came back to the sale to tell me how much she loved it - it really does the job!

Monday, November 16, 2009

Pretty cluster hat

cluster-stitch-hat

Here's a simple little hat I made by experimenting with a cluster stitch. The yarn is the same I used for the mittens I made during my crochet blitz. It's a lovely yarn to work with (and the colour in this photo is more accurate than the one of the mittens) and I definately want to use it again.

The pattern was pretty basic. Using a 6.50mm hook, I made a flat disk of double crochet until the crown was the width I wanted. After 1 more round of dc, without increases, I switched to doing clusters. For the first round I skipped 3 stitches, then did 4 dc in one. For the remaining rounds, I worked the 4 dc in between the 2nd and 3rd dc of the previous cluster. When it was as long as I wanted, I did a round of sc into the top of each dc, then made the ribbed cuff by alternating front and back post dc.

With a nice, chunky yarn like this, the hat was very quick to make up. I think I finished it in about an hour, maybe an hour and a half with interruptions. ;-)

Showpiece feature: beadwork vest


Vest detail
Originally uploaded by amkb

My daughter and I had another day at the museum, and this time, I brought along my monopod. It allowed me to finally get some decent pictures of some of my favourite pieces in the Aborigional display, though I still ended up on ISO1600, so they're pretty grainy.

This is a detail from a vest that always amazes me when I see it. You can see the rest of it here. The front panels are completely covered in solid beads! This technique uses lengths of pre-strung beads laid out in the pattern, then tacked into place from underneath. Most pieces I've seen using this technique have little spaces in between the beads where the tacking stitches are, but I see no sign of them here.

A lot of planning and skill went into making this, and I'm sure it was proudly worn by its original owner.

I wonder how much it weighs?

Saturday, November 7, 2009

Bobble cap

bobble-cap

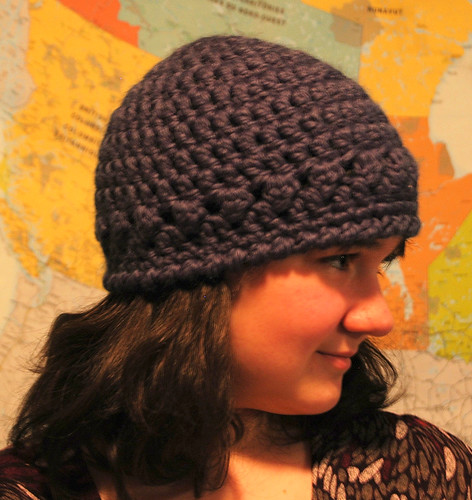
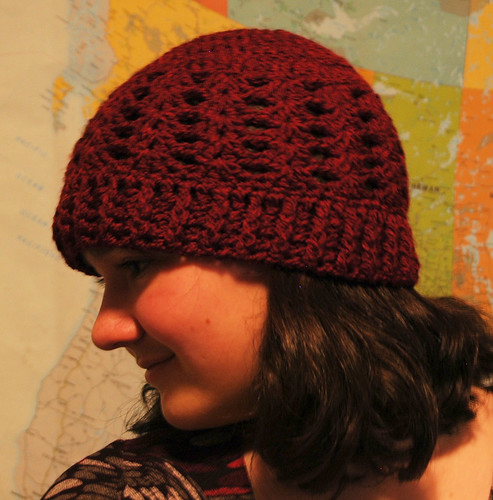
This was a simple and quick cap that I really enjoyed making. The yarn is Lion Brand Wool Ease Thick and Quick in Denim. I find I really like this yarn to work with.

All but the last round is done with a 9.00mm hook. The last round was done with a 10.00mm hook.

Bobbles are clusters of 3 double crochet together (dctog)

I've never written out a detailed pattern of anything I've done before, so if I've made any errors, please let me know.

1st round - 8dc in magic ring join with ss

2nd round - sc into same spot as ss and ch 2 (counts as 1 dc now and throughout). 1 dc into same spot. 2dc into top of next 7 stitches. ss into 2nd stitch of ch 2 (16 stitches)

3rd round - sc into same spot as ss and ch 2. 1 dc into same spot. 1 dc into next stitch. * 2 dc into next stitch, then 1 dc. Repeat from * to end. ss into second stitch of ch 2 (24 stitches)

4th round - sc into same spot as ss and ch 2. 1 dc into same spot. 1 dc into next 2 stitches. *2 dc, 1 dc, 1 dc into next 3 stitches. Repeat from * to end. ss into second stitch of ch 2 (32 stitches)

5th round - sc into same spot as ss and ch 2. 1 dc into same spot. 1 dc into next 3 stitches. * 2dc, 1 dc, 1dc, 1dc into next 4 stitches. Repeat from * to end. ss into second stitch of ch 2 (40 stitches)

6th round - sc into same spot as ss and ch 2. 1 dc into each stitch to end. ss into second stitch of ch 2 (40 stitches)

7th and 8th rounds - repeat round 6

9th round - sc into same spot as ss and chain 2. YOH, insert hook into same stitch, bring up loop, YOH, pull yarn through 2 loops (two loops remain), YOH, insert hook into same stitch, bring up loop, YOH, pull yarn through 2 loops, (3 loops remain), YOH, pull yarn through all loops. Cluster made: equals 3 dctog. *ch 1, skip 1 st, 3 dctog into second stitch. Repeat from * to end, finishing with a ss into top of first cluster (second stitch of ch 2). (20 clusters)

10th round - sc into same spot as ss and chain 2. 1 dc into ch 1 space. * 1 dc into top of cluster, 1 dc into ch 1 space. Repeat from * to end. ss into second stitch of ch 2. (40 stitches)

11th round - sc into same spot as ss and chain 1. 1 sc into each stitch to end. ss into ch 1 (40 stitches)

Switch to 10 mm hook
12th round - sc into same spot as ss and chain 1. Reverse single crochet into each stitch to end. ss into ch 1. Finish off with large tapestry needle

Finish off tail of magic ring by pulling it tight to close up the ring, then using a tapestry needle to weave the tail around the ring another time or two before snipping off.

Friday, November 6, 2009

Vision hat


vision-hat
Originally uploaded by amkb

I've finally taken some photos of the projects I've made so far, though unfortunately, none are very good. Ah, well.

Here, my daughter is modelling the crocheted Vision Hat, so called because the origional pattern called for Vision yarn from Coats and Clark. I didn't have any. This yarn is Bernat Alpaca Natural Blends. It's a bulky yarn (5), 70% acrylic, 30% alpaca, hand wash, lay flat to dry. It's a lovely yarn to work with, and really quite inexpensive for an alpaca. It's soft, light and warm to wear, and the pattern has a really comfortable stretch to it.

The pattern is available for free here.

Thursday, November 5, 2009

Showpiece: loomed quill work

Today I'll hopefully get photos taken of my latest projects. Until then, here's another showpiece from the Royal Alberta Museum.

DSC_6930-50%

This amazing piece of work is a baby belt - a long strap used to support a baby too big for a cradleboard on the back. This piece was made with a loom and dyed porcupine quills, edged with beads. I think the whole thing was about 5 feet long - long enough to reach from one shoulder, down around the baby's bottom, and back up to the opposite shoulder. The ends were then tied in front.

The work is so beautifully precise, and the piece is in excellent condition.