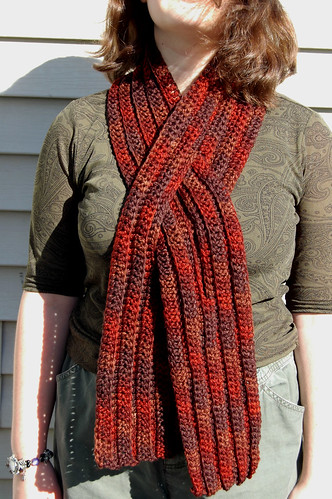
I've seen designs for scarves with a split to put the end through around, but haven't seen a pattern for one yet. So I made one up.
The yarn used is Bernat Softee Chunky in Terra Cotta Mist. 100% acrylic; machine wash and dry. The colours are actually a lot brighter in the photo than it is in reality - that bright sunshine really brings the colours out. It's really soft and warm.
The hook I used was a 5.50mm
This pattern would be very easy to modify. I chose to put in 2 slits, but it can be made with just one on one side, or none at all.
Using the Softee Chunky yarn (2 balls) and 5.50mm hook, this is how I made this scarf.
Chain 160 + 2
1st row: working into the BACK of the chain, work 1dc into the 3rd loop from the hook. Do not count turning chain here and throughout. Continue working dc into the back of each chain to end. Ch 2 and turn.
Remaining rows are worked in back loops only.
2nd row: work dc into each stitch to end. Ch 2 and turn
repeat for rows 3 and 4 if making a split scarf. If skipping the splits, repeat to desired width and finish off.
* (see note below) Count 30 dc from the end. Place a marker in the 31st stitch. Counting the marked stitch, count 18 dc and place a marker on the 18th stitch. Repeat on other end.
5th row: Work dc into the first 30 stitches, stopping just before the marker. Ch 18. Continue dc after second marker to skip 18 stitches. Dc to stitch before next marker. Ch 18. Continue dc from stitch after last marker to end. Ch 2 and turn (don't forget that the dc are still all worked in the back loop)
6th row: Dc to end. At the chains, dc into the chain, not around. Ch 2 at end and turn.
repeat row 2 for rows 7-9.
Finish off yarn and weave in loose ends.
*NOTE: determining where to make the splits.
Work up the scarf until it is half the width you want it to be, ending on an even numbered row.
Find the centre of the scarf in progress. Put it around your neck with the centre placed in the middle of the back of your neck, ensuring the working row is at the top. Cross the ends comfortably in front of your neck. Place a stitch marker in a stitch close to where they cross near your neck.
How wide to make the split is determined by width of the scarf, which needs to be an odd number of rows. The centre row must be an odd number, so that the width is the same on either side. Each row of dc = 2 chs and 2 stitches skipped in the split. Therefore a scarf that's 9 rows wide like this one, needs a split that's 18 stitches wide.
One you have determined the number of stitches you need to skip, count them out from the marker towards the end and place another marker. The markers need to be in the first and last skipped stitches.
If are making just one split, you can continue on from there. For two splits, place matching markers along the opposite end of the row, adjusting as needed to ensure they are equally spaced.
Continue working as for 5th row.
1 comment:
I really like the desing!
Post a Comment