Pages

Friday, July 31, 2009

Crochet - balletneck sweater, original yoke

I got my husband to take a photo of me wearing the sweater before I modified the yoke.

Original Yoke

The width issue is a pretty obvious problem here. *L* What you can't see is the little ball of remaining yarn hanging off the back of my left shoulder.

What I've decided to do is take out the last 2 rounds of sc after the round of tc. Since I was adding quite a few more rounds, I decided to add more beads. I had to unwrap the ball of remaining yarn and string them on the other end, push them up to where I was working, then ball the yarn up again.

The first round after the tc is still in sc, but I worked it from the inside of the yoke, sliding a bead up every second stitch. After that, I'm working several decreasing rounds of hdc. When I get to doing sc again, I'll be adding another bead round and finish off with a plan sc round.

Although the yoke area looks like it's about to slide off my shoulders at any moment, they actually can't fall off. Now that the sleeve seams are completed, they are snug enough around the upper arm that the sleeves hold up the yoke area. The sleeves aren't tight, but because of the vertical ribbing, there's a nice elasticity.

As for the body, I'm quite happy with how it sits. While somewhat form fitting, it actually feels loose and comfortable. It's long enough that I can raise my arms and not flash belly at the world. Best of all, when I put my arms down again, the whole thing just slides back down into place. No need to yank it down.

I should be able to finish the whole thing some time this evening. I'll wait to take photos until tomorrow, though, and try to get some in daylight. :-D

Wednesday, July 29, 2009

Crochet - balletneck sweater, sleeve seam adjustments

Now for the short seam of the arm, which has been the biggest challenge with this project. As usual, these images are also available here.

This is going to be a photo heavy post!

First, the "before" photo.

before4627

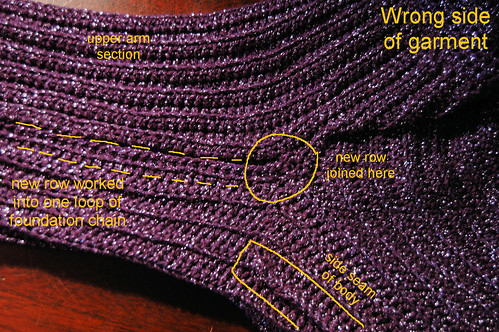
What you are seeing here is where the upper arm section was worked into the body section, then into the foundation chain for the rest of the sleeve. The lower section's foundation chain is joined into the top stitch of the first shorter underarm row in the same corner. As you can see, this left a gap between the two foundation chains. If you look at the full size image, you can also make out that, where the sides joined here, the hill/valley sequence would not line up.
join4634

Note that the seam is NOT made in this photo - I've just put the edges together for the photo.


After a couple of false starts, I joined the yarn for the new row at the base of where the foundation chain started in the upper sleeve, then worked the new row into the foundation chain of the lower sleeve. I actually did a joined hdc right in the gap and joining stitch of the foundation row to close it up, so I wouldn't have to go back and close it up while tucking in the loose ends. I then worked hdc into the foundation row, lining each one up with the opposite hdc. To create the illusion of working into the back loop of a stitch, I dug the hook into what would have been the back of the foundation chain. This left a row of yarn loops that kind of looked like the other rows, though the result was flat, rather than ribbed, as this new row is facing in the opposite direction of all the other rows in the underarm section.

join4635

Here's another view of the same area, showing a bit of the right side of the new row.

row added4633

Now over to the wrist end. You can see the "fake" line of loops to make it look like a hill, with the new tops of the stitches to fall into a valley once seamed together. This is the opposite of all the other seams done in the garment. Once flipped to the right side, those seams were hidden in valleys. No such disguised seams here! I had to find a way to close the seam while giving the illusion of a regular valley row on the right side.

row added4636

In this view, you can see how much flatter the "valley" is on the right side of the new row.

insideseam4637

The completed seam!

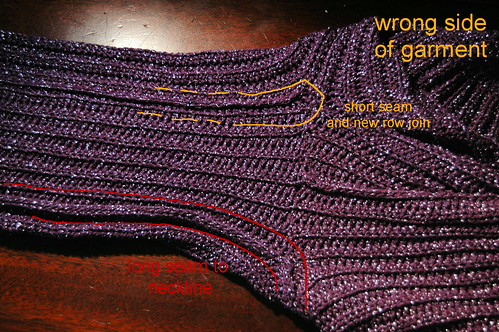
The old seam, which runs from wrist to neckline, is more prominent, as I simply did a slip stitch through all the loops. With the new short seam, I turned the work so that the underarm section with its new row was away from me, while the foundation row for the upper arm section was facing me, and slip stitches the corners together. I was then able to do a slip stitch seam into the back loops only of the new row. The result is much less bulky than the other seam, worked through all loops.
insideseam4639

Looking at the same seams at the shoulder and underarm.
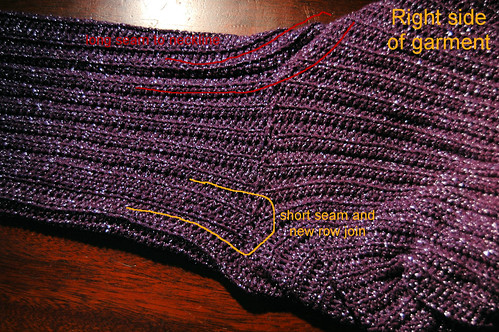
outsideseam4642

Now we're looking at the seams on the right side. The long seam at the top created a slightly deeper valley than the regular rows, but that's about it. The new row and short seam are quite flat in comparison.
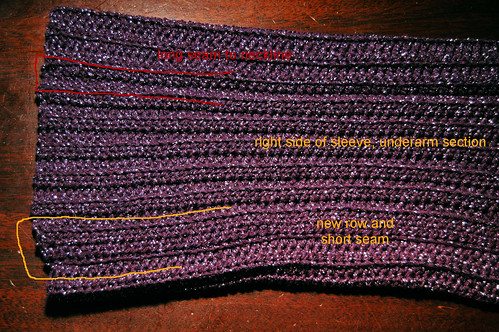
outsideseam4646

And finally, looking at the right side of the end of the sleeve. Again, you can see that the new row lies flat instead of forming a valley, but it otherwise fits with the sequence.

Once worn, I don't think the difference will be at all noticeable, unless you really look for it. I'm quite happy with how it worked out.

Now I need to do the other sleeve, which I won't bother taking photos of. After that, the hard part will be over and I will make the adjustments to the yoke.

Crochet - balleneck sweater, yoke

I completed the yoke on the sweater - at least according to the instructions. I will have to make some changes to it, which I will explain later. As usual, I've got these images available for full size viewing on flickr.


beads4614

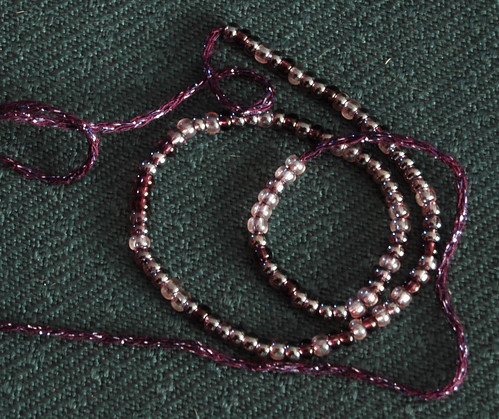
I don't plan to add the optional ribbon shown in the pattern photo, but I did want to add some something extra. I decided to add a row of beads in the first sc row of the neck line, which required pre-stringing half the number of beads as I had rows I'd sc into. The beads I chose are a mix of pinks and purples called Lilac Lustre, from DeSerres. I meant to string them randomly, but it turned out they didn't all have the same size holes, with the darker colours tending to be too small to string while all the pinks strung easily. Because of the thickness of the yarn on the needle right at the eye, I still ended up having to use pliers to draw them through. :-/

scbeadroundstart4616

In the instructions, I was supposed to do all the rounds for the yoke from the right side of the sweater. With the beads, I did the first sc round from the inside so that the beads would be on the outside. Starting at the back, I did 1 sc at the top of each hill and valley, making sure to slide up a bead into the sc in a valley on the wrong side, so it'd be on a hill on the right side.

Here, I've done most of the back and flipped it right side out, to show how much the neckline is being pulled in in the process.

scbeadround4617

Here you can actually see the beads, as well as compare the beaded back to the unworked front. The colours of the beads are very subtle, which is exactly what I wanted. I was a bit concerned that the pink would stand out more than I wanted it to, but it blends in nicely.

hdcrounds4621

After the beaded row was done, I turned the work right side out again to do the next couple of rows. After this point, the rows began to decrease.

yoke4624

Here we have the completed yoke (and my daughter's crack eyed kitty, who was fascinated by the ball of excess yarn peeking over the edge of the piano bench. Yes, she tried to get it. ;-D ). When I finished the yoke according to the instructions, I decided not to end off the yarn. I used some stitch markers to secure the slip stitched loop and attach what was left of the yarn to the fabric so it wouldn't pull, then tried it on.

I am so glad I did that!

With the sweater being so much larger than the one modelled with the pattern, the yoke doesn't rest on the shoulders the same way. It's so wide, it sat at the very edge of my shoulders, where they were at risk of simply slipping off. I got my elder daughter to try it on, too, in case her bust size, which more closely matches my mother's, would make a difference, and it didn't. I didn't get a photo of it, but will before I make the changes needed to fix it.

Another thing about the yoke on a larger size is that, compared to the photo, it seems very narrow. Some of that can be attributed to the smaller gauge, but not much.

yoke4625

Here's a closer view of the yoke details. The round of triple crochet (tc) is where the optional ribbon would have been woven into, but I will be leaving it as is. There are 2 rounds of sc finishing the yoke. What I will be doing is undoing one of these rounds (the other one tightens and tidies up the tc round), then doing a mirror repeat of the rounds before the tc, reducing in the same pattern. This will add a couple of inches to the width of the yoke, which should be enough to keep it from falling off the shoulders, while still maintaining the wide neckline my mother likes.

Next up, figuring out the final sleeve seam!

Monday, July 27, 2009

Balletneck Sweater - sleeve seam

I'm afraid I stalled quite a bit on the balletneck sweater. How to do the lower arm seam on one side is still irritating me, and I didn't even start on the second arm sections until recently. I've decided to just let that portion wait until later. Until then, I've finished the arm sections and put together the long seam that stretches from neck edge to wrist. This will allow me to work on the yoke and finish the short arm seams later.

You can access larger images for more detail in my flickr account.

Balletneck sweater, in progress

This first view is of the inside of the garment, showing the seams and joins. I used a slip stitch to do the seams, rather than sewing them. I wanted the extra strength. I also started at the wrist and worked up to the neck edge.

The potential weak spot of this is at the point where the seam transitions from the upper and lower arm sections to where the upper arm panel joins the armhole section of the body panel. This is also where the lower arm section joins to the under arm section. In the photo, this is where the seam begins to curve upwards, and a Y shape forms in the hills and valleys of the pattern. When I did the first sleeve, I saw that there was a bit of a gap, so when I finished the second sleeve, I left a long enough tail in the yarn for fastening off that I could sew it down the seam to the weak point and strengthen it.


Balletneck sweater, in progress


Here, I've flipped the whole thing right side out and we are looking at the outside of the garment. The hills and valleys line up quite nicely, and the seam should be pretty much invisible when worn.


Balletneck sweater, in progress

A different view of the outside of the garment, with only the seam edge marked. The stitch marker is just for me to keep track of which is the front panel, as the front and back are done exactly the same.

It's not quite as noticeable in this photo, since it only shows the one arm, but the neck edge at this point is HUGE. The stitches all along the neck edge are done in sc instead of hdc, but right now you can't really tell. The first row of the yoke will be done in sc, so all of this will be pulled in to about half the width it currently is. It will be interesting to see the difference. I am currently planning on adding beads to this sc row, too. I'll try it out first and see how it looks, though it'll mean stringing about 100 beads onto the yarn, first.

My daughter's blanket


My daughter's blanket
Originally uploaded by amkb

My older daughter has asked me to crochet a blanket for her, which will be my next big project to start once the balletneck sweater is finished. Watching her sister choosing pattern and yarn inspired a desire for a blanket in my 13 yr old. She, however, took to crochet the way her sister takes to painting, and has no need to wait for me to make anything for her. She's doing it herself.

She decided on Bernat Chunky (bulky, 5) in Camouflage for her yarn. It's machine washable and dry-able. The shell pattern is from the back of one of the labels; a simple, repeated shell made up of 1sc, 2ch, 2dc using a J hook. It's come out strangely narrow - perhaps because my daughter tends to work very tightly. It will probably be necessary to add a border to make it wide enough to comfortably use.

In this photo, she's almost finished her first 300g ball of yarn. This is going to be a very warm and soft blanket. The older cat already loves it, and has a tendency to use it for a bed, even if my daughter is in the middle of working on it. *L*

I think she's doing a fantastic job!

Friday, July 3, 2009

crochet - balletneck sweater; the first sleeve sections.

Note: for larger views, click on the images to go to my flickr account for the "all sizes" option.

I've finally finished the lower sleeve section. Here's how it looks.

IMG_3105-50%

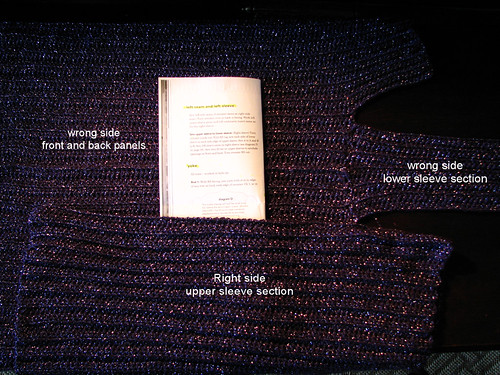
In this photo, you are seeing all the wrong (inside) sides of the panels, including the little bit of lower sleeve in view at the neck of the sweater. If you look at the larger images, you can see how well the upper sleeve portion lines up with the hills and valleys of the body panels.

IMG_3106-50%

Here, I've just turned the upper sleeve portion over so you can see how the lower sleeve section is joined to the underarm rows. Not as neat a joining as I would have liked, but better than when I tried it the first time. I ended up with big gaps and the rows weren't lining up, so I undid it to the first row and reworked it. For the size I'm making, there are 12 lower sleeve rows to match the 12 underarm rows.
IMG_3107-50%

If you look at the larger images, you can see the diagram in the instructions. Here, I've labelled the sides that will be sewn together - A to A and B to B.

The starting row for the lower portion of the sleeve is joined at the underarm of the B side, so the edge that will be sewn is the starting chain. The B side of the upper arm portion is also the starting row, which means that the loose section is the starting chain as well.

If you have looked at the original size of the image, you may have spotted a potential problem.

In the last post I wrote, I mentioned some issues I had with making an invisible joining at the top of the starting row. I redid it to ensure everything lined up. Now that the upper and lower portions are done, I find that the A sides, which are the last rows done in both portions, line up the way they're supposed to. The B sides, however, don't. The hills and valleys of the rows leave me with the same problem I encountered when starting the upper portion at the neck. When I try to line up the B sides, however, it's as if I'm missing a row - or have a row too many. I don't, however. I've got 12 rows of the lower sleeve portion matching the 12 rows of the underarm portion. I have the upper portion right, as it not only appears seamlessly attached to the body panel, it also lines up with the opposite panel and the A side of the lower sleeve portion properly.

I don't know why it's turning out this way. Everything else lines up.

Hopefully, I'll figure it out before I have to sew them together. Now that these are done, I'm sewing together the opposite side seam and will work on the other sleeve. Once that one is done, the sleeve parts will all be sewn up.

IMG_3109-50%

Here, I've just positioned the sleeve portions as if they were sewn together and still inside out, turning back the upper sleeve portion to show the right (outside) sides of the sleeve.

update: silly me! Until I started reviewing this post, I completely missed my typo on the labelled image - I wrote sleep instead of sleeve! *L* Oops.