Pages

Friday, March 27, 2009

Am I going too far?

You know, I may just be going off the deep end with this crocheting of household items.

You see, after moving the coffee table to vacuum under it today, I was dismayed to see the deep, sharp-edged holes the legs were leaving in our brand new carpet. Not good.

Now, I know you can get special pads or discs that can be put under the legs of things to protect flooring, and I have looked at them. I've yet to see one that wasn't round. Also, they would never stay in place under and item on a carpet that might need to be moved.

My solution?


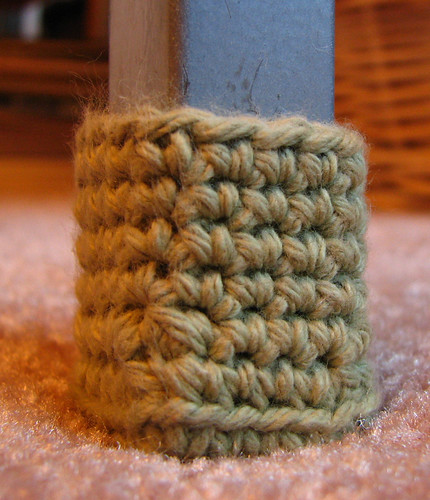
I made little square booties for the legs of our coffee table.

Is that too much? *L*

I started off by making a square the same size of the leg base using cotton yarn. The same stuff I've been using for my placemats - I've got one more to do, but decided to not take a change of running out of yarn and am waiting to buy another ball. Meanwhile, I'd been using the remains to make can coolies.

Using a 3.5mm hook, the size I needed was 5 x 5 in sc. Then I went around the edge in sc (5 on each side), with 1 ch in each corner to turn.

To build up the sides, I did a row of sc. To get 5 stitches on each side, I did 4sc, then 2sc together at the corner chain and the 1st sc of the next side, so there wouldn't be any gap.

This was the right size for the base, but when I built it up, I found 5 sc each side was too loose. I ripped it down to the first row, then reduced the second row to 4 stitches each side by doing 2sc together at each corner. After that, I just built it up for another 4 rows of sc, for a total of 6 rows.

The result is snug enough that, should we need to move the coffee table around, the little booties won't slip off. We're still going to get dents in the carpet, but they won't be as sharp and damaging.

I'm now thinking of making larger versions of these, except with several layers on the bottom for extra padding, to put on the legs of our desk. It has square legs too, and is making much deeper holes in the carpet. Nothing I've seen in the stores would fit properly under it.

So what do you think? Have I gone to far? LOL

Tuesday, March 24, 2009

Paper cut 3D Easter egg

Today I took advantage of my crafting work space and started on some Easter decorations. I decided to start with some paper cutting, which I haven't done in years. It felt good to get back to it! I wanted to do some egg shapes, but wanted to make it a bit different, so I went with a 3D idea, which I haven't done using this method before - wild and crazy crafter that I am. ;-)

I started out by printing a basic egg shape in the size I wanted, then used that to cut out a pair of templates in ordinary card stock.

egg2284-50%

I left one alone, while the other was folded in half lengthwise. I also did a quick fold cross wise to find the centre and marked it.

egg2285-50%

Using the same, plain card stock that I used for the template, I pencilled in the egg shapes. I had room enough for 3 per page, and I did two of them to make 3 eggs total. I might do more in other sizes. Using the template that was folded in half, I marked cutting lines, 3 in the top halves, 3 in the bottoms. I did get a photo, but for some reason, my camera refused to focus on the page.

egg2287-50%

Going to my print out, I doodled a bit to come up with a design. These will be hung, so the top has to have enough solid paper to support the string. The design also had to keep a border around the edge, as well as leave a line in the centre for cutting, later. I didn't want to get intricate, as I want to get a few pieces under my knife for practice, first. Plus, since they'll be hanging, they need a fair amount of strength. I'll save intricate for something worth framing.


egg2288-50%

Next, I pencilled in the design onto one of the egg shapes, then cut out all the design elements inside the egg. In this photo, you can see the cutting line marked in the top half.


egg2289-50%

After cutting out the egg shape, I used it as a template to mark the pattern onto the second half. I could have done two different designs for each half, but decided to keep it symmetrical.

egg2290-50%

Once I'd transferred the design, I cut the split in the top half, then very carefully erased all my pencil marks.

After that, I just needed to repeat the process for the second half, except that I made the cut on the bottom half instead of the top. Lastly, I slid the two halves together along the cut lines.


egg2292-50%

And here we have the finished egg.

The whole thing took me about an hour to do.

Monday, March 23, 2009

Knit scarf


scarf-full
Originally uploaded by amkb

A sure sign that crafting is contagious. Our younger daughter has taken up crochet and a bit of knitting. Our elder daughter, who is already a fantastic painter and makes very unique fabric dolls, among other things, is trying to figure out crochet now.

My husband, meanwhile, has been itching to knit. He's tried a few times, but didn't get the groove until he made this scarf for our younger daughter (and willing model). I had to laugh at ourselves. While my husband was finishing this scarf, I was working on another placemat in the cotton, while our elder daughter was trying to crochet. Youngest was making sure my husband's yarn didn't get tangled. So all 4 of us, sitting there, knitting and crocheting... while watching a Rambo marathon. LOL

He got himself some larger needles, which helped. I had a stash of Bernat Harmony yarn, which is quite bulky (rated 5 on the label). The colour is Silk Green.

You can see a more detailed image here.

He did quite well, I think. Knitting is one thing I'm just not getting the hang of, though I admit it's probably because I don't enjoy doing it enough to get better. I'm happier with my hooks. My husband prefers needles. Between the two of us, we've got it all covered. ;-)

Tuesday, March 17, 2009

Placemate Redux


placemat-comparison-50%
Originally uploaded by amkb

I finally finished blocking the last two placemats today. I ended up using steam, and wanted to show the comparison between steam and wet blocking.

The placemat on top was the first one I made and wet blocked, as posted previously. When I unpinned it, however, I found it had a tendency to ruffle and wouldn't lie flat, as you can see in the photo. It has been washed, but not put through the drier.

The placemat underneath is one that was pinned dry, then steamed. The result lies flat, drapes nicely, and is much more open. Having stretched the crap out of it while pinning it down, it also has a less bulky feel to it.

If I'm going to be steaming finished items this often, I'd better invest in a garment steamer. Using my steam iron is a bit tedious.

Monday, March 16, 2009

Future planning

Well, I've been inspired by Plant June's crocheted socks.


I've been thinking of doing socks for a while, and was really curious about how it would work with this stretch yarn. After reading the post about them, I decided to give it a go. I found some stretch sock yarn on sale and picked up what should be more than enough yarn to do 2 pairs of crochets socks, with some left over. In knitting, one ball should be enough, but crochet takes about 1/3rd more yarn, so this should work out.

I won't be making them until I finish my place mats, though. I've finished 4 in the red acrylic - I'll post more on those later - and have picked up a lovely cotton yarn in Tavern Green for another set. Once those are done, I'll start on the socks.


A closer look at the stretch yarn. I'd have preferred a solid colour, but I can go for this organic looking mix.

Which leads me to something I've been wondering. Why is sock yarn so frequently in those garishly bright colours? I don't mind some colour variations, but they're so... busy. It's either that or colours like black and navy. There doesn't seem to be much choice in between.

Ah, well.

Meanwhile, I've set up a work station on the other side of out desk. Which means I can start unpacking and setting up my other craft supplies. I'm looking forward to doing some papercutting in the near future, and getting some use out of that embroidery frame I picked up shortly before the move. :-D

Monday, March 9, 2009

Placemat

Well, we're all moved in, though far from unpacked. *L*

One of the things I'm enjoying most about our new home is that fact that we have a dining area. Which means we can actually sit around the table together as a family to eat - something we haven't been able to do in over 3 years!

So when I found this free pattern for a placemat at Coats and Clark, I figured I'd give it a go.

As usual, I changed a few things. I didn't have enough cotton yarn left to make a placemat set - I've been using it to make lots of little rectangular coasters, hot pads, etc. Instead I used a ball of "Walmart Special" acrylic yarn I had in the same bulk rating (medium/4). The instructions also called for a 4mm/US G-6 hook. My size G hooks are 4.25 mm. Looks like I have a 4mm gap in my hooks. I'll need to fix that. ;-)


The placemat was quick to work up - I did it in an evening while watching tv (we have cable tv in our new place, whether we want it or not, so we're rediscovering the joys of the mute button during commercials).

The red looks absolutely blinding in this photo. It isn't really that bad! Honest! *L* It's actually a very dark, though still bright, red.

I didn't get around to blocking it until this morning - I don't know that it would be needed if I'd done it in cotton. It's a basic wet block, which should be enough.


Still blindingly red, but a slightly better detail view.

I like this enough that I'll probably make 3 more. And will probably check out the cotton yarns and see about making some in that instead of acrylic. Right now, variagated cotton seems to be in the "in" thing, and I'd rather do it in a solid colour, so we'll see what I find.